Sunday, August 28, 2016

Cinnamon Swirl Muffins (Grain-Free)

It isn't fall weather yet but I am so ready for the temperature to start dipping below 70 degrees Fahrenheit. It has been in the 90s here with rain threatening constantly, making everything a humid mess. Well, inside my house we keep it frigid so I was ready to go for something cinnamon.'

This is a recipe I adapted from a 1-minute coffee cake in a mug single serving recipe from Chocolate Covered Katie. It's adapted in a number of ways - I have made the recipe for more than one serving, I have used a different combination of flours, and I have used eggs and eliminated some of the other liquid ingredients to compensate. Still, I always want to give credit where credit is due. Check her out, she has great healthy recipes that taste good, with a lot of options for single-serving baking projects. These can be made as singles in the microwave but won't look quite as nice. Still tasty though.


Cinnamon Swirl Muffins (Grain-Free, Lower-Sugar)

1 cup plus 2 tbsp almond flour
1/2 cup tapioca flour
1 1/2 tsp baking powder
1/2 tsp salt
6 tbsp coconut sugar
2 eggs
1/4 cup vegetable oil

For the swirl:
1 tsp cinnamon
2 tbsp brown sugar Splenda
1 tbsp butter, melted/softened
Pinch of salt

Yield: 6 muffins

Instructions

Preheat oven to 350 F. Combine batter dry ingredients and mix well. Add wet and mix until just mixed. In a tiny bowl, combine all swirl ingredients. Fill six greased muffin cups 1/2 way with the batter.

Sprinkle on two-thirds of the swirl, then spoon the remaining batter on top. Finally, sprinkle on the rest of the swirl. Bake 12-13 minutes. If you aren't worried about sugar consumption, a powdered sugar glaze might be a nice addition!

Monday, August 22, 2016

Grain-Free Chocolate Waffles

I started making the recipe I posted in July for grain-free waffles this weekend, one which has quickly become a favorite in our almost weekly rotation. I knew we were eating them with strawberries, so at the last minute tried making a chocolate version. I took notes so I could share what I did!


Crispy Chocolate Grain-Free Waffles
(adapted from an adaptation on a  recipe on Simply Nourished Recipes)


Ingredients
  • 2 cups almond flour (or 1.5 cups almond flour and .5 cup tiger nut flour)*
  • 1/4 cup unsweetened cocoa powder
  • 1 cup tapioca starch/flour
  • 1 Tbsp. + 1 tsp. baking powder
  • 2 eggs
  • 1 cup almond milk
  • 1/2 cup coconut sugar
  • 1 tsp. vanilla
  • ½ cup coconut oil, melted
Instructions
  1. Preheat waffle iron according to manufacturer's directions.
  2. In a large bowl, combine almond flour, tiger nut flour, cocoa powder, tapioca starch, coconut sugar, and baking powder. Whisk or stir to combine well.
  3. Add wet ingredients to dry and stir until combined.
  4. Use 1/3 to 1/2 cup of batter at a time and use waffle maker as directed.
*On this particular day, I had no almond flour. Three bags of coconut flour, but no almond flour. So I went all tiger nut flour and it was fine!

Monday, August 15, 2016

Chocolate Chili Icebox Cookies

These are a simple, easy cookie that bakes up perfectly. Not overly sweet, and the cayenne is only the subtlest kick in the seconds after taking a bite.


Chocolate Chili Icebox Cookies
(recipe from Sweet Paul Magazine, Winter 2014)

Makes about 4 dozen

You will need:

1 1⁄2 cups all purpose flour
1⁄3cup Dutch-processed cocoa powder
3⁄4 teaspoon cinnamon, ground
1⁄2  teaspoon cayenne pepper 
1⁄2  teaspoon salt
1⁄4 teaspoon baking soda
1 1⁄2 sticks unsalted butter, at room temperature
3⁄4 cup sugar
1 egg white
1 teaspoon vanilla extract
demerara sugar, for rolling

  1. Whisk together the first 6 ingredients.
  2. Beat butter and sugar until light and fluffy.
  3. Add egg white and vanilla and beat to combine. Scrape down sides of bowl.
  4. Add the flour mixture and stir just until combined.
  5. Turn dough onto a lightly floured surface.
  6. Dust your hands with flour and shape into a disc.
  7. Cut disc in half and shape each into logs about 8” long and 11⁄2” in diameter.
  8. Roll in demerara sugar and wrap well with plastic wrap.
  9. Refrigerate until completely chilled, at least 4 hours or up to overnight.
  10. Preheat oven to 350oF.
  11. Line baking sheets with parchment paper.
  12. Cut into 1⁄4” slices and arrange cookies on baking sheets 1” apart.
  13. Bake, in batches if necessary, until cookies are soft but dry. This will take about 9 minutes.
  14. Transfer to a wire rack and let cool completely.

Monday, August 08, 2016

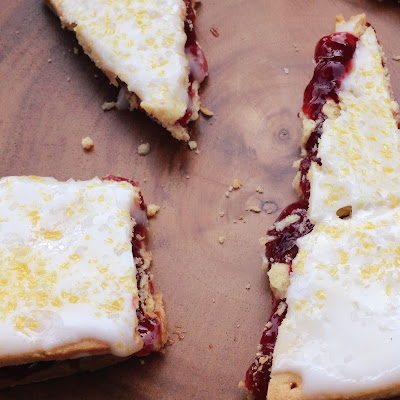
Lingonberry Snitter

I had my library order Scandinavian Baking and it is a beautiful cookbook! I wanted to make something from it before returning it, but a lot of the savory baked goods would have required me to purchase obscure ingredients (rye flakes? no idea.) The description of this recipe said it was super sweet so I bought lingonberry jam to put in the middle (which isn't very sweet.) In the end, it was really not that sweet at all, so I'm a bit puzzled. Plus the directions don't get the math right, they say to roll the dough into a 16x9 sheet and then cut it into two pieces that are each 8x4.5... but for that size you'd end up with four pieces. Very confusing. I just decided as long as the pieces were the same size, it was all good. It also turned out that the baking time was too long - I would try 12-15 minutes as 20 made mine overbaked.

From some of the reviews I've read, there are multiple errors in the cookbook. So do bake Scandinavian, but maybe from a different source. Dang! It's so gorgeous, you can understand how I got pulled in.


Lingonberry Snitter (adapted from cookbook mentioned above)

1 2/3 cup flour
1/3 cup powdered sugar
7 tbsp butter, chilled
1 egg
Jam (I used about 2/3 of a jar of lingonberry)

7/8 cup powdered sugar
2 tbsp water

Sift together flour and sugar. Rub in butter with fingertips until mixture is sandy. Gently barely mix in egg. Chill dough for 30 minutes. Roll out into rectangle, even sides, cut into two equal sections. Place on parchment paper lined sheet and prick all over with fork. Bake 12-15 minutes at 350 and let cool. Mix powdered sugar and water together and spread over one piece. Let sit 30 minutes after sprinkling with colored sugar or edible glitter. Spread jam on the other side and pile the frosting topped on on top. Cut into awkward cracked pieces.

Monday, August 01, 2016

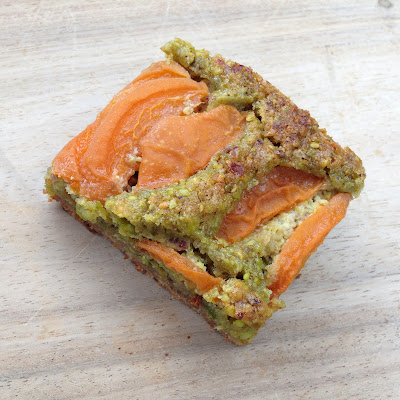
Apricot Pistachio Bars (and how I made the recipe grain free)

I've had this recipe on my to-make list forever. When I found myself with extra apricots, I finally made it (once I tracked down pistachios.)  But I wanted everyone in my household to be able to eat them, so I made them with substitutions for flour and sugar. I'll copy the recipe as is from the amazing Deb at Smitten Kitchen, and make notes below as to what I changed.

Everyone who tried these liked them, including co-workers who don't care about eating lower carb and grain-free.  My husband said he did not think he would ever order it from a bakery case because of the color (green!) but I thought the apricot color was pretty with the pistachio. These were not too sweet, a sophisticated bar.


Apricot Pistachio Squares
(from Deb at Smitten Kitchen)

Yield: 16 or 25 bars, depending on how you cut them

Crust
1 cup (125 grams) all-purpose flour*
1/4 teaspoon table salt
1/4 cup (50 grams) granulated sugar**
1/2 cup (4 ounces or 115 grams) unsalted butter, cold is fine

Filling
3/4 cup (a scant 4 ounces or 110 grams) shelled unsalted pistachios
1 tablespoon (10 grams) all purpose flour*
Few pinches of sea salt
6 tablespoons (75 grams) sugar**
5 tablespoons (70 grams) unsalted butter, cold is fine
1 large egg
1/4 teaspoon almond extract, 2 teaspoons brandy or another flavoring of your choice (totally optional)
1 pound firm-ripe apricots

To finish
Powdered sugar or 1/4 cup apricot jam***

Heat your oven to 350 degrees F. Cut two 12-inch lengths of parchment paper and trim each to fit the 8-inch width of an 8×8-inch square baking pan. Press it into the bottom and sides of your pan in one direction, then use the second sheet to line the rest of the pan, perpendicular to the first sheet. (If you have an 8-inch square springform, you can skip this and just butter it well.)

Make the crust: Combine the flour, salt and sugar in the bowl of a food processor. Cut the butter into chunks, and add it to the bowl, then run the machine until the mixture forms large clumps — that’s right, just keep running it; it might take 30 seconds to 1 minute for it to come together, but it will. Transfer the dough clumps to your prepared baking pan and press it evenly across the bottom and 1/4-inch up the sides. Bake for 15 minutes, until very pale golden. For the sake of speed, transfer to a cooling rack in your freezer for 10 to 15 minutes while you prepare the filing.

Make the filling: In your food processor bowl (which I never bother cleaning between these steps), grind your pistachios, sugar, flour and salt together until the nuts are powdery. Cut the butter into chunks and add it to the machine. Run the machine until no buttery bits are visible. Add any flavorings and egg, blending until just combined.

Spread filling over mostly cooled (warmth is okay but it’s hoped that the freezer will have firmed the base enough that you can spread something over it) crust. Cut apricots in half (or, you might find that you can tear them open at the seams with your fingers) and remove pits. From here, you have a few decoration options: you can place the apricot halves in facedown or up all over the pistachio base. You can do as I did, which is cut them into strips, then slide each cut half onto a butter knife or offset spatula, tilt it so that it fans a little, and slide it onto your pistachio filling decoratively.

Bake the bars for 60 minutes, or until they are golden and a toothpick inserted into the pistachio portion comes out batter-free. This might take up to 10 minutes longer depending on the juiciness of your apricots and the amount you were able to nestle in. Let cool completely in pan; you can hasten this along in the fridge.

To finish, you can make a shiny glaze for your tart by warming the jam in a small saucepan until it thins, and brushing this mixture over the top of the cooled tart. Or, you can keep it rustic with just a dusting of powdered sugar, as I did.

Cut bars into squares — chilled bars will give you the cleanest cuts. Keep leftover bars chilled.

* - I used a mixture of 2/3 almond flour and 1/3 tigernut flour, mostly because that is what I had in the cupboards!
** - I used coconut sugar instead.
*** - I skipped this step. They were tasty enough without this, and more like a breakfast baked good.