Wednesday, August 29, 2007

Milk Chocolate Caramel Tart

For the August Daring Baker challenge, we were given the Milk Chocolate Caramel Tart recipe from Eric Kayser’s Sweet and Savory tarts. I was invited to lunch at a co-worker's home with a bunch of other women fairly early in the month, so I decided to attempt this recipe for the luncheon.

For the recipe, please see the related entry in Veronica's Test Kitchen, one of the hostesses for this month's challenge.

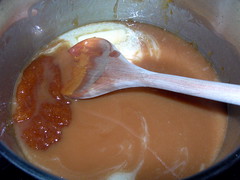
Tarts can look deceptively easy, particularly when dealing with caramel, and dry caramel at that. This recipe caused some frustration, but no tears this time. Just laughter - at myself, at the potential ruin of yet another pan, and realizing that it was probably wise to pick librarianship over baking as a career path.

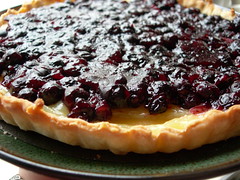
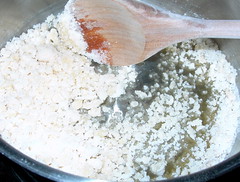
For my first feat, I tried making a crust recipe in a food processor that was about 4 cups too small. I forget that I don't have the biggest one and that most recipes are probably written for a larger bowl. Halfway through I had to dump everything into a bowl and mix it by hand. It seemed to work okay, but was pretty dry. After chilling the dough, it didn't want to roll out very easily - I was able to make most pieces equally thin at least, as you can see in the crust, but had to piece it together quite a bit. One benefit to this recipe was the use of hazelnuts - I had a few cups of hazelnuts in the freezer, left over from the annual bag my Mom sends me from Oregon so I can make holiday treats with the same flavors I grew up with. It was nice to have a reason to use them, although lately I've been sneaking handfuls for snacking, so I imagine the rest won't last long.

Caramel (batch #1)
For my first batch of caramel, I did as the recipe instructed and didn't stir the sugar. Since there was an entire cup, the bottom of the sugar got extremely hot before it all dissolved. As a result, adding the cream made the mixture seize up. I knew it was possible that continuing to stir the mixture might bring it back together, but I decided to quit while I was ahead. Batch #1 - in the trash.


Caramel (batch #2)
This batch of caramel goes in the "I should have known" category. Promptly after washing the pan and wooden spoon, I went about trying another batch of caramel, but the spoon still had water in it. Hello, sugar crystals. Another batch bites the dust.


Straining the caramel
At this point I decided it couldn't hurt to try one more time. I didn't have any karo syrup so I couldn't try the "wet" method of making caramel that one of the Daring Bakers had suggested. So this time I used a different utensil, stirred a little at the beginning, got a few crystals, but simply strained them out as I poured the mixture into the pan. The color seemed right, a golden brown, so I decided to try baking it.


Baked Caramel
To my pleasure, the caramel layer seemed to bake up nicely. The crust also didn't get too brown, which was nice.


Milk chocolate mousse

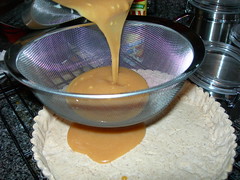
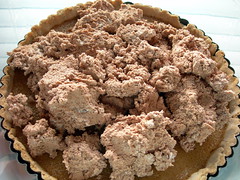
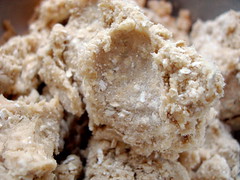
The next step was making a milk chocolate mousse. So many good chocolates are out there to select from, and this time I used Lindt Extra Creamy. I was making this tart the night before, and didn't want the crust to get soggy. I decided to make the mousse ahead of time and store it in the fridge until the next day, which unfortunately meant that it set up a great deal. Here you see the texture of the mousse the next morning as I tried spreading it on the tart. It eventually warmed to the touch of my fingertips and I was able to press it down somewhat smoothly, but it lacked the creamy texture it would have had if I had spread it right after making it. It still tasted really good!


Milk Chocolate Caramel Tart

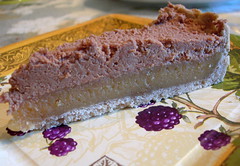
The end result was a pretty tart, which I cut into 16 pieces to serve. I agree with the other Daring Bakers about the cinnamon in the crust being overpowering. One co-worker friend said that she thought the slightly browned sugar taste in the caramel added a lot of depth to the taste, and I would agree. Another co-worker said that if I had added peanuts to the caramel layer, it would have tasted like a Snickers bar.

My original intent was to make a dark chocolate version, but I was not impressed with the crust, and the event I was planning to bring it for was cancelled. So for this one, only one whole dessert, but three batches of caramel!

Daring Bakers Orange Logo
This entry was brought to you by the Daring Bakers. Please check out other renditions of this tart by going to the blogroll listed on the left menu of my blog.

Categories: Caramel, Chocolate, Daring Bakers, Mousse, Tart

Sunday, August 19, 2007

Creme Bruleed Chocolate Chiffon Bundt Cake

I have been hearing about this recipe from my co-worker for several months now, so when it came time to pick a dessert to bring for our French-themed International Dinner Night, it was a no-brainer.

The book Baking With Julia is a cookbook I think everyone should have, particularly aspiring bakers, so I'm not going to copy the recipe here. (Ha HA!). I think the end result was good enough to try for the actual recipe, but you could probably mimic it with recipes you already have and end up with a similar result.

The first step is to make a custard, similar to what you would make for creme brulee, only not broiling or toasting it on its own. The egg yolks and sugar are cooked over simmering water until thick and creamy.
Custard
I made the custard a day ahead.

The cake batter is a typical chiffon cake, where you fold in whipped egg whites at the end. I am the proud owner of a new mesh strainer so I was all over sifting the dry ingredients. I usually skip this step but it definitely helps create a nice texture.
Dry ingredients

To help the egg whites not loose their volume, they have to be gradually folded into the batter. Only about 1/3 is added at first, to lighten the batter, and then the batter is folded into the egg whites. I took pictures of every step, just for kicks.
Batter steps

I smiled when I took the cake out of the oven, because the recipe said it should have a crack on the top and be just starting to pull away from the edges. Check! You'll also see my well-used bundt pan that I found for 50 cents at a garage sale - the same day I bought a $1 cake saver. Love garage sales for baking supplies.
Cake out of the oven

After the cake has cooled, and right before serving, raspberries have to be tossed with Chambord and spooned into the middle of the cake. Chambord is SO yummy with chocolate, and using fresh raspberries really kicks up the flavor of the liquor.
Raspberry Steps

The custard comes into play now, as it gets poured over the berries and over the sides of the cake. As you can tell, mine was probably not quite thick enough, and drained through the berries pretty quickly. The hostess at the party had a culinary torch, so the resident chef (NOT me) did the broiling of the sugar on the top of the custard. It didn't matter ultimately that the custard sunk through - you can put sugar on anything and broil it!
Torching the sugar


Here is a bigger picture of the finished project. It may have looked more impressive with a thicker custard, but I like seeing the raspberries peeking through.
Creme Bruleed Chocolate Chiffon Bundt Cake

The recipe says to serve it right away, and I did. With the number of people there, we quickly made it disappear.
All gone

I would make this recipe again. It wasn't difficult, it is just time consuming and some things need to be done ahead of time. The cake had an amazing flavor and was nice and light.

Categories: Cake, Chocolate, Custard, Raspberries

Monday, August 13, 2007

Aggression Cookies


Aggression Cookie Dough
Originally uploaded by watchjennybake.
This recipe dates back to my childhood, where we had a cookbook called Kids in the Kitchen that I remember making recipes out of from way back. This recipe has stuck with me through the years, part because of the fun, and part because the recipe is so easy to remember.

Aggression cookies are like they sound - a way to release your aggressions, or stress, or whatever mood you are feeling too much of. You mix them with your hands, of course (hopefully clean ones). I have to admit that I don't think the cookies are that spectacular except straight out of the oven, but that is SO not the point here. Plus there are no eggs, so this is a recipe that it is safe to eat the dough of.

You can either follow this recipe or use the basic formula or the same amount of sugar, flour, and butter plus twice the amount of oats, the same teaspoon amount of baking powder as cups of the sugar/flour/butter amounts, and whatever random additions you want to make.

Aggression Cookies

1 1/2 cups butter or margarine, room temperature
1 1/2 cups brown sugar
1 1/2 cups all purpose flour
3 cups oats
1 1/2 tsp baking powder
Chocolate chips, raisins, M&Ms, whatever you want to add

Dump all ingredients into a bowl*. Mix together with clean hands. Mash it! Knead it! Smash it! The longer and harder you mix it, the better it tastes.

Form into flat discs. Bake at 350 F for 10-15 minutes.

*I recommend leaving out the additions such as chocolate chips until the batter has been well mixed.

Monday, August 06, 2007

Blueberry Lemon Curd Tart


Blueberry Lemon Curd Tart
Originally uploaded by watchjennybake.
I go hunting for recipes based on ingredients that I either have on hand or think sound good together. I recently went blueberry picking at The Happy Berry in Pickens, SC. I made blueberry muffins and had been eating them with oatmeal, but wanted to do something special. In my blueberry recipe hunting I found that almost everything included lemon. So, lemon and blueberry started me thinking on a blueberry and lemon curd idea, being a big fan of lemon curd.

This recipe held the most promise, but I have to confess I cheated extensively. What I will share with you is my cheating recipe, in hopes that you will feel inspired to whip one up and share it with your friends. (If you don't feel like cheating, and want to make the crust and lemon curd from scratch, by all means follow the link to the recipe above!)

Blueberry Lemon Curd Tart
1 pie or pastry crust
1 jar lemon curd
1 pint blueberries
1/3 cup granulated sugar
2 tbsp cornstarch
1/4 cup water

Line tart pan with crust, prick with fork, and bake until golden. Allow to cool. Spread lemon curd along bottom of cooled crust. I would use a healthy layer - I probably used about a 1/2 cup.

In a saucepan, heat blueberries, sugar, cornstarch, and water over medium heat, until mixture has thickened to desired consistency and berries have started to burst.* Allow to cool.**

Spread berry mixture over lemon curd.

To serve, sprinkle with powdered sugar or garnish with fresh blueberries and mint sprigs. I just left it as is, thinking the colors spoke for themselves.

*Depending on what kind of berries you use, they might not burst by the time the mixture thickens, and that's okay. Smaller berries seem to stay firm longer, but still taste good.

**I make a variety of this blueberry mixture, just adding a couple of cinnamon sticks, as an easy dessert sauce that is wonderful over vanilla icecream. This could also make a good crepe filling.

Jenny's notes: I want to try this soon with blackberries, because I also love blackberries and lemon curd!! It also begs the trial of other jams and jellies in a similar way. Tarts seem to be an easy way to put together a dessert without having to use a lot of extended heat during an already hot summer!

Categories: Blueberry, Lemon, Tart

Wednesday, August 01, 2007

Second Time is a Charm - Strawberry Mirror Cake

The day after the Big Cake Disaster, I decided that I still had most of the parts - the cake, the soaking liquid, the strawberry juice, and the strawberry puree with added gelatin - I had to at least try twice.

I remember when making the original recipe, I thought medium was too high for cooking the eggs and milk mixture since it specifically said not to let it come to boil. I followed the recipe instead of my instincts, which happens more than I like to admit. The second time, I followed my instincts and ended up with a frothy, thick bavarian cream mixture to fold in with the whipped cream. It actually cooked really quickly too, not a lot of stirring required.

Knowing I would let the bavarian cream set up overnight this time, I didn't wait as long as I could have for the mixture to firm up in the ice bath. I also figured that since the strawberries had been sitting in the gelatin overnight, that was bound to add some firmness to the cake. And it seemed to be fine.

This challenge, by the way, is the monthly challenge for the Daring Bakers. We are an ever-growing group of bakers who do one challenge together every month. If you want to see the host's blog for this month and also to see the recipe, please go here,. The recipe is much too long to copy and paste over. The overview though - a white cake, brushed with a flavored simple syrup, cut smaller than the springform pan, layered and surrounded by a strawberry bavarian cream, and topped with a strawberry gelatin mirror. The only modification I made to the recipe was to replace the kirsch with strawberry extract. I didn't want the mother-to-be to have to worry about consuming alcohol, no matter how negligible of an amount it would have been. (Strawberry extract was surprisingly hard to find - only one grocery store out of four that I went to had it!)

We were allowed to decorate the top as long as you could still see the mirror. I was making this for a baby shower at work, and decorated it accordingly.
Top of Strawberry Mirror Cake

Like many of the other Daring Bakers, I think the cake looks more impressive than it tastes. The gelatinous layer on top was a little strange, and I thought the bavarian cream could have had SO much more flavor. The worst part was the cake - it really didn't have much flavor, even with the soaking syrup, and I would probably use a different cake recipe if I were to make this again.

Here is a picture of the cake on a plate with other treats from the baby shower. It ended up looking pretty uniform on the side view, even if the outside was pretty lumpy. Slice of strawberry mirror cake The theme of the shower was pink pink pink, and the cake definitely fit the bill in that regard.

One thing I am most impressed by when looking at some of the other Daring Bakers blogs is how perfect what they have made looks. I really want to start focusing in on finessing the look of what I make. I could have spent more time smoothing the surface of the bavarian cream before pouring the gelatin, for instance, and been more careful when cutting the circles of cake. I want things to look good, not just taste good!

I'm glad I stuck with it and followed the recipe through. Next time I won't wait nearly as long before trying the recipe for the first time, and I'll also pay attention to my instincts!

Brought to you by the Daring Bakers. Please look at other DB blogs on the list to the left! Daring Bakers Blue Logo

Categories: Cake, Daring Bakers, Strawberry