Monday, December 31, 2018

Kaiserschmarrn or The Emperor's Mess

This recipe comes to you via a long internet rabbit hole! We were watching the Great Baking Challenge, Holiday Edition, on Netflix. It's the Great British Bakeoff but brought to America, with the addition of judge Sherry Yard. Sherry Yard.. I knew I recognized her name, wasn't she the pastry chef for Wolfgang Puck? So I started poking around, and discovered, yes! She is also the three-time James Beard Award winning pastry chef Sherry Yard. Her Wikipedia page lists her accomplishments and also in a one-sentence paragraph, "Yard has stated that her signature dessert is Kaiserschmarrn.

I had never heard of Kaiserschmarrn, so I looked it up, and watched endless videos in German featuring people making it, and it is one of those recipes that people make in a variety of ways. A video in Tiroli claiming to have the original recipe makes it more like a flat pancake which gets broken into pieces. Other recipes separate the eggs and beat the whites, and bake it in the oven more like a souffle. Whatever the technic, it all ends up on the plate in messy pieces, caramelized somewhat with butter and sugar, and served with plum or lingonberry.


I am going to start with the recipe from the Austrian National Tourist Office and go from there. Many of the recipes used raisins, and some of them had soaked the raisins in rum. I didn't have raisins, but I did have candied orange peel, so I soaked a few tablespoons in a little bit of an apple brandy we have in the pantry, having no rum either. I'm not sure the dish needs it, it almost distracts from the lusciousness that ends up on the plate.

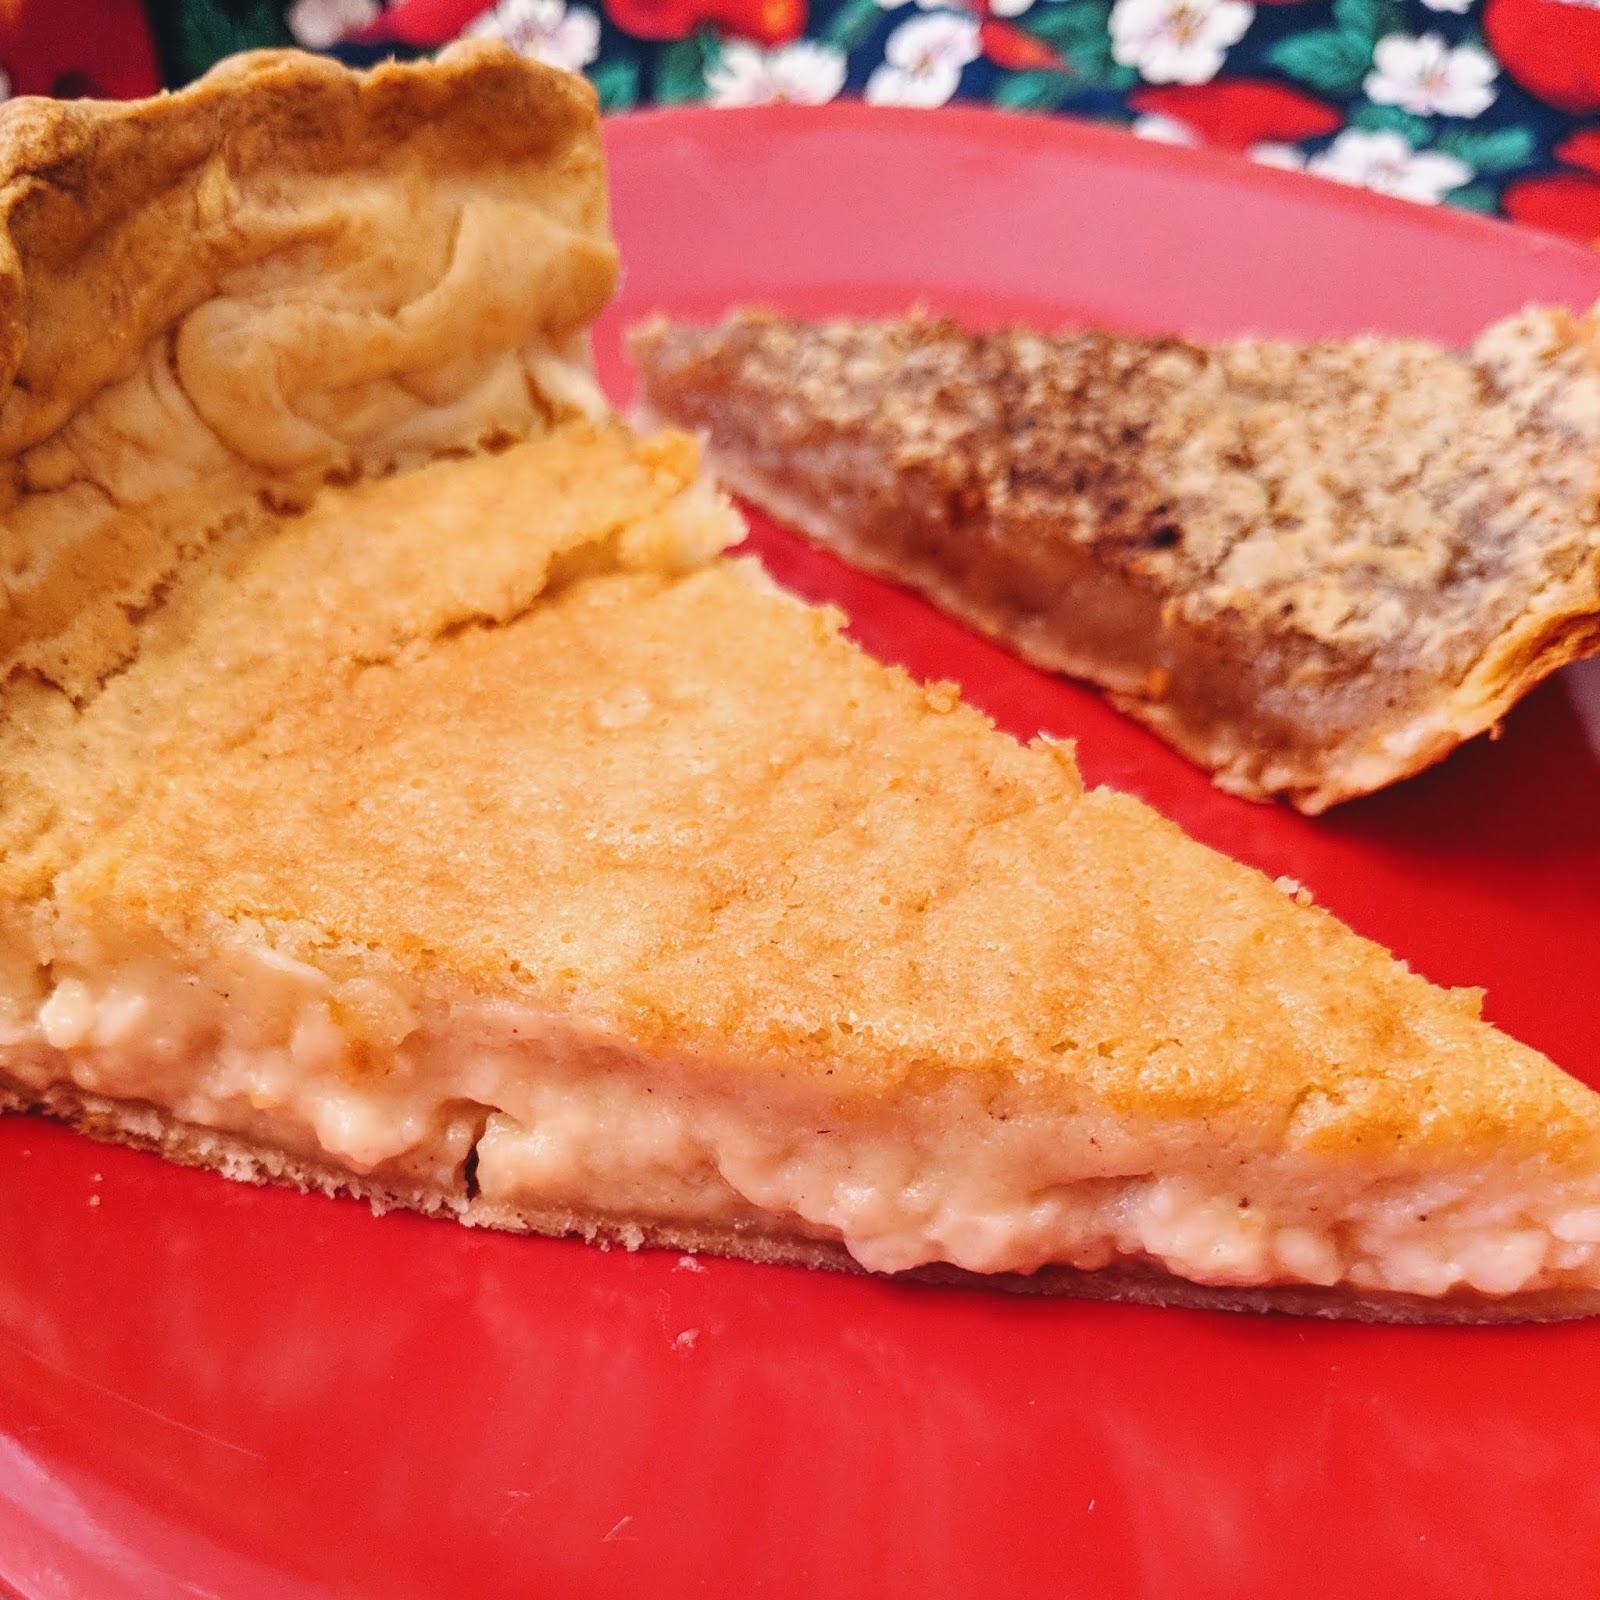
And yeah, it's messy. But it's delicious. Its' closest cousin is probably the pannukakku, the delicious oven pancake from Finland that is more custardy than most German/Dutch oven pancakes. But with added caramelization (meaning added flavor) and more prescribed toppings.

Kaiserschmarrn or The Emperor's Mess

Ingredients
  • 6 eggs
  • 12 oz milk
  • 1 cup all-purpose flour
  • 2 tbsp raisins or other dried fruit
  • 1tsp vanilla
  • a dash of rum or other liqueur
  • a pinch of salt
  • 1/4 cup granulated sugar (for egg whites)
  • 2-4 Tbsp unsalted butter
  • 1 tbsp of butter shavings and granulated sugar, for caramelizing
  • powdered sugar for dusting
Place the raisins and/or dried fruit in a bowl, mix with the rum and leave to stand for approx. 15 minutes. Separate the eggs and place the yolks in a mixing bowl. Pour in the milk and vanilla, and add the flour. Mix to form a smooth batter.

Beat the egg whites together with the sugar and a small pinch of salt until it forms a firm peak, and fold into the batter mix. Pre-heat the oven to 350°F.

Melt the butter in a heatproof (coated) dish. Pour in the mixture and after 1–2 minutes sprinkle the soaked raisins over the top. Cook the underside until light brown, turn over using a spatula and bake for 6–8 minutes in the pre-heated oven until golden brown.*

Tear the ‘Schmarren’ into small pieces, using two forks. Sprinkle the butter shavings over the top, add some crystal sugar, and caramelize in the broiler under high top heat.**

Remove from the oven and arrange on pre-heated plates. Dust with confectioners sugar and cinnamon.

Serve with baked plums, a berry or fruit compote.

*Because I had seen it made so many ways, I did not turn over the pancake before putting it in the oven. But after 8 minutes it hadn't cooked through. I cut it into quarters, turned it over in messy fashion, and finished cooking it on the stovetop. I do think the oven helps with the rise of the batter.
**I just tossed in the pan on the stove until everything was cooked through enough and some parts were browning. I only ended up with one piece that seemed too dark.

Over all, the pan I chose didn't quite fit all of the batter, so some adjustment may need to be made (or just leave some out!

Speaking of pancakes...
Like pancakes? I seem to make them from around the world! Check out the Finnish pannukakku, Icelandic pönnukökur, Papua New Guinean banana pancakes, the Danish ebleskiver, the Hungarian palacsintas, the Swedish pancakes from Alaska, and what we call the German oven apple pancake. I also made ratio pancakes from Michael Ruhlman's book, which we can call American.

Monday, December 24, 2018

Christmas Cranberry Buckle

Usually my workplace has a holiday luncheon, where all of us bring in dishes to share. I usually make a dessert (see Buche de Noel (2007), gingerbread house (2009), stollen (2010), lemon gingerbread wonderland cake (2012), cocoa pomegranate pavlova (2013), wintermint cake (2015), and fresh pear cake (2016).)

This year because the school year ended so late, and today was the actual last day we were even open, we went with brunch instead. I hemmed and hawed over what to make and ended up with a coffee cake idea. I've had this cranberry buckle on my to-make list for a while, I had 1.5 bags of fresh cranberries in the fridge, and it was just the perfect time.


Christmas Cranberry Buckle
(recipe from Wicked Good Kitchen)

Ingredients

For the Spiked Candied Fruit
  • 3 tablespoons (34 g) finely chopped candied orange peel
  • 3 tablespoons (34 g) finely chopped crystallized ginger
  • 1 tablespoon (15 ml) orange liqueur
For the Sugar Cookie Streusel
  • ¾ cup (98 g) unbleached all-purpose flour
  • 6 tablespoons (75 g) granulated sugar
  • 6 tablespoons (85 g) salted butter, cut into bits
For the Cake
  • 1½ cups (195 g) unbleached all-purpose flour, plus extra for cake pan
  • 1½ teaspoons (7 g) baking powder
  • ¾ teaspoon (3.6 g) fine-grain sea salt
  • ½ teaspoon (1.25 g) ground cinnamon
  • ¼ teaspoon (.65 g) freshly grated whole nutmeg
  • 10 tablespoons (about 141 g) unsalted butter, softened
  • ¾ cup (150 g) granulated sugar
  • 2 teaspoons (4 g) grated lemon zest, from 1 medium lemon
  • 2 teaspoons (10 ml) pure vanilla extract
  • 2 large eggs (mine weighted 112 g w/o shells), room temperature
  • 3½ cups (14 oz or about 350 g) fresh cranberries, rinsed & dried
  • Shortening or favorite cooking oil, for greasing cake pan
For the Sugar Topping
  • 1½ to 2 teaspoons (6 to 8 g) granulated sugar
Special Equipment
  • One 9-inch (23 cm) round nonstick springform pan
  • Two insulated cake strips, such as Wilton® Small Bake Even Strips (Set of 2)
  • Cake Lifter, helpful but not necessary

Directions

Prepare the Spiked Candied Fruit: In a small bowl, combine candied orange peel, crystallized ginger and orange liqueur. Cover and let stand for several hours or overnight at room temperature.

Prepare the Sugar Cookie Streusel: In a large bowl, whisk together the flour and sugar. Using a pastry blender, cut in the butter until mixture resembles a coarse meal. Set aside.

Arrange oven rack in lower third of oven and preheat oven to 350ºF (177ºC). Grease 9-inch (23 cm) round nonstick springform pan with shortening and dust with flour, tapping out the excess. If using insulated cake strips, don’t forget to prepare the pan per manufacturer’s directions with the exception of using two (as shown in the article above). Set aside.

Prepare the Cake: In a medium bowl, whisk together flour, baking powder, salt and spices until well combined. Using an electric stand mixer fitted with paddle attachment, or handheld mixer and large bowl, cream together butter and sugar until light and fluffy, about 3 minutes. Add lemon zest and vanilla; beat until combined.

Add the eggs, one at a time, blending well after each addition on medium speed scraping sides and bottom of bowl as necessary. (Mixture may look slightly separated. Don’t worry. It will pull together with the addition of flour.) Add flour gradually while mixing at low speed until mixture is just blended. Do not overmix. (Batter will be thick and very heavy.) Using rubber spatula, carefully fold in spiked candied fruit and cranberries until distributed evenly.

Using rubber spatula, scrape batter into prepared pan. With spatula, spread batter evenly to pan edges and smooth the top. Use hand to clump portions of streusel by squeezing and use fingers to sprinkle small clumps of streusel evenly over top of batter. Repeat process with remaining streusel.

Bake in preheated oven until toothpick inserted into center comes out clean, about 55 to 60 minutes. Remove cake from oven and place on wire cooling rack. Immediately, sprinkle sugar over the top of cake and run thin metal icing spatula around edge of pan to loosen cake from sides of pan. This will prevent the cranberries from sticking to the sides of pan and will make removing easier. Cool for 15 minutes.

To Unmold Cake: If using, remove insulated cake strips. Unmold cake by removing sides of pan. Cool until just warm or to room temperature, about 1 hour. Slice into wedges and serve.

Yield: Makes one 9-inch (23 cm) cake, serving 8 to 10.

Notes from JennyBakes:

-When I tried to go to the liquor store, there was a sign up that said "Be right back," but it was pouring down rain and I just wanted to go home. So instead of an orange flavor, I used kirsch, since I had some on hand.
-I no longer have a working 9" springform so I just used a 9" square pyrex, and that fit the cake perfectly. I did not have any burning issues as described by the original baker. 
 

Monday, December 17, 2018

Georgia Cookie Candy

I love peanut butter balls during the holidays, or the regional version known as Buckeyes. But the rolling into balls and the dipping into chocolate is so much work, and messy work. And mine always look knobbly and never neat. So when I saw this recipe, which is basically peanut butter balls in bar form, I knew I had to try it. Georgia is trying to claim it for itself, but who knows where they really originated. You get slightly less chocolate in this variety, so I added more than what the recipe called for, but then came the difficulty of cutting it into squares. I should have either done it earlier before the chocolate set completely, or used a warmed up knife. So mine are not perfect, but possibly slightly more perfect than the ball form?

And to my co-worker who doesn't care for chocolate and peanut butter together, I really do hope I can eventually make something with a different flavor profile this holiday season. Sorry!!


Georgia Cookie Candy

(recipe from Food Network)

Ingredients

1 cup (2 sticks) butter or margarine, softened
1 cup crunchy peanut butter
3 cups confectioners' sugar, sifted
1 1/2 cups graham cracker crumbs
1 1/2 cups semisweet chocolate chips


Directions

  1. Line a 13 by 9 by 2-inch pan with foil. 
  2. Combine the butter, peanut butter, sugar, and graham cracker crumbs in a food processor. Process until the mixture forms a ball. Press into the foil-lined pan using your hands or a spatula. 
  3. Melt the chocolate chips in a double boiler over simmering water or in a microwave-safe glass dish in the microwave for 1 minute on high (100%). Stir. If the chocolate has not completely melted, microwave for 10 seconds more, then stir. Spread evenly over the cookie layer with a spatula. Chill for several hours. 
  4. When ready to serve, allow the candy to come to room temperature before cutting into pieces. Store in an airtight container in the refrigerator.

Monday, December 10, 2018

Butter Tart Squares

Sorry this is a day late, I hadn't posted it in advance and had no power during an ice storm for 30 hours! 

Another recipe from our neighbors to the north! When I went poking around for typical Canadian sweets, I came across a lot of butter tart recipes. But I don't have a mini tart pan, and that's a lot of work. So when I came across a few bar cookie (or "squares") versions, I knew I'd found a good idea. People who received my lumberjack boxes got one butter tart square, and I heard from a lot of people that they liked these a lot. I did too, definitely my favorite bake from December so far.

I also discovered the marvelous site that is Canadian Living - kind of like the Canadian version of Sunset Magazine (northwest) or Southern Living (southern) and has great regional recipes.


Butter Tart Squares
(recipe from Canadian Living)

  • s
  •  
In bowl, mix flour with sugar; using pastry blender, cut in butter until crumbly. Press into 9-inch square metal cake pan; bake in 350 F (180 C) oven for 15 minutes.

Filling: In bowl, mix butter with eggs; blend in sugar, flour, baking powder, vanilla and salt. Stir in raisins and walnuts; pour over base.

Bake in 350 F (180 C) oven until top springs back when touched lightly, 20 to 25 minutes. Let cool in pan on rack. Cut into squares.

Monday, December 03, 2018

Polar Bear Paws

This year I'm giving away boxes of sweets that are Canadian or Alaskan inspired. One fun recipe I came across, one I liked more than I expected (as I am not a huge fan of white chocolate.) This is apparently a copycat recipe from something you can buy from See's Candies, but that's not local to me anymore. They were all over when I lived in the northwest.


The author of the copycat recipe links to her homemade caramel recipe but since I had so much to make this weekend I definitely took the easy way out of homemade caramel.

I ended up making two shapes, some that are flatter, and some that are thicker clusters. The thicker ones were harder to dip in white chocolate but nicer to bite into, and a better balance of salt (peanuts) and white chocolate (coating.) But it's not as sweet as you would think.


Polar Bear Paws

Ingredients

  • 1 (11 ounce) bag Kraft Caramel Bits or squares
  • 3 tablespoons heavy whipping cream
  • 1 tablespoon butter
  • 1 cup peanuts roasted and/or cocktail
  • 12 ounces vanilla almond bark or white melting wafers

Instructions

  1. Line a large cookie sheet with Silpat mats (or parchment paper) and grease it with butter. Set aside.
  2. Melt caramels with butter and cream in the microwave in 30 second increments, stirring, and repeating until smooth.
  3. Mix in the peanuts and then let it sit in the bowl to cool for about 15 minutes, stirring every few minutes.
  4. Spoon onto the mats in tablespoon size mounds. Place in the fridge for 30-60 minutes until set.
  5. Place chocolate in a bowl and melt in the microwave on low in 30 second increments and stir until melted and smooth. Dip caramel cluster in the chocolate and use a fork to remove it. Holding it over the bowl, tap the fork on the edge to let any excess chocolate drip back down. Place cluster back on the parchment lined pan and repeat with remaining clusters.
  6. Put the pan back in the fridge for 30-60 minutes until chocolate is set. Remove and package up.


Monday, November 26, 2018

Pumpkin Spice Ruffled Milk PIe

I had this recipe on my radar for Thanksgiving dessert, but instead ended up making it for brunch on Thanksgiving weekend. The recipe creator has great photos you should peek in at, and she also made the recipe vegan. I went with regular butter and milk, and substituted the sugar for a lower-carb substitute. Most milk pies have eggs in the custard, so if I tried one again I'd use that kind of recipe, but this was different, and different can be good. I sometimes like using phyllo/filo dough for a less carby baked good without having to deal with nut flours, etc.


The recipe comes from Ful-Filled, but I think I probably encountered it in Pinterest. She directs the baker not to pack the spirals too tightly, but they looked prettier that way so I did anyway. And she was right, the custard had no room to go and I couldn't fit it all in the pan!


PUMPKIN SPICE RUFFLED MILK PIE
Prep Time: 10 minutes
Cook Time: 40 minutes
Total Time: 50 minutes
Yield: 8-10 slices
Ingredients
  • 10-14 sheets frozen phyllo dough, thawed
  • 6 tablespoons (85g) butter, melted (use vegan butter or olive oil for a dairy free option)
  • 1 1/2 cups (192g) milk (full fat coconut or nut milk for dairy free option)
  • 3 tbsp cornstarch
  • 1 tablespoon vanilla extract
  • 1 cup (225g)of pumpkin puree (about 1/2 of a 15oz can)
  • 1/2 cup (100g) sugar (I used light brown sugar)
  • 1 tsp cinnamon
  • 1/2 tsp ground ginger
  • 1/4 tsp fresh ground nutmeg
  • 1/8 tsp ground cloves
  • 1 tbsp powdered sugar + 1/2 tsp cinnamon, for dusting
Instructions
  • Preheat your oven to 350°F (175°C). Brush a 9-inch round cake pan lightly with melted butter and line with a sheet of parchment that is large enough to come up the sides of the baking pan. Lightly brush the parchment with butter.
  • Place 1 sheet of phyllo dough on a clean surface and brush it with melted butter (a light coat will do just fine). Place another sheet of phyllo over the top of the first one and brush with butter. Use your fingers to scrunch up the fillo long ways, into a loose ruffled strip (its okay if the phyllo tears a bit). Wind up the dough into a loose, ruffled spiral, place it in your prepared pan and repeat with the rest of the phyllo dough until your pan is filled. (you should have 5-7 spirals depending on the size of your phyllo)
  • Brush the tops of the spirals with the remaining butter. Bake in the pre-heated oven for 20-25 minutes, until the phyllo is golden brown.
  • While the phyllo bakes, prepare the pumpkin custard by whisking together the milk, cornstarch, pumpkin, vanilla, spices and sugar.
  • Remove the pan from the oven and pour the pumpkin custard mixture over the spirals. Return pan to the oven and bake another 20-25 minutes or until the custard is set in the center.
  • Let cool for 15 minutes, then lift from the pan and serve dusted with cinnamon and powdered sugar. Best eaten warm, but leftovers store beautifully in the fridge for up to 3 days (if it even lasts that long ;)

Monday, November 19, 2018

Black Walnut Pumpkin Bread

There is this cake I have wanted to make, the "Black is the New Jam Cake with Sorghum Sea Foam Icing" from Victuals: An Appalachian Journey, with Recipes by Ronni Lundy. First it was that I had to track down sorghum, and I did, from a guy standing by the side of the road on a drive through the North Carolina mountains. It's legit, it's Appalachian, check. But then I used some of that sorghum in another recipe. The other rare ingredient is the black walnuts which are only available a certain time of year. When I saw them this year, I proudly purchased them, knowing I had sorghum at home, and I was going to make! that! cake! Except I needed a jar of jam and didn't have any in the pantry.


I went looking for alternate black walnut recipes. One day I will conquer that cake, but I didn't want to go back to the store just to make it. I also have quite a bit of canned pumpkin on hand, so I decided it would be great to find something that combined both. I ran across this Black Walnut Pumpkin Bread recipe from the Never Enough Thyme when Lana's Cooking blog. I went for it and mixed the batter while I boiled water for dinner too. Opening the black walnuts, which I'd never had, was quite an experience. They almost smell like perfume, it is really a strange experience.


The fragrance of the bread with the walnuts filled the house, and I couldn't wait to try it. We do have a slight walnut allergy in my family, and I found my throat felt a little scratchy, so I will have to give most of this away. But I did enjoy this distinct flavor of a regional nut!


Black Walnut Pumpkin Bread
(recipe from Lana, the directions are mine as per her request, but please visit her blog to see her longer post, her directions, and her photos)

Ingredients
  • 2 eggs
  • 1/2 cup oil
  • 1 cup canned pumpkin
  • 1/3 cup water
  • 1 1/4 cups sugar
  • 1 1/2 cup all-purpose flour
  • 1/4 tsp. salt
  • 1/2 tsp. nutmeg
  • 1/2 tsp. cinnamon
  • 1 tsp. baking soda
  • 1 cup chopped black walnuts
1.  Preheat oven to 350 F and prepare a 9x5 (6 cup) loaf pan.
2. Stir dry ingredients together.
3. Mix in wet ingredients.
4. Stir in walnuts.
5. Bake for an hour or until a toothpick comes out clean (I needed almost 75 minutes for my loaf.)

Monday, November 12, 2018

Apple and Cheddar Scones

These are slightly more involved than most scone recipes I make, due to the roasting of the apples and the shredding of the cheese, but I would like to say: WORTH IT. I've had my eye on this recipe from Smitten Kitchen for several years and finally had a chance to make them on a late morning. I had two wrinkly Mutsu apples leftover from fall apple trips and used those for this recipe. Their paleness and the paleness of the white cheddar (from Canada) makes for a deceptively monochromatic scone. But the flavor is anything but.


I will point you to Deb's recipe for step-by-step photos and a different method for the recipe, and merely copy and paste the ingredients here. I made them my normal scone method which I will put below, but that is not her original instructions.

Apple and Cheddar Scones
(from Smitten Kitchen!) 

Makes 6 generous scones

2 firm tart apples
1 1/2 cups (6.75 ounces or 195 grams) all-purpose flour
1/4 cup sugar plus 1 1/2 tablespoons for sprinkling (total of 2.2 ounces or 63 grams)
1/2 tablespoon (7 grams) baking powder
1/2 teaspoon salt (3 grams) plus additional for egg wash
6 tablespoons (3 ounces or 85 grams)unsalted butter, chilled and cut into 1/2-inch cubes plus additional for baking sheet if not lining it with parchment
1/2 cup (2.25 ounces or 65 grams) sharp cheddar, shredded (white is recommended, I assume for aesthetics)
1/4 cup (2 ounces) heavy cream
2 large eggs (NOTE: only one go INTO the scones - JennyBakes)

Position a rack at the center of oven and preheat oven to 375 °F. Line baking sheet with parchment paper.

Peel and core apples, then cut them into one-sixteenths. (I assumed this meant chunks, not slivers.) Placed them in a single layer on a baking sheet lined with parchment paper and bake them until they take on a little color and feel dry to the touch, about 20 minutes. They will be about half-baked. Let them cool completely. Leave oven on.

Sift or whisk flour, sugar, baking powder and salt together. Cut chilled butter into chunks and rub into dry ingredients with fingertips. Stir in cheese and apples. Beat together ONE egg and cream, and pour over the mix, stirring the most minimum required to bring the dough together and not one bit more.

Generously flour your counter top and place the scone dough on top of it. Sprinkle with flour. Use a rolling pin to gently roll (or use your hands to pat) the dough into a 1 1/4-inch thick, 6-inch circle. Cut circle into 6 wedges. Transfer them to a baking sheet that has either been buttered or lined with a fresh sheet of parchment paper. Leave at least 2 inches between each scone.

Beat remaining egg in a small bowl with a pinch of salt. Brush the scones with egg wash and sprinkle them with remaining tablespoon of sugar. Bake until firm and golden, about 30 minutes. With a spatula, lift them to a wire rack to cool for 10 minutes.

Notes from JennyBakes:

-Well I misread the recipe originally and had to dump out the TWO eggs plus cream I'd mixed together.
-I only baked for 20 minutes and they could have gone longer but I'm skeptical about the 30 in my oven, anyway.
-I added more than 1/2 cup cheese. I just shredded what I had on hand and used it. So they were a bit cheesy (this was not a bad thing.)
-I did not add salt to my egg wash. I was worried about getting too salty.....

Monday, November 05, 2018

Curry Cauliflower Christmas Pasty with Almonds and Apricots from Home Made Christmas by Yvette van Boven

The first time I heard about hot water crust was whilst watching The Great British Bake Off. I had great plans to try a version, although many of the recipes called for lard, I'd encountered a few with butter or shortening. I knew that the important things were to make sure the filling was not too liquidy so as not to end up with a soggy bottom.

As I was perusing this cookbook, the pasty really stood out for several reasons - it is vegetarian (so many aren't!), it had centerpiece potential, and the flavors were interesting. And it looked like it started with a hot water crust of some kind, a technique I'd never used.


Curry Cauliflower Christmas Pasty with Almonds and Apricots

Serves 6-8 people

For the filling:

1 tbsp olive oil
2 onions, diced*
4 ribs celery, finely diced
2 small cloves garlic, minced
1 tbsp curry powder
1 tbsp paprika
4 heaping tbsp (70 g) tomato paste
1 head cauliflower, ground into crumbs in the food processor*
1/2 cup (100 g) red lentils
2 cups (500 ml) vegetable stock
3/4 cup (100 g) almonds, finely chopped
3/4 cup (100 g) dried apricots, halved*
1 1/2 cups (150 g) grated aged cheese*
4 eggs, beaten
A generous bunch of fresh, flat-leaf parsley, chopped
Sea salt and freshly ground black pepper

For the dough:

 3 1/2 cups (450 g) all-purpose flour
2 tsp salt
3/4 cup + 1 tbsp (200 ml) milk
7 tbsp (100 g) butter
1 egg, beaten

On the side:

1 2/3 cups (400 ml) sour cream
Some scallion rings
Sea salt and freshly ground pepper
Optional: fresh garden herbs


Prepare:

Make the filling: in a large, heavy-bottomed pan, heat the oil. Saute the onions and celery until soft. Add the garlic. Cook everything for a while. Add the curry powder, paprika, and tomato paste. While stirring, cook for several minutes, until it starts to smell sweet and spicy. Then, stir in the cauliflower crumbs and the lentils. Douse with the stock. Cover and let simmer gently for about 20 minutes. Stir occasionally while reducing it into a thick paste that is no longer wet but does not burn and stick to the pan either. Remove from the heat and let cool somewhat.

Make the dough:

Grease a 9-inch (22-cm) springform pan (or a pie pan) and dust it with flour. Mix the flour and salt. Put the milk and the butter in a saucepan, and add 1/2 cup plus 2 tbsp (150 ml) water, and heat until the butter has melted.

Add the flour in one batch and thoroughly stir everything into one ball. Remove it from the pan and quickly knead it on a floured countertop into a coherent dough. Let the dough rest for a while. Divide the dough into 1/3 and 2/3. Roll out the larger part and use it to line the springform pan, allowing some overhang over the edges.

Preheat the oven to 350 F (180 C.)

Stir the almonds, apricots, and cheese into the cauliflower filling, followed by the beaten eggs and the parsley. Season with salt and pepper.

Spoon the filling into the dough-lined springform pan. Roll out the remaining dough and use it to cover the pasty filling.

Use an apple corer to cut three holes in the top crust. Trim the edges and roll out the trimmings. Cut Christmas decorations from the dough and stick them onto the pasty with a beaten egg. Glaze the entire top of the pasty with the remaining egg.

Bake for 1 hour. Use a skewer to check whether the filling is done: every oven is different. Sometimes it takes a little longer, sometimes it doesn't. Loosely cover the pasty with aluminum foil if the top is browning too fast.

Serve immediately while still warm, or let cool and serve cold. You can always reheat the pasty later.

Make:

You can heat up the pasty covered with aluminum foil. It will take about 20 minutes in an oven preheated to 350 F (180 C.) Serve with sour cream (seasoned with some scallion rings, salt and pepper, and some fresh garden herbs if you want.)

* Notes from JennyBakes

I only used one onion because I didn't want it to overpower. I also lightly chunked the cauliflower rather than grind it to have more texture. If you really only half the apricots but grind everything else, the only chunks you will encounter are apricots and I think that's a bit unbalanced. (Especially since if you have leftovers, the apricots get more and more savory and it starts tasting like curry grapes or something.) I wasn't sure what kind of cheese to buy (it just says aged!) so I used a nice hard cheese like Parmesan. I only had a six inch springform so I made that size and cooked for a shorter time, then put the rest of the filling into ramekins with crust toppers, and they were tasty too!

 
Home Made Christmas
by Yvette van Boven
Abrams Books
Publication Date: 16 October 2018

Recipes are divided into the type of dish, with fun menu ideas in the back. Others I've marked to try include Ginger Hot Chocolate, Squash, Feta & Sage Pull-Apart Bread, Carrot Tatin with Goat Cheese, Trifle with Salty Caramel, Cheesecake Cream & Chewy Brownies, Hazelnut Meringue Log with Frangelico Cream & Caramel. Last week I posted the Vegetable Spiral Tart.

This post is sponsored by ABRAMS Books, as part of the ABRAMS Dinner Party.

Monday, October 29, 2018

Vegetable Spiral Tart from Home Made Christmas

As a part of the ABRAMS Dinner Party again for 2018-19, I will be sent most of the cookbooks for their season. This is how I ended up thumbing through Home Made Christmas by Yvette van Boven several months before Christmas! I marked a few sweet recipes to try, as I tend to do, but I kept coming back to a few savory dishes. One that topped the list is the vegetable spiral tart. In the cookbook, Yvette has made a beautiful tart with all one spiral. As I attempted to force my vegetables into submission, I decided it was going to be easier to make rosettes surrounding a central spiral. It isn't quite as perfect as the picture but it was tasty, and will do just nicely for lunch later this week as well!


Vegetable Spiral Tart with Avocado-Curry Cream

For the crust:

About 1 pound (450 g) sweet potatoes, peeled*
1 egg
Sea salt and freshly ground black pepper

For the filling:

3 large carrots (about 11 oz/300 g, peeled)
2 parsnips, peeled
1 eggplant
2 eggs
1/2 cup plus 2 tbsp (150 ml) heavy cream
1 small clove garlic, pressed or grated
1 tsp curry powder
1 tsp caraway seeds

On the side: 

1 avocado
1 tsp curry powder
Grated zest and juice of 1/2 lemon
1/2 cup (125 ml) crème fraîche

Preheat the oven to 350 F (180 C).

Cut a piece of parchment paper to size so it fits a 9-inch [tart] pan. Grease everything, including the parchment paper.**

Grate the sweet potatoes in a food processor using a coarse grater.*** Beat the egg with some salt and pepper and combine it with the sweet potato. Press the sweet potato mixture into the [tart] pan, forming an even layer on the bottom and up the edges. Prebake the crust on the lower rack in the oven until half done and the edges begin to brown, about 25 minutes. Let cool somewhat on a rack.

Increase the oven temperature to 400 F (200 C).

Meanwhile, make the filling. Shave the vegetables as thinly as you dare into strips. I use a vegetable peeler for the carrots and the parsnips. That works better than you might think. For the eggplant I use a chef's knife to cut very thin slivers.

Whisk the eggs and cream together with the garlic, curry powder, and caraway. Season with salt and pepper.

Fit the vegetables in the pan in circles, artfully alternating among different colors so it will look beautiful. Continue until all have been used up. After filling the whole pan I always stick the final slivers left on the counter in between the vegetable spirals. You can really use everything!

Pour the egg mixture over the vegetables, carefully spreading it out. Bake the tart for at least 45 minutes, until done. Let rest for 10 minutes before removing it from the pan. If you are planning to serve the tart later you should bake it for only 35 minutes. In that case it will go back into the oven just before serving. Let cool, cover, and store in the fridge until ready to serve.

Make the avocado cream. Puree the avocado together with the curry powder and the lemon zest and juice in a food processor until completely smooth. Stir in the crème fraîche. Cover and refrigerate until ready to serve.

Allow the tart to reach room temperature (if it's been in the fridge.) Preheat the oven to 400 F (200 C). Bake the tart for about 15 minutes, until nicely done and warm throughout. Serve with the cold avocado cream.

Notes from JennyBakes:

Overall, this was tasty if a bit fiddly. The crust was simple but delicious, so I'm already thinking of other ways I can use it... maybe as a crust for a savory cheesecake! I would like to know if I could do a simpler version of this without having to shave and arrange the vegetables. Also for my tastes, eggplant is not really working here, but I know I'm not a huge fan the way other people are.

* This was just one average sweet potato

** Really listen to this step. I skipped it and will have a messy oven floor to clean sometime soon.

*** I didn't pull out the food processor, just used a handheld grater and it was fine.

I keep saying [tart] when she says pie pan, because the ingredients fit perfectly in a tart pan, the recipe title is tart, the picture looks like a tart, and I think there wouldn't be enough to fill a pie pan. The cookbook author is Dutch so I wondered if tart and pie are the same English word. No big deal, but you might want more of at least the egg mixture if you're going pie plate.

I didn't make the avocado-curry cream but it would have been good, adding some acid it probably needed. The curry flavor in the egg mixture comes across pretty strongly already, so you may want to reduce it in one of the two places if you're making both the tart and the cream.

Home Made Christmas
by Yvette van Boven
Abrams Books
Publication Date: 16 October 2018

Recipes are divided into the type of dish, with fun menu ideas in the back. Others I've marked to try include Ginger Hot Chocolate, Squash, Feta & Sage Pull-Apart Bread, Curry Cauliflower Christmas Pasty with Almonds & Apricots, Carrot Tatin with Goat Cheese, Trifle with Salty Caramel, Cheesecake Cream & Chewy Brownies, Hazelnut Meringue Log with Frangelico Cream & Caramel. (I actually bought everything for the Curry Cauliflower Pasty except... the cauliflower. Doh! So I need to make another trip to the store.)

This post is sponsored by ABRAMS Books, as part of the ABRAMS Dinner Party.

Monday, October 22, 2018

Apple Cider Cake with Apple Cider Glaze

On our first orchard trip of the autumn, I bought a gallon of apple cider. I had about half a gallon left and it started to expire, so I went looking for a recipe that used a lot of it. Between cake and glaze, this recipe uses 2 cups. Instead of going full apple cider doughnut with Martha's cake recipe, I didn't cover the cake in the cinnamon sugar mixture and opted for the apple cider glaze instead, for a slightly more sophisticated look.


Apple Cider Cake

For the cake:
(recipe adapted slightly from Martha Stewart's Apple Cider Doughnut Cake)


Glaze
(recipe from Buns In My Oven)

1 cup apple cider
1/2 - 3/4 cup powdered sugar
2 tablespoons butter
1 teaspoon cinnamon
Dash of salt

Bring the cider to a boil over medium heat, reduce heat to low, and simmer for 10 minutes or until reduced by half. Stir in the butter, cinnamon, salt, and 1/2 cup of powdered sugar until well combined. Add remaining powdered sugar to thicken the glaze, if desired. 

Drizzle over cooled cake. Cake can be stored, covered, at room temperature up to 2 days.  

Monday, October 15, 2018

Pumpkin Spice Rice Krispies Treats

Well, you know how it is. One recipe flops (a batter that never is a dough, long story) and you run out of non-stick spray that you need before you can bake that cake - well, you did buy that bag of pumpkin spice marshmallows.

So here's some real-life, this is all I baked this weekend, completely processed food product "baked good." Sometimes that will have to do!


Pumpkin Spice Rice Krispies Treat
(recipe from Kraft.com)

Ingredients

3 Tbsp. butter
1 pkg (8 oz.) jet-puffed pumpkin spice mallows
5 cups puffed rice cereal
1 cup candy corn


1. Line a 13x9-inch pan with foil, with ends of foil extending over sides. Spray with cooking spray.
2. Microwave butter in large microwaveable bowl on HIGH 45 sec. or until melted. Add marshmallows; toss to coat. Microwave 1-1 1/2 minutes or until marshmallows are completely melted and mixture is well blended, stirring after 45 seconds. Add cereal; mix well.
3. Press onto bottom of prepared pan. Decorate with candy corn; cool.
4. Use foil handles to lift cereal mixture from pan; cut into shapes with pumpkin shaped cookie cutters or use knife to cut into bars.


Notes from JennyBakes:

I saw many variations of this online, including several that incorporated coffee/espresso in some way in order to make pumpkin spice latte rice krispie treats. This might be tasty! I also saw some combined with marshmallow cream in the middle, others dipped in dark or white chocolate, others making pumpkin spice from plain marshmallows. You do you.

The contained that goes in the microwave needs to be larger than 4 cups, I learned through experience and a very sticky mess.

I found I needed less space than 9x13 so I put my empty nonstick spray can down in the 9x13 pan and pushed all the marshmallow mixture into the smaller space for more even, thick squares.

Monday, October 08, 2018

Lassie Tart

I read a lot of fiction, as most of you know. Recently I read Our Homesick Songs by Emma Hooper, about a dying fishing village in Newfoundland and the people who live there. Most of the residents are moving away for work. In one scene, the Mom from the central family sends her children, Cora and Jack, to buy something from the bakery to celebrate their last day as a family before the parents start trading off traveling "up north" for work.
"They got the only pie, dark berries and dark molasses crust, and continued on home..."
Their mother Martha approves of their selection.
"Lassie tart, she said. Good choice."
So this of course set me off on an internet research rabbit hole. There aren't many places online to find the recipe for a lassie tart, although if you just look for Newfoundland tart or Newfoundland molasses tart, a few more come up. They all agree the traditional berry (which is made into a jam before filling the tart) is the Partridge Berry, but that was not a berry I could get my hands on, not in frozen form or in jam. Several bakers who had made the tart used lingonberries, so I did that as well.


The tart has a lattice top so I was refreshing my skills by looking at tutorials for them, and encountered a "plaid" pattern with varying widths of lattice that I really liked. Unfortunately I didn't really pull it off; my tart just looks like I didn't cut my lattice evenly, not like I did so intentionally. This molasses dough is pretty soft and not as easy to work with as typical pie dough.

Ultimately I made the recipe from the Globe and Mail, and will include it in its entirety below, but should say that I used a 12 oz jar of lingonberry jam instead of making any (and that was just about right for one 8-inch tart. I can't see this recipe making enough pastry for 2 complete tarts as it says it will. In the end this is a fairly simple recipe, perfect for a place with a lot of molasses and jam on hand like Newfoundland. I wonder if this could be adapted slightly for Thanksgiving - I wouldn't use all cranberries, I don't think, but maybe half (or, you know, cranberry sauce) and maybe add some orange zest to bring out the orange pekoe tea in the crust. It's a keeper.


Murray McDonald's Lassie Tart
(from The Globe and Mail)
Servings: Two 8-inch tarts


Ingredients

1 cup butter
3/4 cup molasses
4 cups flour
2 1/2 tsp cinnamon
2 1/2 tsp ground cloves
1 tsp ground ginger
1/4 tsp salt
2 tsp baking soda
1/4 cup brewed orange-pekoe tea
6 cups partridgeberries, also known as lingonberries (or substitute cranberries)
2 tbsp lemon juice
1 tbsp lemon zest
1/2 cup brown sugar


Method

To make the pastry dough, cream the butter and molasses. In a separate bowl, sift together the flour, cinnamon, cloves, ginger and salt. In a small bowl or cup, stir the baking soda into the hot brewed tea, then add immediately to the butter-and-molasses mixture and stir well. Add dry ingredients to the same bowl and mix until just combined. Pat the dough into a ball and flatten, wrap in plastic wrap and chill it in the fridge overnight or for at least 2 hours.

To make the partridgeberry jam, place the berries, lemon juice, lemon zest and sugar in a heavy-bottomed pot and simmer over medium-low heat for 1 hour. Set aside and let cool.
To assemble the tarts, roll out the dough to 1/8 inch thick and 10 inches round. Transfer to an 8-inch tart pan and trim the overhanging edges. Form a ball with the scraps, roll out the dough and cut out strips for the lattice top.

Fill tart with 1/2 inch of partridgeberry jam. Place the lattice overtop and use a fork to crimp the edges of the pastry.

Bake at 325 F for 35 minutes or until the top is dark brown.

Monday, October 01, 2018

Chocolate Pantry Cake

This cake is based on Deb-from-Smitten-Kitchen's chocolate olive oil cake, which I decided to make when I ran out of baking powder and didn't want to go to the store! We all have those days. This recipe also doesn't need butter, eggs, or chocolate that has to be melted (if you use her version with a glaze, you'll need chocolate chips at least, but since we buy the $7.50/bag stevia sweetened chocolate chips I wasn't going to use them for this! I decided it would be just fine with whipped cream.)

I didn't make this cake perfectly. I underbaked it, meaning I had a bit of a tiny lava cake situation in the middle. I didn't grease the pan high enough, so it stuck around the rim. I don't think I mixed it enough, in fear of overmixing, so one bite tasted like baking soda, whoops. It's a bit droopy in the middle. But you know what, it tastes good, the whipped cream is a nice pairing, and sometimes you just want something you can pull together quickly without special ingredients. Oh yeah, also this is a vegan recipe! It reminds me quite a bit of the flavor of the Morning Loaf recipe I've made a bunch since it originally showed up in JennyBakes, but it relies on coconut oil and espresso powder.


Chocolate Pantry Cake
  • 1 1/2 cups all-purpose flour
  • 3/4 cup unsweetened cocoa powder
  • 1 1/2 teaspoons baking soda
  • 1/2 teaspoon fine sea salt
  • 3/4 cup granulated sugar
  • 3/4 cup brown sugar
  • 1/2 cup oil (Deb likes olive, I used vegetable and olive half and half)
  • 1 1/2 cups cold coffee
  • 1 tablespoon cider vinegar or white vinegar
1. Preheat oven to 350 F. Line a 9" cake pan with parchment paper and spray with non stick spray (you can butter it but this will render it unvegan!)
2. Stir dry ingredients together with a whisk, knocking out any lumps in the brown sugar and cocoa powder.
3. Whisk in oil, then add in coffee and vinegar until smooth.
4.  Scrape into pan. Bake 30-35 minutes or until tester comes out clean.
5. Go to Deb's recipe for the glaze or just serve with whipped cream or dusted with powdered sugar. (Oh yeah and if you use real whipped cream, again, that renders it unvegan.)

Monday, September 24, 2018

Hutterite Schuten Pie (Cottage Cheese Pie)

This was the other pie I made from Secrets of a Hutterite Kitchen by Mary-Ann Kirkby. Partly, I was intrigued by cottage cheese in a pie. But she also mentions in passing that sometimes this is served for breakfast or the tea-time meal lunche.


It definitely tastes better cool than warm, in my opinion, kind of like a custard rather than a cheesecake, which I think I was expecting. I think in previous Hutterite books they may have mentioned using raisins in this pie, and while that sounded weird, now that I've tasted it, I can actually see that working. Maybe with a little bit of rum to soak the raisins in, you could have a rum raisin schuten pie!


Schuten Pie (Cottage-Cheese Pie)

1 1/2 cups dry-curd cottage cheese*
1 cup thick cream, or 1/2 cup whipping cream and 1/2 cup sour cream
1 egg slightly beaten
1 tsp vanilla
1/2 tsp salt
1/3 cup flour
1/4 cup sugar
1/2 cup Golden syrup
1/2 tsp nutmeg (optional)

Stir all the ingredients together and pour into an unbaked pie crust. Bake at 350 F for approximately 45 minutes.

*I just put mine in a strainer for an hour or so and called it good.

Monday, September 17, 2018

Pumpkin Chestnut Flour Scones (grain-free)

I had leftover pumpkin and leftover chestnut flour, and thus these scones were born. I think I need a different flour combination because these were a bit overly moist, but better moist than crumbly, I suppose.  So this may not be final recipe but still passable!


Pumpkin Scones
(recipe adapted from Martha Stewart via Martha Bakes on PBS.org, which I made last year)

Ingredients 
 
1 cup chestnut flour
1 cup almond flour
1/3 cup coconut sugar
2 teaspoons baking powder
¾ teaspoon ground ginger
¾ teaspoon ground cinnamon
½ teaspoon freshly grated nutmeg
Coarse salt
1 stick (1/2 cup frozen unsalted butter, grated on large holes of a box grater; plus 1 tablespoon melted
2 tablespoons heavy cream, plus more for brushing
1 large egg, room temperature
1/3 cup canned unsweetened pumpkin puree

Directions

  1. Preheat the oven to 375 degrees. In a bowl, whisk together flours, coconut sugar, baking powder, ginger, cinnamon, nutmeg, and ¾ teaspoon salt. Stir in grated butter.
  2. In another bowl, whisk together cream, egg, and pumpkin; stir into flour mixture just until dough forms. Pat into a 6-inch round on a parchment-lined baking sheet. Brush with cream. Using a knife or bench scraper, cut dough into 8 wedges, and pull 2 inches apart. If dough is too moist to do this, you may portion it into a scone pan or muffin tins.
  3. Bake, rotating sheet halfway through, until scones are golden brown, about 20 minutes. Let cool completely on sheet on a wire rack.

Monday, September 10, 2018

Zucker Pie (Sugar Pie)

I've been reading books from Canada and Alaska this year, and along the way I read a handful of books about Hutterites, a religious sect similar in belief to Mennonites and Amish, but different in the sense that they live communally.They are best known for their communities in Manitoba and Saskatchewan, although there are still some in the United States as well. They use a lot of traditional recipes, and after reading Secrets of a Hutterite Kitchen by Mary-Ann Kirkby, I wanted to try baking a few. Most of the recipes included in that book are as originally written - enough quantities to feed the entire community. 110 eggs... 24 cups of poppy seeds... etc. Luckily the author worked with others to convert a few into a quantity appropriate for the home chef!


The first recipe I wanted to try was the Zucker (or Sugar) Pie, one that the author had a fond memory of from her childhood in the community. It reminded me a lot of the Hoosier Sugar Pie we used to make at the tearoom I worked at in Greencastle, Indiana. It would not surprise me if that pie had Amish origins. Hoosier and Zucker do kind of sound the same. The baker I worked with at the tearoom had an unusual way of making that pie - she'd sprinkle the sugar, spices, and flour into the crust and pour the cream over it, barely mixing it before baking. This recipe has you mix all the wet ingredients together and pour into the crust. And just like the Hoosier sugar pie, it is not full in the crust. I also overbaked the edges on this one (that's what I get for buying a storebought crust instead of making my own. My non-Hutterite but skilled baker grandmother would be horrified!)


The cinnamon is nice but phew, this pie is SWEET. One thing that became clear in reading the Kirkby is that most Hutterites have a flat-out sweet tooth. They even use their allowances to buy commercial sugar snacks to multiply their sweet pies and cookies. I have grown to prefer a little more balance to the sweet. But if you are a straight-sweet person, this is probably for you.

Zucker Pie (Sugar Pie)

1 cup thick cream
1 cup sugar
1 egg
1 tsp vanilla
1 tbsp cornstarch
1 tsp cinnamon

Beat all the ingredients together and pour into unbaked pie crust. Sprinkle with cinnamon. Bake at 350 F for 35-40 minutes.

Monday, September 03, 2018

Brownie Crinkle Cookies of Internet Fame

Well here I am again, making the cookie that has permeated the internet, but probably months after I first saw them. The brownie crinkle cookies from The Boy Who Bakes have popped up on many Instagram feeds and blogs since he first posted his how-to video (available at the link above.) I finally made them to bring to share with library faculty and staff on the day before classes start - it's a super busy day full of advising, hiring, and last-minute preparation for classes.


I can tell I don't have my gram to cup conversion quite right because I think the batter is supposed to be thinner than mine was. Pictures he and others have posted make them a lot flatter and spread out. Next time I'll start by not adding the extra 2 tbsp of flour. Truth be told I could measure in a scale but find it easier to try to just convert to cups. I know this makes me a bad baker, perhaps, but convenience is going to win out. I also noticed a distinct difference between pan 1 and pan 2, since I left the batter in the bowl instead of scooping it onto 2 baking sheets (because I only have 1 flat cookie sheet!) - even though the recipe specifically tells you to do it immediately, I ignored it. So my first batch are shiny and pictured as you see above while my second batch are more knobbly, closer to the double chocolate oatmeal cookies I loved in childhood than how these are supposed to look. Still, they are tasty and I will bring them to work.


I will post the recipe directly from The Boy Who Bakes blog, but all recipe development and instructions belong to him. I will not provide my conversions as they are not quite there. Hopefully I can try this again and see if a few tweaks get it closer to his pictures.

Brownie Crinkle Cookies
Makes 10

200g dark chocolate (around 65-70% cocoa solids), finely chopped
125g unsalted butter, diced
150g caster sugar
100g light brown sugar
2 large eggs
130g plain flour
3 tbsp cocoa powder (dutch processed)
1 tsp baking powder
1/4 tsp salt (plus flaked sea salt for sprinkling)

Temperature and timing is very important with this recipe so before you start get all the ingredients weighed out, two baking trays lined with parchment paper and the oven preheated to 180C (160C fan) 350F.

Place the butter and chocolate into a heatproof bowl and set over a pan and gently simmering water. Allow to melt, stirring occasionally until fully melted. Remove the bowl from the heat and set aside for the moment. In the bowl of a stand mixer fitted with the whisk attachment, or using an electric hand mixer, whisk together the eggs and sugars for exactly 5 minutes. Once the eggs have been mixing for exactly 5 minutes pour in the chocolate mixture and mix for a minute or so to combine. Meanwhile mix together the dry ingredients, sieving the cocoa powder if it has lots of lumps. Add the dry ingredients and mix very briefly just until combined. Use your spatula to give one last mix, scraping the bottom of the bowl to make sure everything is evenly combined. Use a ice cream scoop to form the cookies. The batter will be a little on the wet side, so invert the cookie scoop just above the baking tray to avoid spills. Make sure to leave plenty of space between each cookie as they will spread. Sprinkle each cookie with a little flaked sea salt before placing into the oven and baking for 12 minutes. The cookies will come out of the oven with that wonderful crinkled look and slightly domed. They will collapse a little as they cool but this helps form that perfect fudgy centre. The cookies will be very soft so allow them to cool on the baking trays for at least 20-30 minutes before removing from the tray to cool completely.

These cookies will keep for 4-5 days but will be best within the first 3 days.