Wednesday, June 27, 2007

Daring Bakers Monthly Challenge - Bagels


Daring Bakers Blue Logo
Originally uploaded by watchjennybake.
The Daring Bakers have struck again! This month the challenge was bagels - not the kind you would get from the grocery store, which is just circle shaped bread, but the authentic Jewish bakery kind, chewy and malty.

The recipe for Real Honest Jewish Purist's Bagels can be found by clicking here. It's too long to post here.

This was my first bagel endeavor, never attempted before because I thought the process would be too long and complicated - what? Boil bread? Weird. So I felt I had to block a bunch of time out to make them. I was surprised by how quick the process took in the end.

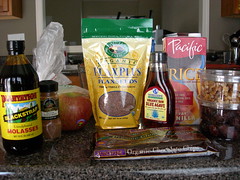
First, the ingredients.
Strange Ingredients for Bagels
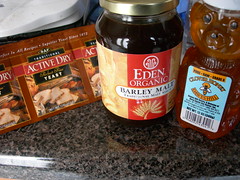
Yeast is pretty ordinary, but the amount used was more than I am accustomed to (although I don't often bake bread, so what do I know). Barley malt syrup was much harder to find, and in fact was only one place in my town of 80,000. The jar says you can substitute it for molasses in any recipe, which I'll have to do with the rest now that I'm done with the challenge.

The first step that struck me as different than other baking is the amount of time the yeast soaks at the beginning - ten minutes.
Yeast starting to feed
It soaks into the water and honey, and after ten minutes is already a growing, living organism. Bread flour gets mixed in gradually by hand, in diminishing amounts, allowing for the absorption of the moisture. I don't think I added as much as I could the first time around, and this is one of the contributors to my breadier bagels.

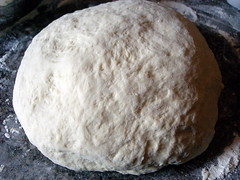
I know some people are afraid to knead dough, but that is my favorite step in the process. I feel my stress leaving and my blood pressure lowering, and just feel great afterwards. I also think it teaches you a lot about what dough should feel like, helps you know when it is ready to rise, etc.

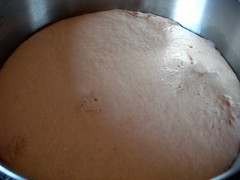
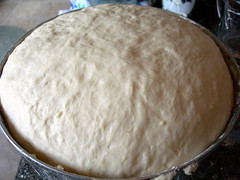
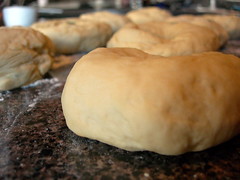
Here is the dough after kneading:
Unproofed dough

And here it is just 30 minutes later. Luckily I had put the malt syrup water on to boil right at the beginning of that time, because by the time it was simmering, the dough was ready to be punched down.
Dough after rising

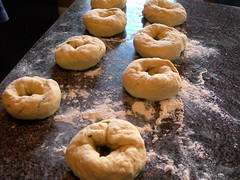
The next step is to divide the dough and form the bagels. There are two methods - one where you handmake a disc and punch a whole in the middle with your thumb, and the other where you form a rope and push the ends together.
Bagels
Here you see both. The bagels closest to the camera are the disc-punch method, and the bagels farther away were ropes first. I see pros and cons to both methods - the disc-punch method makes a more uniform bagel, but unless you boil them quickly they might rise too much and the hole gets too small. In the rope method, the dough is a better texture because of extra handling, but I had a hard time keeping them from coming apart in the water.

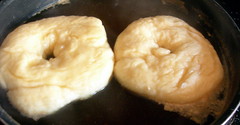
Ah, the water. This was the part I was most nervous about. The bagels are supposed to sink first, and then float, but every single bagel in my first batch was a floater. They turn blobby and fatty and look outrageously disgusting, but I decided to tough it out and try baking them even after they looked like this.
Bagels boiling

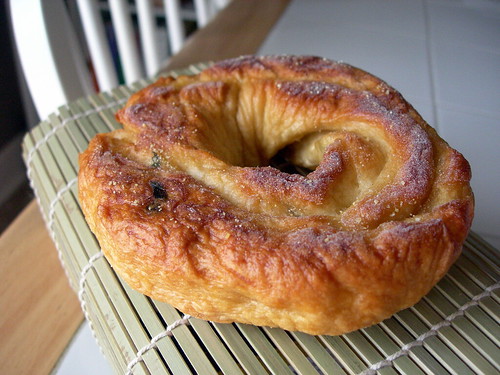
After they are drained on a kitchen towel, they can be baked plain or covered with toppings. I did half and half, and here is the plain:
Plain bagels

You might notice that they do decrease in size in the oven. They actually turned a little flat on me, which was amazing considering the obvious aggression of the yeast. Here is a pic of the poppy seed and sesame seed bagels:
Plain bagels with toppings
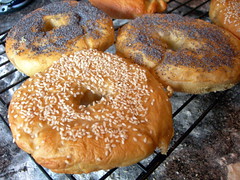
I really liked the flavor of the sesame seed bagels, I have to say.

Over all, I feel my first batch wasn't quite there. They were a little bready and were just huge. Half of them molded before we ate or froze them, unfortunately.

A few weeks later, I decided to try making flavored bagels, and to see if I could improve on the texture. I made a half batch this time. I had cheddar cheese in the fridge and parsley, so that's what I used..... I tend to be a "what's in the fridge" type cook. :)

My goal was to add all of the flour to try to increase their density, but on this particular day the dough would just not accept it. I punched it and forced it but only got 3/4 of the flour into the dough. The same thing happened with the parsley and cheese - not all that I wanted in there made it in.
Side view

I decided based on some feedback from other Daring Bakers to try the rope method with all of them, to try to really punch out some of the air. I was so rough with them, or so I thought, but the bread dough is really resilient.
Cheddar Parsley Bagels

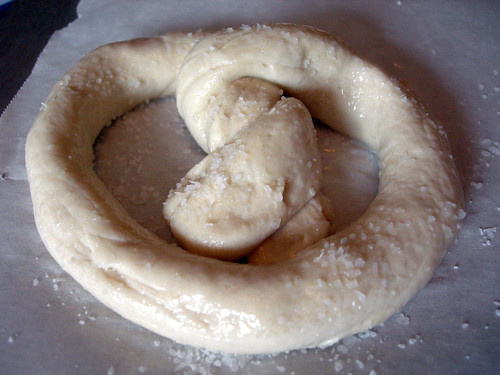
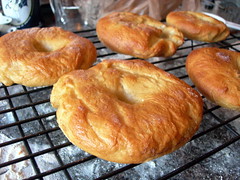
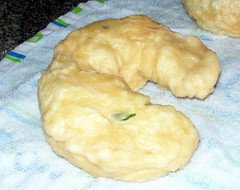
Another thing I decided to do was turn the water up a little more. The directions are a little confusing, because they say the water should be barely moving. But in my first batch I wasn't convinced the water was hot enough. So I turned it up to where I could see more action under the surface, but only to the bagels demise, I think. I ended up with croissant-shaped bagels, which my household now refers to as "croiggels." This particular picture is a croiggel after it has been boiled but before being baked.
Croiggel

So the finished product for this batch was a little more uniform, a little denser, and had a hint of cheese flavor.
Finished product - cheddar parsley bagel

I gave most of these away to co-workers, who said they enjoyed them, which makes me wonder if I might just not be a fan of "authentic" bagels. I guess it happens.

To read more about what the other Daring Bakers did, follow the many links on the side of my blog.

Categories: Bagels, Bread, Daring Bakers, Yeast

Monday, June 25, 2007

Papaya Blueberry Oatmeal Breakfast Cookies

These are adapted from a recipe adapted by my in-laws to turn a breakfast bread into cookies. They travel a lot, and eating cookies in the morning makes sense.

I'll give you the basic recipe, and please realize you can try almost anything with it. The main point is to not use white flour or sugar, use a lot of fruit, and be creative! The texture is a little like baked oatmeal, and I'm trying to make it breadier without adding too many bad things. The oatmeal texture is okay with me, but it might be foreign to you.

Healthy Breakfast Cookies
2 cups oat flour *
1 cup oats
1/4 cup flaxseed meal
2 tsp baking powder
2 tsp assorted ground spices (cinnamon is good, in this I used allspice and cloves)
1/2 tsp salt
8 (ish) medjool dates, pits removed
1 1/2 cups liquid (rice milk, apple juice, soy milk)
2 medium apples (peeled and chopped) **
1/4 cupish molasses ***
2-3 tbsp agave syrup
crunchy things, dried fruit, or fresh fruit

1. Preheat oven to 350 F.
2. In a bowl, combine dry ingredients.
3. In a blender, blend fruits and liquids until smooth.
4. Mix dry ingredients, wet ingredients, and sweeteners to taste. Stir in crunchies. Mixture will be rather moist, but you can add extra oat flour or oats if you're concerned.
5. Make uniform heaps onto parchment paper lined cookie sheets. Bake 30-45 minutes and cool on wire rack.
6. Freeze extra or chill up to 4 days.

* Oat flour is made by grinding up oats, not quick ones, but regular. 2 cups oats = roughly 1 1/2 cups oat flour, so allow for extra
** Papaya was on sale, so I substituted papaya for apple, just about two cups. I would try almost any fruit!
*** I left the molasses out this time, to try for a fruitier cookie. Just experiment!

Here is a picture of the original version made by Al during their visit:
Apple Molasses Breakfast Cookies
They threw in some walnuts and organic chocolate chips.

Here is a picture of some of the weirder ingredients:
Strange ingredients


Categories: Blueberries, Cookies, Papaya, Vegan

Monday, June 18, 2007

Coffee Banana Chocolate Chip Scones

The last time I had bananas sitting around, I decided to try to find a scone recipe that could include them. I also had some random chocolate chips sitting around (white and semisweet).

The original recipe can be found here but since I altered it quite a bit to make it richer, the recipe below is my own version.

Coffee Banana Chocolate Chip Scones

Ingredients:
2 cups flour
4 tsp baking powder
1/2 tsp salt
1/4 cup granulated sugar
1/2 cup butter
1/2 cup mashed ripe banana
1/2 cup heavy cream
2 tsp instant coffee granules
1 tsp vanilla
1 cup miscellaneous baking chips (optional)

Directions:
In large bowl, combine flour, baking powder, salt and sugar. Cut in butter until mixture resembles fine crumbs. Gently heat cream in separate bowl (or glass measuring cup) and stir in instant coffee until dissolved. Stir in vanilla and banana; add to dry mixture, stirring lightly to make a moist dough. Stir in chips (optional).

On lightly floured board, knead dough lightly for about 30 seconds. Roll out dough to 1/2 inch thickness; cut into 3 inch rounds and place on lightly greased baking sheet. Bake in 425 F oven for 15 minutes or until lightly browned. Makes about 10 scones.

Jenny's notes: I used a scone pan for mine, so it made 8 scones. You could also just pat the dough into a circle and cut it into wedges. I used three bananas, so my mixture was a little more moist and the scones had to bake longer because of this.

I used 2/3 cup white chocolate chips and 1/3 cup semisweet chocolate chips, because that's what I had. The next time I make these I will try adding peanut butter chips too because even though there are many many flavors here, peanut butter would have just kicked the entire recipe up to pure heaven.

I feel obligated to say that my husband thought there were too many flavors going on here, and that the flavor was too intense. You could start with half the amount of coffee if you were concerned, but for me, the more flavor the better.

Categories: Banana, Chocolate, Coffee, Scones

Sunday, June 10, 2007

Pretzels


Finished Pretzels
Originally uploaded by watchjennybake.
I can see myself veering away from super sweet stuff to yeasty items. I made my first post about the Daring Bakers two weeks ago, but they've been together longer than I've been a part of them.

Last year one of their challenges was to make pretzels. Recipe can be found here. I can't say enough about these. They were so easy, and so delicious. And perfect with mustard or plain.

As you can see, mine are a bit pale, and I could have used an extra 2-5 minutes, but they were still good. This was the first time this month I wished I had a pastry brush (the last step includes brushing the pretzels with melted butter) but not the last!

This was the first time in a long while I had kneaded dough by hand - probably not since the day the industrial mixer broke down on challah day, back when I worked at a bakery. I had forgotten how great it feels, both during and after, and don't plan on using the silly dough hooks on my mixer again any time soon. I also have a lovely island in my kitchen now which is perfect for kneading and preparing dough.

A picture of them before baking:
Before rising and baking

The only thing I can say about these - I wish I hadn't baked them all at once. They get a little soggy and tough after a day or so, and I could have stopped after the last step before baking, and frozen the dough. At least, that's what I'll try next time unless I'm baking for a crowd.

Categories: Bread, Pretzels, Savory, Yeast

Monday, June 04, 2007

Pie Challenge!

A_Muffin_Story on LJ declared this week pie week! My goal is to make at least three pie type dishes this week, and not all sweet!

I had some leftover diplomat cream from the pastry challenge I did last weekend, and found a banana cream pie recipe that could use it. The recipe was from a cookbook I've had for a while but never tried anything from - the Roselyn's Cookbook. When I lived in Indiana, I heard story after story about Roselyn's - a historic local bakery that had unfortunately closed by the time I lived there, but they had sold recipes and continued selling some of their products under the Roselyn's name.

Banana Cream PieThe banana cream pie is nothing difficult - I used a graham cracker crust, soaked the 3 bananas in pineapple juice, filled the crust with the diplomat cream, topped it with bananas, and put whipped cream on the top.

Banana Cream PieThe piece I took doesn't look pretty (really I should have used a somewhat different cream that would have set up more) but it tasted good!

Hooray for pie week!


Categories: Banana, Cream, Pie