I have this great cookbook called A Baker's Field Guide to Christmas Cookies, and I pick a few recipes out of it to try every year. I've been eyeing the "Yuletide Mocha Orange Patchwork, Pinwheel, and Marbled Cookies" recipe for several years and decided to try it for the first holiday cookies of the 2007 season.
This recipe could be replicated with any combination of flavored, firm sugar cookie dough. This time around in the recipe the orange dough was crumbly - I may have miscounted the flour when I measured, because the mocha dough was perfection.
If you are going to mix up sugar cookies, you might as well make two batches!
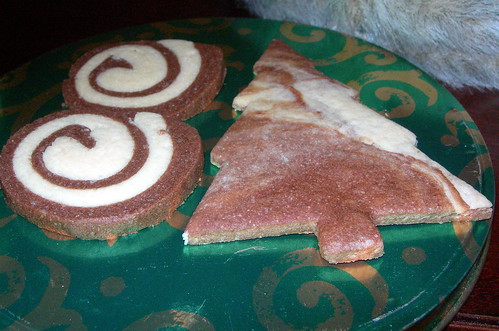
Yuletide Mocha Orange Patchwork, Pinwheel, and Marbled Cookiesfrom A Baker's Field Guide to Christmas CookiesYield: 100 pinwheels or 50 assorted 3- to 4-inch patchwork cookies; yield of marbled cookies varies
Ingredients
Orange dough:3 cups all-purpose flour
1/2 tsp baking soda
1/4 tsp salt
1 cup (2 sticks) unsalted butter, softened
1 cup granulated sugar
2 tsp finely grated orange zest
1 tsp vanilla extract
1 large egg
Mocha dough:2 1/2 cups all-purpose flour
1/2 cup Dutch-processed unsweetened cocoa powder
1/2 tsp baking soda
1/4 tsp salt
1 cup (2 sticks) unsalted butter, softened
1 cup granulated sugar
1 tsp instant espresso or coffee
1 tsp vanilla extract
1 egg
1. For orange dough, whisk flour, baking soda, and salt together in a small bowl. In a large bowl with an electric mixer, beat butter until creamy, about 2 minutes. Add sugar gradually, beating until light and fluffy, about 3 minutes; beat in orange zest and vanilla. Beat in egg. Add about one-third of flour mixture and mix on low speed. Gradually add remaining flour, mixing until just blended. Scrape dough onto large piece of plastic wrap. Use wrap to help shape into a large, flat disc, then cover completely with wrap. Refrigerate until firm enough to roll out, at least 2 hours or overnight.
2. For mocha dough, whisk flour, cocoa, baking soda, and salt together in a small bowl. In a large bowl with an electric mixer on medium-high speed, beat butter until creamy, about 2 minutes. Add sugar gradually, beating until light and fluffy, about 3 minutes. Dissolve instant espresso into vanilla, then beat into dough. Beat in egg. Add about one-third of the flour mixture and mix on low speed. Gradually add remaining flour, mixing until just blended. Scrape dough onto large piece of plastic wrap. Use wrap to help shape into a large, flat disc, then cover completely with wrap. Refrigerate until firm enough to roll out, at least 2 hours or overnight.
3. Line 2 cookie sheets with parchment paper.
4.
For patchwork cookies: Choose two compatible cookie cutters, large and small, such as a large and small star or bell or a large gingerbread person and a small heart. The only absolute is that the small cookie cutter must fit within the larger one with a border of dough all around. Roll both doughs out to 1/4-inch thickness on lightly floured surface. I will use stars as our example: Cut out a large orange star and place on cookie sheet. Cut out a large mocha star and place 2 inches away on the same sheet. Now cut out a small star out of the larger orange star and a small mocha star out of the large mocha star. Place small mocha star inside larger orange star (in void created by removing small orange star) and vice versa. Be as creative as you like, but keep similarly sized cookies on same sheet for even baking times. When pan is filled with cookies, place in freezer for 15 minutes or refrigerator for 30 minutes.
For Pinwheel Cookies:Cut each flavored dough in half. Roll half of orange dough out to 1/4-inch thickness on lightly floured surface to a rectangle about 14x16 inches. Roll half of mocha dough out in the same manner. Place orange dough on top of mocha dough and square off the four sides by trimming with a pizza cutter or sharp knife. Starting at one short end, roll both doughs up together as tightly as possible. Your roll should be about 2 inches in diameter. Carefully cover rolled dough with plastic wrap. Repeat with remaining dough halves. Freeze 30 minutes or refrigerate for 1 hour, until very firm. (Rolls may be frozen at this point for up to 1 month). Trim ends of roll so that spiral design is flat. Cut 1/4-inch-thick slices off roll and place 2 inches apart on cookie sheets.
For Marbled Cookies:Briefly knead all the scraps left from both flavors of dough together to create a marbled effect, roll out as described above, and cut out cookies as you wish; they will look marbled.
5. Preheat oven to 350 degrees F. Bake until dry to touch and edges are just beginning to color, about 12 minutes for cookies 2 inches across. Lift up a cookie; it should lift without breaking, and bottom will be slightly colored. Adjust baking time up or down accordingly if cookies are much smaller or larger. Slide parchment onto racks to cool cookies completely.
Categories:
Chocolate,
Cookies,
Holiday,
Mocha,
Orange