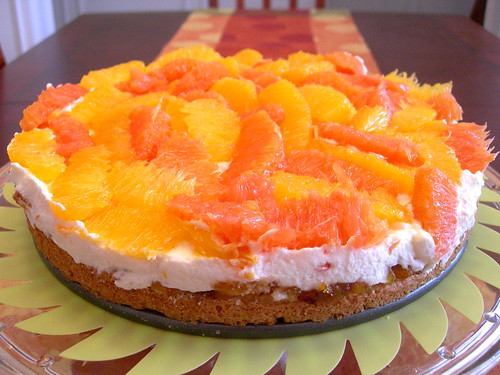
I would like to give myself the award for Officially Not Procrastinating For Once on the Daring Bakers Challenge, as I had this done the first week of March! The 2010 March Daring Baker’s challenge was hosted by Jennifer of Chocolate Shavings. She chose Orange Tian as the challenge for this month, a dessert based on a recipe from Alain Ducasse’s Cooking School in Paris.
From what I understand, a tian can be sweet or savory, and is probably what you are having in a nicer restaurant if it looks like the layers of something were in a ring before you get it. I didn't have enough smaller rings or cookie cutters, so I made it all as one dessert in a springform pan.
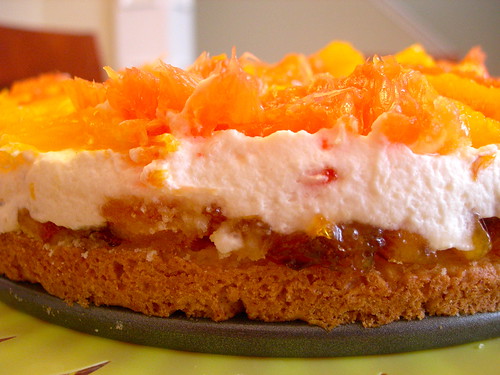
The recipe calls for oranges, and I used a combination of navel and cara cara (also a kind of navel, but pinker in color). The combination was unintentionally striking on the top layer! It looks like grapefruit, but was all sweet and orangey.
My favorite part of this recipe was the chance to make orange marmalade, which I hadn't done before. Of course, the directions said to cook until it reached jam consistency, rather than giving me a number of minutes, and I thought it meant until it was jammy and still HOT. So I ended up scorching some of the orange rind, and the final marmalade was almost a soft candy, but the burnt flavor was actually nice and the rest was good on crackers and toast.
The tian had four layers - the pate sablee crust, which is like a cross between pie crust and sugar cookie, the marmalade, stabilized whipped cream, and the oranges in caramel mixture. Then you drizzle an orange caramel sauce on top. Yes, I said caramel sauce, my old nemesis. It worked out okay this time.
Over all, this was way too sweet for me to want to make it again, but it did look pretty.
Saturday, March 27, 2010
Friday, March 26, 2010
Vegan Baked Goods in San Diego
This was intended to be a fantastic review post of Stephanie's Bakery in San Diego, where I was this last week for the Music Library Association Annual Conference. Unfortunately, despite nothing on their web site to the contrary, and no signage at the bakery itself, they were not open the three different times I tried visiting throughout the week. I hope they are just on vacation, and have a beach-town mentality that doesn't always think to put up a sign, because the idea of a vegan bakery that serves fantastic lunch and dinner sounded amazing! My friend Stephanie, pictured, is not the Stephanie of Stephanie's, but was also disappointed. She is a vegan living in California who has been to Stephanie's before, and was looking forward to going back.
I know this picture is very blurry, but I was delighted to meet a new music librarian who says she has been following JennyBakes for two years or so. I tried whisking her away on a bakery adventure to Stephanie's. We still had fun, but not as much as we would have had if we'd actually had a bakery to review.
There was vegan food to be had in San Diego, even baked goods. I ate several times at the OB People's Food Co-op, with the grocery on the first floor and fantastic deli on the second. I bought their cookbook, so you might see some of their vegan recipes in this blog in the near future. This goddess bar, for instance, was fantastic.
Categories: Bakery, Vegan
Wednesday, March 17, 2010
Cookbook Review - The Whimsical Bakehouse
In the Whimsical Bakehouse by Kaye Hansen and Liv Hansen, you are confronted with page after page of vibrant, whimsical cakes. The recipes seem pretty standard, but what drew me in was the chocolate art. I was intimidated by how beautiful it looked, since Liv is clearly an artist who happens to use chocolate as her medium, but the directions were clear and took away the complexity.
So the cake and frosting and filling recipes - fine. Good, even. But to me, the joy in this book is about working with chocolate, something I have wanted to learn more about.
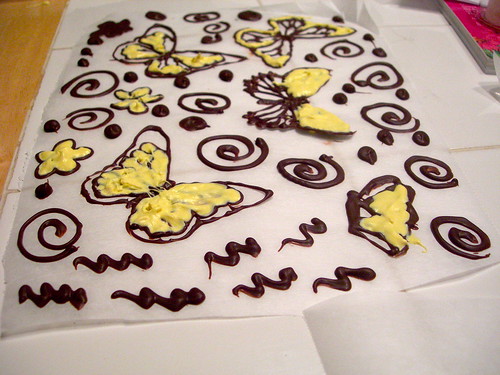
The process starts by outlining images in chocolate. I found some good butterflies online, and drew one freehand. The spirals and squiggles were just done freehand with extra melted chocolate. The examples in the book are far more delicate and intricate than mine, but I was just curious if I could do it at all! Melted chocolate is harder to work with than something like buttercream, because if it is warm enough to flow easily, it is pretty liquidy, and the cooler and thicker it gets, the harder it is to be precise. The book describes an advanced method where brushes are involved, but I found myself just using the brushes to help with the next stage. Maybe next time I can create feathered effects!
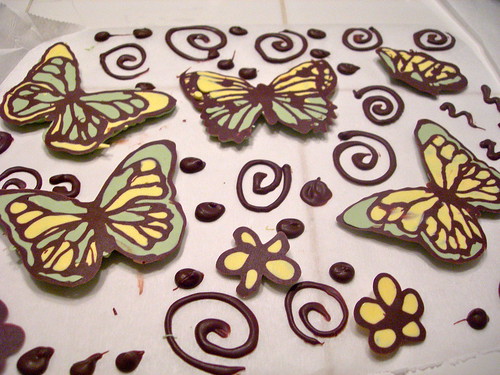
The next step is to use colored white chocolate. For simplicity, I only made yellow and green, but on a week with more time I would have liked more varied butterflies. In the book, Liv also creates almost a watercolor texture with colors that flow into each other within an outlined space, whereas I tended to put one color per outline. It really just creates a difference in style - hers were more realistic, ethereal, and mine are more cartoonish. Cartoonish isn't bad!
After filling in all the spaces and adding extra to the back, the chocolate has already started to harden. Then they can be flipped over and viewed. This technique does create chocolate decorations that have to be used on one side, but the possibilities are endless here.
There are a few questions I had that weren't answered in the text. There weren't really any indications on how far in advance you could assemble the cake, and since all of them were quite intricate, this would have been helpful. I almost waited until the last minute to add the chocolate parts, but that didn't really fit my schedule, so I decided to chance it and iced and decorated the cake the night before. I used their house buttercream, which is made with an interesting recipe that combines boiling water, powdered sugar, and cold butter (I didn't think it could possible come together but it worked great!), and put the chocolate decorations on right after icing the final layer. They stayed through the night in the fridge with no problem, and still seemed rather stable.
I made the golden butter cake, and was surprised that the book did not include any soaking syrups, since butter cakes can be a little dry. At least the one I made was! I suspect I should have split the two layers in half again so there was a higher ratio of filling to cake. I should have made filling but I had so much buttercream that I just used that in the middle - but the filling recipes look amazing.
Another thing I'd say about the recipes is that they aren't for standard cake pan sizes, and I really wish they'd made each one for the same size cake and included recipes on cutting back or increasing them. I made the golden butter cake which is for 10" pans but I only had 9" pans, and some of the others call for 8". I'm not sure the typical home baker would have an entire cupboard of cake pans - I bake a lot, and I certainly don't!
Categories: Cookbook Review, Cake, Buttercream, Chocolate
Sunday, March 14, 2010
Cupcakes vs. Muffins
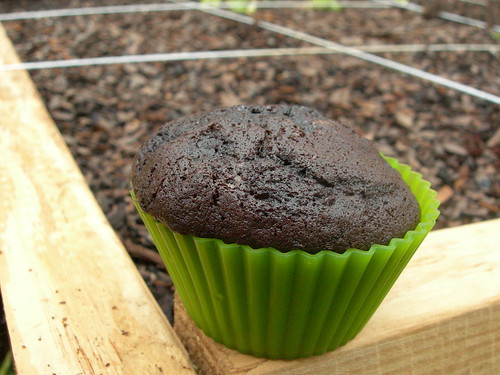
Is there some kind of definitive distinction between cupcakes and muffins? Two recipes I made recently have made me question it. Both were tasty, and that was definitely not the problem. The first is this Cocoa Banana Muffin from The Modern Baker by Nick Malgieri. Chocolatey with banana chunks - for breakfast? Yes please! But really, if I'd slapped some buttercream on the top, what would distinguish it from being a cupcake?
When I was looking for a way to use up the rest of my homemade mascarpone from my tiramisu experiment, I found myself back in The Craft of Baking, making a recipe for carrot cupcakes with mascarpone whipped cream. It was one of those great moments where I had everything on hand for a recipe, and even added some raisins and nuts, both of which seemed awfully muffin-esque. Now... is it because it had frosting that it was a cupcake and not a muffin? I would have eaten that for breakfast. In fact, I brought them into work and handed them out around 9 am.
Does anyone have an answer? I'll keep baking the tasty treats....
Categories: Banana, Bread, Breakfast, Carrot, Chocolate, Cupcake, Muffin, Raisin
Monday, March 01, 2010
Daring Bakers February 2010 - Tiramisu
I know, I know. It is no longer February. I have been catching up on my fun-things to-do list, which also included a bunch of gardening this weekend. So I literally made the elements of tiramisu - lady fingers, mascarpone cheese, zabaglione, pastry cream, and whipped cream - in between gardening ventures, which I now blog about over here. Trust me, I know even less about gardening than I do baking, so if you have any advice to give, hop on over. (For instance, it could snow - what should I do for the spinach and lettuce I planted? Ah, crazy weather).
Back to tiramisu. The February 2010 Daring Bakers’ challenge was hosted by Aparna of My Diverse Kitchen and Deeba of Passionate About Baking. They chose Tiramisu as the challenge for the month. Their challenge recipe is based on recipes from The Washington Post, Cordon Bleu at Home and Baking Obsession.
Included in the challenge was that everything had to be made from scratch, including the lady fingers (savoiardi) and mascarpone cheese. I've made tiramisu before, although not such a complicated recipe, so I was honestly the most excited about making cheese from scratch, something I've never done! First I had to hunt down cheesecloth, and I had some funny phone conversations with people working at various grocery stories until I found some at a craft store. It seemed essential, and I'm glad I bought it since it was pretty liquidy before it cooled. I actually got to a point in the recipe where I'd already cooked it twice as long as it said and it wasn't getting any thicker, so I called it good and thought I'd see what happened.
I loved how it turned out - thick, spreadable, soft - I now have almost a cup left over, and would love suggestions for how to use it! I will never buy mascarpone at the store again. This was probably 1/4 of the cost to do it this way, and simple.
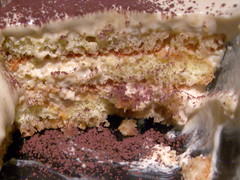
Ultimately I was unhappiest with the filling. It was made of four components - the mascarpone, whipped cream, the zabaglione, and the pastry cream. It was pretty soft when I layered it with the lady fingers, but I was hopeful that it would set up. Maybe it isn't supposed to entirely in "real" tiramisu, but I just feel like I must have done something wrong. WIth all the variables and my complete and utter last-minuteness (actually overdueness at this point!) I didn't have time to retrace my steps. I'd hate to think it was something as simple as underbeating the whipped cream.
During one of the stages, I think when I made the zabaglione and pastry cream, Sleepless in Seattle was on the television. If you know the movie enough, you probably know what comes next, but probably the best movie quotation about tiramisu ever:
Sam Baldwin: What is "tiramisu"?
Jay: You'll find out.
Sam Baldwin: Well, what is it?
Jay: You'll see!
Sam Baldwin: Some woman is gonna want me to do it to her and I'm not gonna know what it is!
A few years back, I had developed a chocolate tiramisu recipe based on the cheater recipe we used at the tearoom where I worked (it involved pudding, cream cheese, and pound cake, be very afraid). I hope I can track it down because this entire venture has made me really want to make that again. Until next time....
ETA: Adding recipe in this space to compensate for disappearing blogs!
Homemade Mascarpone Cheese
(Recipe from Baking Obsession)
Makes about 12 oz
Ingredients:
Bring 1 inch of water to a boil in a wide skillet. Reduce the heat to medium-low so the water is barely simmering. Pour the cream into a medium heat-resistant bowl, then place the bowl into the skillet. Heat the cream, stirring often, to 190 F. It will take about 15 minutes of delicate heating. Add the lemon juice and continue heating the mixture, stirring gently, until the cream curdles. Do not expect the same action as you see during ricotta cheese making. All that the whipping cream will do is become thicker, like a well-done crème anglaise. It will cover a back of your wooden spoon thickly. You will see just a few clear whey streaks when you stir. Remove the bowl from the water and let cool for about 20 minutes. Meanwhile, line a sieve with four layers of dampened cheesecloth and set it over a bowl. Transfer the mixture into the lined sieve. Do not squeeze the cheese in the cheesecloth or press on its surface (be patient, it will firm up after refrigeration time). Once cooled completely, cover with plastic wrap and refrigerate (in the sieve) overnight or up to 24 hours.
LADYFINGERS / SAVOIARDI BISCUITSRecipe from Cordon Bleu At Home)
This recipe makes approximately 24 big ladyfingers or 45 small (2 1/2″ to 3″ long) ladyfingers.
Ingredients:
3 eggs, separated
6 tablespoons /75gms granulated sugar
3/4 cup/95gms cake flour, sifted (or 3/4 cup all purpose flour + 2 tbsp corn starch)
6 tablespoons /50gms confectioner’s sugar,
Method:
Preheat your oven to 350 F (175 C) degrees, then lightly brush 2 baking sheets with oil or softened butter and line with parchment paper.
Beat the egg whites using a hand held electric mixer until stiff peaks form. Gradually add granulate sugar and continue beating until the egg whites become stiff again, glossy and smooth.
In a small bowl, beat the egg yolks lightly with a fork and fold them into the meringue, using a wooden spoon. Sift the flour over this mixture and fold gently until just mixed. It is important to fold very gently and not overdo the folding. Otherwise the batter would deflate and lose volume resulting in ladyfingers which are flat and not spongy.
Fit a pastry bag with a plain tip (or just snip the end off; you could also use a Ziploc bag) and fill with the batter. Pipe the batter into 5″ long and 3/4″ wide strips leaving about 1″ space in between the strips.
Sprinkle half the confectioner’s sugar over the ladyfingers and wait for 5 minutes. The sugar will pearl or look wet and glisten. Now sprinkle the remaining sugar. This helps to give the ladyfingers their characteristic crispness.
Hold the parchment paper in place with your thumb and lift one side of the baking sheet and gently tap it on the work surface to remove excess sprinkled sugar.
Bake the ladyfingers for 10 minutes, then rotate the sheets and bake for another 5 minutes or so until the puff up, turn lightly golden brown and are still soft.
Allow them to cool slightly on the sheets for about 5 minutes and then remove the ladyfingers from the baking sheet with a metal spatula while still hot, and cool on a rack.
Store them in an airtight container till required. They should keep for 2 to 3 weeks.
Categories: Cheese, Custard, Daring Bakers
Back to tiramisu. The February 2010 Daring Bakers’ challenge was hosted by Aparna of My Diverse Kitchen and Deeba of Passionate About Baking. They chose Tiramisu as the challenge for the month. Their challenge recipe is based on recipes from The Washington Post, Cordon Bleu at Home and Baking Obsession.
Included in the challenge was that everything had to be made from scratch, including the lady fingers (savoiardi) and mascarpone cheese. I've made tiramisu before, although not such a complicated recipe, so I was honestly the most excited about making cheese from scratch, something I've never done! First I had to hunt down cheesecloth, and I had some funny phone conversations with people working at various grocery stories until I found some at a craft store. It seemed essential, and I'm glad I bought it since it was pretty liquidy before it cooled. I actually got to a point in the recipe where I'd already cooked it twice as long as it said and it wasn't getting any thicker, so I called it good and thought I'd see what happened.
I loved how it turned out - thick, spreadable, soft - I now have almost a cup left over, and would love suggestions for how to use it! I will never buy mascarpone at the store again. This was probably 1/4 of the cost to do it this way, and simple.
Ultimately I was unhappiest with the filling. It was made of four components - the mascarpone, whipped cream, the zabaglione, and the pastry cream. It was pretty soft when I layered it with the lady fingers, but I was hopeful that it would set up. Maybe it isn't supposed to entirely in "real" tiramisu, but I just feel like I must have done something wrong. WIth all the variables and my complete and utter last-minuteness (actually overdueness at this point!) I didn't have time to retrace my steps. I'd hate to think it was something as simple as underbeating the whipped cream.
During one of the stages, I think when I made the zabaglione and pastry cream, Sleepless in Seattle was on the television. If you know the movie enough, you probably know what comes next, but probably the best movie quotation about tiramisu ever:
Sam Baldwin: What is "tiramisu"?
Jay: You'll find out.
Sam Baldwin: Well, what is it?
Jay: You'll see!
Sam Baldwin: Some woman is gonna want me to do it to her and I'm not gonna know what it is!
A few years back, I had developed a chocolate tiramisu recipe based on the cheater recipe we used at the tearoom where I worked (it involved pudding, cream cheese, and pound cake, be very afraid). I hope I can track it down because this entire venture has made me really want to make that again. Until next time....
ETA: Adding recipe in this space to compensate for disappearing blogs!
Homemade Mascarpone Cheese
(Recipe from Baking Obsession)
Makes about 12 oz
Ingredients:
- 500 ml whipping (36 %) pasteurized (not ultra-pasteurized), preferably organic cream
- 1 tbsp fresh lemon juice
Bring 1 inch of water to a boil in a wide skillet. Reduce the heat to medium-low so the water is barely simmering. Pour the cream into a medium heat-resistant bowl, then place the bowl into the skillet. Heat the cream, stirring often, to 190 F. It will take about 15 minutes of delicate heating. Add the lemon juice and continue heating the mixture, stirring gently, until the cream curdles. Do not expect the same action as you see during ricotta cheese making. All that the whipping cream will do is become thicker, like a well-done crème anglaise. It will cover a back of your wooden spoon thickly. You will see just a few clear whey streaks when you stir. Remove the bowl from the water and let cool for about 20 minutes. Meanwhile, line a sieve with four layers of dampened cheesecloth and set it over a bowl. Transfer the mixture into the lined sieve. Do not squeeze the cheese in the cheesecloth or press on its surface (be patient, it will firm up after refrigeration time). Once cooled completely, cover with plastic wrap and refrigerate (in the sieve) overnight or up to 24 hours.
TIRAMISU
Recipe source: Carminantonio’s Tiramisu from The Washington Post, July 11 2007 )
This recipe makes 6 servings
Ingredients:
For the zabaglione:
2 large egg yolks
3 tablespoons sugar/50gms
1/4 cup/60ml Marsala wine (or port or coffee)
1/4 teaspoon/ 1.25ml vanilla extract
1/2 teaspoon finely grated lemon zest
For the vanilla pastry cream:
1/4 cup/55gms sugar
1 tablespoon/8gms all purpose flour
1/2 teaspoon finely grated lemon zest
1/2 teaspoon/ 2.5ml vanilla extract
1 large egg yolk
3/4 cup/175ml whole milk
For the whipped cream:
1 cup/235ml chilled heavy cream (we used 25%)
1/4 cup/55gms sugar
1/2 teaspoon/ 2.5ml vanilla extract
To assemble the tiramisu:
2 cups/470ml brewed espresso, warmed
1 teaspoon/5ml rum extract (optional)
1/2 cup/110gms sugar
1/3 cup/75gms mascarpone cheese
36 savoiardi/ ladyfinger biscuits (you may use less)
2 tablespoons/30gms unsweetened cocoa powder
Method:
For the zabaglione:
Heat water in a double boiler. If you
don’t have a double boiler, place a pot with about an inch of water in
it on the stove. Place a heat-proof bowl in the pot making sure the
bottom does not touch the water.
In a large mixing bowl (or stainless
steel mixing bowl), mix together the egg yolks, sugar, the Marsala (or
espresso/ coffee), vanilla extract and lemon zest. Whisk together until
the yolks are fully blended and the mixture looks smooth.
Transfer the mixture to the top of a
double boiler or place your bowl over the pan/ pot with simmering water.
Cook the egg mixture over low heat, stirring constantly, for about 8
minutes or until it resembles thick custard. It may bubble a bit as it
reaches that consistency.
Let cool to room temperature and
transfer the zabaglione to a bowl. Cover and refrigerate at least 4
hours or overnight, until thoroughly chilled.
For the pastry cream:
Mix together the sugar, flour, lemon
zest and vanilla extract in a medium heavy-bottomed saucepan. To this
add the egg yolk and half the milk. Whisk until smooth.
Now place the saucepan over low heat and cook, stirring constantly to prevent the mixture from curdling.
Add the remaining milk a little at a
time, still stirring constantly. After about 12 minutes the mixture will
be thick, free of lumps and beginning to bubble. (If you have a few
lumps, don’t worry. You can push the cream through a fine-mesh
strainer.)
Transfer the pastry cream to a bowl
and cool to room temperature. Cover with plastic film and refrigerate at
least 4 hours or overnight, until thoroughly chilled.
For the whipped cream:
Combine
the cream, sugar and vanilla extract in a mixing bowl. Beat with an
electric hand mixer or immersion blender until the mixture holds stiff
peaks. Set aside.
To assemble the tiramisu:
Have ready a rectangular serving dish (about 8″ by 8″ should do) or one of your choice.
Mix together the warm espresso, rum extract and sugar in a shallow dish, whisking to mix well. Set aside to cool.
In a large bowl, beat the mascarpone
cheese with a spoon to break down the lumps and make it smooth. This
will make it easier to fold. Add the prepared and chilled zabaglione and
pastry cream, blending until just combined. Gently fold in the whipped
cream. Set this cream mixture aside.
Now to start assembling the tiramisu.
Workings quickly, dip 12 of the
ladyfingers in the sweetened espresso, about 1 second per side. They
should be moist but not soggy. Immediately transfer each ladyfinger to
the platter, placing them side by side in a single row. You may break a
lady finger into two, if necessary, to ensure the base of your dish is
completely covered.
Spoon one-third of the cream mixture
on top of the ladyfingers, then use a rubber spatula or spreading knife
to cover the top evenly, all the way to the edges.
Repeat to create 2 more layers, using
12 ladyfingers and the cream mixture for each layer. Clean any spilled
cream mixture; cover carefully with plastic wrap and refrigerate the
tiramisu overnight.
LADYFINGERS / SAVOIARDI BISCUITSRecipe from Cordon Bleu At Home)
This recipe makes approximately 24 big ladyfingers or 45 small (2 1/2″ to 3″ long) ladyfingers.
Ingredients:
3 eggs, separated
6 tablespoons /75gms granulated sugar
3/4 cup/95gms cake flour, sifted (or 3/4 cup all purpose flour + 2 tbsp corn starch)
6 tablespoons /50gms confectioner’s sugar,
Method:
Preheat your oven to 350 F (175 C) degrees, then lightly brush 2 baking sheets with oil or softened butter and line with parchment paper.
Beat the egg whites using a hand held electric mixer until stiff peaks form. Gradually add granulate sugar and continue beating until the egg whites become stiff again, glossy and smooth.
In a small bowl, beat the egg yolks lightly with a fork and fold them into the meringue, using a wooden spoon. Sift the flour over this mixture and fold gently until just mixed. It is important to fold very gently and not overdo the folding. Otherwise the batter would deflate and lose volume resulting in ladyfingers which are flat and not spongy.
Fit a pastry bag with a plain tip (or just snip the end off; you could also use a Ziploc bag) and fill with the batter. Pipe the batter into 5″ long and 3/4″ wide strips leaving about 1″ space in between the strips.
Sprinkle half the confectioner’s sugar over the ladyfingers and wait for 5 minutes. The sugar will pearl or look wet and glisten. Now sprinkle the remaining sugar. This helps to give the ladyfingers their characteristic crispness.
Hold the parchment paper in place with your thumb and lift one side of the baking sheet and gently tap it on the work surface to remove excess sprinkled sugar.
Bake the ladyfingers for 10 minutes, then rotate the sheets and bake for another 5 minutes or so until the puff up, turn lightly golden brown and are still soft.
Allow them to cool slightly on the sheets for about 5 minutes and then remove the ladyfingers from the baking sheet with a metal spatula while still hot, and cool on a rack.
Store them in an airtight container till required. They should keep for 2 to 3 weeks.
Categories: Cheese, Custard, Daring Bakers
Subscribe to:
Posts (Atom)