Monday, January 27, 2020

Hippy Banana Bread from Shutterbean

I came across this recipe following a link to pickled carrots. Ah, the internet. What I loved about this one is how it invites substitution - while the original calls for sunflower seeds, pepitas, nuts, and dried cherries, I used a combination of things I had on hand and needed to use up from the pantry, and it was still a success! I can imagine going a chocolate direction as well.


Hippy Banana Bread
(recipe from Shutterbean)

makes 1 loaf
  • 1 cup all-purpose flour
  • 1/2 cup almond flour
  • 1 teaspoon baking soda
  • 1 teaspoon salt
  • 1/4 teaspoon ground cinnamon
  • 1/2 cup olive oil
  • 1/2 cup brown sugar, packed
  • 1/4 cup maple syrup*
  • 1 1/2 teaspoons pure vanilla extract
  • 2 eggs
  • 3 ripe bananas, mashed (about 1 cup puree)
  • 1/2 cup chopped walnuts
  • 1/2 cup dried cherries*
  • 1/2 cup raw sunflower seeds*
  • 1/2 cup raw pepitas
Preheat oven to 350F. Butter an 8 x 4 inch loaf pan. Line pan with a sling of parchment paper, with the long sides overhanging. Lightly butter the parchment, then set the pan aside.

Whisk together the flours, baking soda, salt and spices in a medium bowl. Set aside.

In a large bowl, whisk together the olive oil and brown sugar, breaking up any lumps. Add the maple syrup and vanilla, whisking until smooth. Add the eggs, one at a time and beat until fully incorporated. With a wooden spoon, stir in the bananas. Add the flour mixture to the liquids, stirring until just combined. Stir in the walnuts, cherries, sunflower seeds and pepitas until fully incorporated. Pour batter into prepared pan, evening out the top if necessary.

Place bread in the oven and bake until cake tester inserted in the middle of the loaf comes out clean, about 55-60 minutes. Remove from the oven, and leave the bread to cool in its pan for 10 minutes. Using the parchment sling, lift the bread out of the pan, unwrap and allow to cool completely on a wire rack.

Notes from JennyBakes:

I ran out of maple syrup so I ended up using 2 tbsp maple syrup and 2 tbsp dark Karo syrup.

I used dried orange-scented cranberries instead of cherries, because I had leftovers from the holidays.

I used shredded coconut instead of sunflower seeds because I had it on hand.

I did use walnuts and pepitas, because I happened to have them...
 

Monday, January 20, 2020

Happy Wife, Happy Life Chocolate Cake

On Episode 171 of the Reading Envy Podcast, I spoke with Jen Nathan Orris about foodie recommendations - cookbooks, memoirs, and more. She brought up Julia Turshen, cookbook author and recipe developer extraordinaire, and recommended all of her cookbooks, particularly Small Victories. Julia actually appeared on Jen's podcast, Skillet, where she cooked Chicken Pelau. (I would later discover Turshen also has her own podcast called Keep Calm and Cook On, which is on brand for her reputation of making cooking accessible.)

I am always excited when I learn about an author or cook (or both) who I haven't heard of before, because it gives me an excuse to dive into something new. So of course I listened to the podcasts and hunted down the cookbooks. I would actually love to try making the chicken pelau at some point, because I am still feeling a bit tentative about cooking chicken and it has some unique techniques like starting with burned sugar. 


I'm not sure if this happens to anyone else, but sometimes I will encounter a recipe in a blog, Instagram post, or cookbook, and it will stick with me. When I'm thinking of my grocery shopping lists it will come to mind again, and I'll make sure I have the ingredients in case I feel inspired to make it. This cake is one Turshen makes for her wife. I was intrigued by the simplicity of the recipe and the strange (to me) ingredients in the frosting. I liked that it tasted better cold. The combination of chocolate and raspberry probably moved it up a few notches. And then when I needed to bake something to burn off some nervous energy, this was the thing. My husband was called home to Oregon at the last minute, and I must admit I've been eating this cake for breakfast (but you know, happy wife and all that.)


Happy Wife, Happy Life Chocolate Cake
from Small Victories by Julia Turshen

Cake:

1 1/4 cups (150 g) all purpose flour
1 cup (200 g) sugar
3/4 cup (75 g) Dutch-processed cocoa powder (such as Guittard or Droste, sifted if lumpy)
1 tsp baking soda
1 tsp baking powder
1/2 tsp kosher salt
8 Tbsp (110 g) unsalted butter, melted and cooled
2 eggs, lightly beaten
1 cup (240 ml) strong black coffee, at room temperature
1 cup (240 ml) buttermilk or plain yogurt
1 tsp vanilla extract

Frosting:

3/4 cup (130 g) semisweet chocolate chips or roughly chopped semisweet chocolate
3/4 cup (180 ml) sour cream, at room temperature
1 Tbsp maple syrup
1/2 cup (160 g) raspberry jam (seeded or seedless, whatever your preference)

Raspberries for serving (optional)

To make the cake: Preheat your oven to 350 F (180 C). Use your hands to butter the bottom and sides of two 8-inch (20-cm) cake pans, then line the bottom of each with a circle of parchment paper. For good measure, butter the parchment paper. Set the pans aside.

In a large bowl, whisk together the flour, sugar, cocoa powder, baking soda, baking powder, and salt. Add the melted butter, eggs, coffee, buttermilk, and vanilla and whisk until the batter is smooth. Divide the batter evenly among the prepared cake pans.

Bake until the cakes are firm to the touch and a toothpick inserted in the centers comes out clean, about 30 minutes. Transfer the cakes, still in their pans, to a wire rack and let them cool completely. Once cool, use a dinner knife to loosen the edges of the cakes from the pans and invert them onto your work surface (you might need to give the pan a little whack). Peel off and discard the parchment.

To make the frosting: Meanwhile, bring a small pot of water to a boil and then lower the heat to a simmer. Put the chocolate chips in a large stainless steel or heatproof glass bowl and set it over the pot (the water should not touch the bowl - if it does, simply pour some out). Stir until the chocolate is melted. (Alternatively, you can melt the chocolate in a microwave in 15-second increments, stirring between increments.) Remove from the heat and whisk in the sour cream and maple syrup. The frosting should be smooth and quite silky. Refrigerate the frosting until the cakes have cooled. It will thicken as it cools (a good thing).

Once the cakes are cool, put one on a serving platter upside-down so that the flat side is facing up. Spread the jam over the top. Put the second cake on top of the jam-slathered cake, again flat-side up—this way you get a nice flat top. (If the jam makes the layers slip and slide a bit, use a couple of skewers to hold the layers together while you frost the sides and then remove the skewers to frost the top). Using a small offset spatula or a dinner knife, spread the frosting all over the sides and top of the cake. There’s no need to be perfect with this; I like it kind of rustic looking. But if you’re more of a type-A person, go ahead and smooth the top and sides (and you could even stick strips of parchment paper under the bottom of the cake before frosting it to keep your serving platter clean). Whatever makes you happy.

Let the cake sit for about 1 hour before serving. There’s something about letting each element get to know the others that serves this cake very well. In fact, I prefer to make it the day before and refrigerate it overnight, and serve it cold. Either way, slice and serve with some fresh raspberries alongside if you’d like.

Note: If you only own a single cake pan, fear not! Simply pour the batter into the pan and bake it until a toothpick tests clean (it will take 10 to 15 minutes longer in the oven than the two separate layers). Once the cake cools completely, use a serrated knife to cut it into two layers. VoilĂ .  

Notes from JennyBakes:

I don't have a lot to say because the recipe is solid. I did specifically look for Dutch-processed cocoa at the store and even in the 21st century, I'd have to go to a specialty place for it, so I just went with a combination of the last of the Ecuadorian cocoa powder from Libby and the Ghiradelli I had in the cupboard. And it was fine. I also didn't wait for the coffee to cool and only quick thinking with the buttermilk saved my eggs from curdling, but all told this is a pretty forgiving recipe. The frosting was such an interesting texture from the start, and the tang of the sour cream is amazing with the raspberry.   

Monday, January 13, 2020

Save-the-Day Spinach Pie

One of my goals for this year is to get better about weekday dinners, and to learn more recipes that might be palatable for younger eaters. I was poking around the internet and found a recommendation for Every Day is Saturday: Recipes + Strategies for Easy Cooking, Every Day of the Week by Sarah Copeland. This recipe is in the "Projects" section because it's just as easy to make two at once, and then you will have made an extra! I like the unusual sections in this cookbook because it's based on type of meal or rather need like quick dinners, last minute friends, etc.

I made a few mistakes with this recipe but I don't think they mattered to the final taste, but it's definitely not as pretty as the one in the cookbook! I'll add some notes at the end to talk about what I could have done better.


Save-the-Day Spinach Pie
(recipe from Sarah Copeland) 

Serves: 8

Ingredients:

30 oz frozen spinach, thawed
½ cup (1 stick) unsalted butter
1 small yellow onion, finely chopped
2 cups whole-milk ricotta cheese
4 large eggs, lightly beaten
⅓ cup crumbled feta cheese
3 tbsp chopped fresh dill
Juice of 1 lemon
1 tsp fine sea salt
¼ tsp freshly ground black pepper
8 sheets frozen phyllo dough, thawed

Preheat the oven to 375 F.

Set the spinach in a colander to drain while you prepare the remaining ingredients, then place it in the center of a large, sturdy dish towel. Squeeze out as much moisture as you can. (If you wash the towel shortly after, the color won’t stain.)

Heat a large pan over medium heat. Melt the butter, and pour off and reserve about 5 tbsp.* Add the onion to the skillet and cook until soft but not brown, about 5 minutes. Transfer to a bowl with the squeezed spinach, and add the ricotta, eggs, feta, dill (If using), lemon juice, salt, and pepper.

Brush a 9x11 inch baking pan with some of the reserved melted butter. Lay the two first sheets of phyllo side by side in the bottom of the pan to cover it and come 1 inch up the sides; brush with butter. Continue with another two sheets of phyllo right on top, layering them slightly overlapping to cover the bottom and up the sides (so far, you’ve used four sheets.) Add the spinach mixture and spread into an even layer. Lay two more sheets of phyllo side by side on top, to cover the entire filling, and brush with butter. Tuck the sides of the phyllo over the top, and layer the two remaining sheets of phyllo on top. Brush with the remaining butter.

Bake until the phyllo is cooked through, shiny, and golden brown, 40 to 45 minutes. Remove and let cool until just warm to the touch before cutting. Cut into 9 or 12 pieces and serve warm or at room temperature. Refrigerate any leftovers in an airtight container for up to 3 days.

DOUBLE UP
One pan is a great start, but two pans of spinach pie will have you set for one hot meal, plus packable lunches and late-day snacks. Cool one pan completely and freeze, well wrapped (in plastic wrap and foil, right in the pan), for up to 2 weeks. To eat, bring to room temperature first, then warm in a hot oven for 5 minutes.

Notes from JennyBakes: Thawing the spinach and phyllo requires some thinking ahead and this makes this recipe more challenging (I know I need to do better at planning!) Making a double batch makes sense, maybe one in a disposable pan, because otherwise you just throw phyllo away.

Phyllo is tricky; you need to keep a damp towel on top of it every second you aren’t working with it directly. It’s ridiculous to melt all the butter in the pan only to pour and measure it out. I melted 3 tbsp in the pan (and that’s probably too much for one small onion!) and 5 tbsp in a ramekin for the assembly.

I might use nonstick spray for everything except the top next time, since the filling has so much fat already and it would assemble more quickly.

And I should have baked this about 5 more minutes!

Monday, January 06, 2020

Spoon Cookies (Lusikkaleivat)

I've had this recipe pinned for a while but finally made them before the holidays. They are called spoon cookies because of the unique way they are shaped - using a regular or teaspoon. I'm not sure if the traditional Finnish uses browned butter, but this one does, and made the cookies extra tasty. If you recall the chocolate cherry trifle of last week, I had some cherry jam leftover, and it was perfect in these.

Here is a picture of the cookies after shaping but before baking:


And here they are after baking, sandwiching, and sprinkling with powdered sugar:


Spoon Cookies
(Recipe courtesy of FoodNetwork)

Ingredients:

1 cup (2 sticks) unsalted butter
2 cups all-purpose flour
3/4 teaspoon baking powder
Pinch fine salt
1 large egg yolk
3/4 cup sugar
1 tablespoon pure vanilla extract
1/4 to 1/3 cup jam, such as a berry, plum or cloudberry
Confectioners' sugar, for dusting

  1. Preheat the oven to 325 degrees F. Line 2 baking sheets with parchment paper or silicone baking mats.
  2. Melt the butter in a small, heavy-bottomed saucepan over medium heat. Continue to cook, swirling the pan occasionally, until the butter browns lightly and smells slightly nutty, about 15 minutes. Transfer the butter to a medium bowl -- be sure to get all the tasty brown bits -- and cool slightly.
  3. Meanwhile, whisk the flour, baking powder and salt in another medium bowl.
  4. Whisk the egg yolk, sugar and vanilla into the cooled browned butter.
  5. Stir the dry ingredients into the butter mixture to make a uniform but crumbly dough that looks like wet sand.
  6. Scoop out dough with a small teaspoon (the kind you set the table with, not the ones you measure with). Rock spoon gently back and forth against the side of the bowl, packing the dough into the spoon, then scrape/slide the spoon against the inside of the bowl to make spoon-shaped cookies. Trim excess dough with your fingers and slide out onto the prepared pans, preserving their shape. (Try to make sure you form an even number of cookies, since these sandwich together.)
  7. Bake cookies until just browned, about 12 to 15 minutes. Cool almost completely on the baking sheets, and then transfer cookies to a rack to cool.
  8. When cool, spread 1/2 teaspoon jam on the flat side of a cookie, and then sandwich together with a second cookie. Repeat until all cookies have met their match. Lightly dust the cookies with the confectioners' sugar. Serve.
  9. Busy baker's tips: The dough can be prepared several hours ahead and stored at room temperature. Freeze baked cookie halves wrapped tightly in plastic wrap, followed by aluminum foil for up to 2 weeks. When ready to serve, defrost at room temperature and assemble as desired. Store sandwiches in an airtight container for up to 3 days. Do not store with crisp cookies, as moisture from the jam will soften the texture of other crisp cookies.

Monday, December 30, 2019

Top JennyBakes Recipes in 2019

This list is based on my own opinion, not necessarily by popularity of the post.
  1. Lacy Brown Butter and Ricotta Cookies (from Stella Parks @bravetart in Instagram)
  2. Peanut Butter (and Chocolate) Chess Pie (from South by Sean Brock) 
  3. Flourless Chocolate Walnut Cookies
  4. Lemon Ricotta Pancakes with Blueberry Syrup (from The Bacon Bible)
  5. "Featherlite" Pancakes (from Rosa Parks via the National Archives)
  6. Chocolate Chunk Cookies (from Genuine Pizza)
  7. Chocolate Sheet Cake with Whipped Salted Caramel Ganache Frosting (from Edd Kimber @theboywhobakes on Instagram)
  8. Orange Honey Cake (from Icing on the Cake)
  9. Brown Butter Blondies
  10. Pumpkin Tea Cake (from Tartine)
You know a recipe is good when you repeat it. I've made #9 at least three times this year.

I liked #7 and then went and made a different cake for my birthday, one I threw away without even finishing the first piece! Boo.

This was my last year with the Abrams Dinner Party, and recipes #4, 6, and 8 came from cookbooks they sent my way. 

Chocolate Cherry Trifle

I was wandering Lidl or Aldi and came across a large jar of sour cherries, and it brought to mind this ancient recipe of Nigella Lawson's show where she makes a chocolate cherry trifle, in her inviting, no stress way of making the viewer feel they can cook or bake just as easily as she can! (You can see that original video and see what I mean.) The unfortunate thing in my household is that I'm the only person who loves cherries, so I knew I'd need to make it for the annual library holiday lunch. I feel like it was a good choice; I saw a few people go back for seconds.


Nigella buys small chocolate pound cakes from the store but I didn't have that option; I did however have an aging chocolate cake mix in the pantry, and made this pound cake recipe using it as the base. It was just fine and worked well. A few notes at the end of this post about other differences I picked up along the way.


Chocolate Cherry Trifle

Ingredients:

2 (approximately 12 ounces each) chocolate pound cakes
1/2 cup black cherry jam
1/2 cup cherry brandy
2 cups drained bottled sour cherries (recommended: Morello)
Custard:
4 ounces bittersweet chocolate, minimum 70 percent cocoa solids, chopped
1 1/3 cups plus 1 tablespoon milk
1 1/3 cups plus 1 tablespoon heavy cream
8 egg yolks
1/2 cup plus 1 tablespoon sugar
1/3 cup cocoa
Topping:
3 cups heavy cream
1-ounce bittersweet chocolate
Special Equipment: Large wide trifle bowl

Directions

  1. Slice the chocolate pound cake and make jam sandwiches with the cherry jam, and layer the bottom of a large wide trifle bowl. Pour over the cherry brandy so that the cake soaks it up, and then top with the drained cherries. Cover with plastic wrap and leave to macerate while you make the custard.
  2. Melt the chocolate on low to medium heat in the microwave, checking after 2 minutes, though it will probably need 4 minutes. Or you can place it in a bowl over a pan of simmering water. Once the chocolate is melted, ser aside while you get on with the custard.
  3. In a saucepan warm the milk and cream. Whisk the egg yolks, sugar, and cocoa in a large bowl. Pour the warm milk and cream into the bowl whisking it into the yolks and sugar mixture. Stir in the melted chocolate, scraping the sides well with a rubber spatula to get all of it in, and pour the custard back into the rinsed saucepan. Cook over a medium heat until the custard thickens, stirring all the time. Make sure it doesn't boil, as it will split and curdle. Keep a sink full of cold water so that if you get scared you can plunge the bottom of the custard pan into the cold water and
  4. whisk like mad, which will avert possible crisis.
  5. The custard will get darker as it cooks and the flecks of chocolate will melt once the custard has thickened. And you do need this thick, so don't panic so much that you stop cooking while it is still runny. Admittedly, it continues to thicken as it cools and also when it's chilling in the refrigerator. Once it is ready, pour into a bowl to cool and cover the top of the custard with cling wrap to prevent a skin from forming.
  6. When the custard is cold, pour and spread it over the chocolate cake layer in the trifle bowl, and leave in the refrigerator to set, covered in plastic wrap overnight.
  7. When you are ready to decorate, softly whip the cream for the topping and spread it gently over the layer of custard. Grate the chocolate over the top. 
Notes from JennyBakes:

The custard made me nervous and I feel I undercooked it, but I was worried from this recipe that it would get too thick or burned. I sure wish they included a temperature!

I added a little powdered sugar to the whipped cream because I felt strange adding it unsweetened.

Since this was a daytime function, I replaced the cherry brandy with the cherry juice from the canned cherries, but did put 2 tbsp of kirsch to make up the 1/2 cup. This way there was plenty of flavor but not an overwhelming amount of alcohol.

Monday, December 23, 2019

Buckwheat Double Chocolate Orange Cookies (gluten-free)

I came across this recipe while looking for new cookies for the holidays, and thought it sounded tasty enough to apply to everyone. I was disappointed when I made them because the gluten-free flour combination resulted in that somewhat bitter aftertaste I think most people who have baked gluten-free will be familiar with. Well boo, I thought, I'll just freeze them and send them to my family when I'm ready to send that box, which wasn't quite when I made these.

This morning I decided to taste one to see how they did post-freezer and discovered - no bitter aftertaste! Dang! They are actually quite soft and delicious! And I could have included them in my cookie boxes after all, which were all already packed. Ah well. Hopefully my sister will enjoy them. I'm wondering if a quick trip to the freezer will solve all my gluten-free flours taste woes and plan to try that strategy again.


Buckwheat Double Chocolate Orange Cookies 
(from fixfeastflair, where they call them Buckwheat Orange Double Chocolate Cookies)

INGREDIENTS

  • 6 Tbsp. (85 g) unsalted butter
  • 12 oz. (345 g) bittersweet chocolate (60–70% cacao mass), chopped (about 2 1⁄4 cups), plus several chunks for the tops of the cookies
  • 11⁄2 tsp. (1 g) packed finely grated zest from 1 medium orange (or bergamot if you can find it!)
  • 1⁄2 c. (65 g) buckwheat flour
  • 2 Tbsp. (15 g) tapioca flour
  • 3⁄4 tsp. baking powder
  • 2 large eggs, at room temperature
  • 1⁄2 c. plus 2 Tbsp. (130 g) organic granulated cane sugar
  • 1⁄2 tsp. fine sea salt
  • 1 tsp. vanilla extract
  • Flaky salt such as Maldon, for the tops

FIX

  1. Position racks in the upper and lower thirds of the oven and preheat to 350ÂşF (175ÂşC). Line 2 rimless cookie sheets with parchment paper.
  2. Place the butter in a small, heavy-bottomed saucepan set over the lowest possible heat. Add
  3. 8 ounces (230 g) of the chocolate and the orange zest, and melt together, stirring frequently to prevent the chocolate from scorching. Continue cooking until the mixture is pleasantly warm, but not super hot, to the touch. Remove from the heat and keep warm. Sift the buckwheat flour, tapioca flour and baking powder into a small bowl and set aside.
  4. Meanwhile, place the eggs, sugar and salt in the bowl of a stand mixer fitted with the paddle attachment and whip on medium-high speed until the mixture is very light and fluffy, 5 minutes. Turn the mixer to low and stir in the vanilla until just combined, then the warm chocolate butter mixture. Add the flour mixture and beat on low speed until combined. Remove the bowl from the mixer and use a flexible silicone spatula to fold in the remaining 4 ounces (115 g) chopped chocolate.
  5. If the batter is very runny, let it cool for a few minutes until it firms to the consistency of a thick brownie batter. Use a #40* spring-loaded ice cream scoop or 2 spoons to drop heaping tablespoons of batter onto the prepared baking sheets, spacing them at least 2 inches (5 cm) apart. Top each cookie with a few chunks of chocolate and a few flecks of flaky salt.
  6. Bake the cookies until puffed and cracked and the edges are set, 8–12 minutes, rotating the pans front to back and top to bottom halfway through baking. Let cool on the pans. Enjoy warm or at room temperature. The cookies are best the day of baking but will keep, airtight at room temperature, for up to 3 days. 

NOTES FROM JENNYBAKES

-Usually I ignore recipes that say to scoop all cookie dough onto cookie sheets at once. For this recipe, you really should, because the tapioca flour will keep thickening the dough.
-Seriously, freeze these cookies overnight before eating.
 

Monday, December 16, 2019

Panforte

I've been circling David Lebovitz's recipe for Panforte for a few years. I couldn't decide if it was just like fruitcake or more like candy. If it was sweet or decidedly not too sweet. Last year, I bought all the ingredients for it but never made it, leaving me cleaning out candied fruit and rancid nuts that really should have been used, whoops. This year I was determined to try it so even though it was the last thing I made for my holiday boxes of baked goods that I give out to a select few, I extended my baking by a day to make it. And honestly unless you are candying your own fruit it is not that complicated, I don't know why I get recipe hangups sometimes.

The most important thing to know is that this recipe looks to be something that a baker can improvise with (see my extensive notes after the recipe for more), it keeps forever, and at least in this iteration, it smells super Christmasy while you are making it. I hope I did it justice.


Panforte

(recipe from David Lebovitz, a pastry chef I admire, go buy his books and read his blog!)

To skin hazelnuts, rub the still-warm toasted nuts in a tea towel, to get off as much of the skins as possible. The nuts can be toasted in a 350ÂşF/180ÂşC oven for about 10 minutes first. If you want to make your own candied citron, you can find [David's] recipe at that link. You'll often see Panforte baked on rice paper (or made of another edible starch), which is harder to get than parchment paper. You can buy sheets of wafer paper online, and cut them to size.
5 tablespoons (40g) unsweetened cocoa powder (Dutch-process or natural)
2 1/2 cups (325g) nuts; any mix of walnuts, almonds, or hazelnuts, toasted
3/4 cup (110g) flour
1 cup (200g) chopped candied citron or another candied citrus
1 tablespoon ground cinnamon
2 teaspoons ground ginger
1 1/2 teaspoons freshly ground black pepper
pinch of grated nutmeg
1/2 teaspoon red chili powder
3 ounces (85g) bittersweet or semisweet chocolate, chopped
1 cup (200g) sugar
3/4 cup (210g) honey
extra cocoa powder, for dusting the pan
powdered sugar, for dusting the panforte
1. Preheat the oven to 325ÂşF (160ÂşC.)
2. Spray a 9 to 10-inch (22-23cm) springform pan with nonstick spray. Dust the inside with cocoa powder, making sure to get it up the sides. Line the bottom with a round of parchment paper.
3. In a large bowl, mix together the cocoa powder, nuts, flour, candied citrus, cinnamon, ginger, black pepper, nutmeg, and red chile powder. Use your fingers to make sure all the ingredients are separate.
4. Melt the chocolate in a small bowl set over a pan of simmering water. Set aside.
5. In a pan fitted with a candy thermometer, heat the sugar and honey until the temperature reads 240ÂşF (115ÂşC.)
6. Pour the hot honey syrup over the nut mixture, add the melted chocolate, and stir well. Scrape the batter into the prepared pan and smooth the top. I start by using a spatula and as the mixture cools, once it’s cool enough to touch, I use a dampened hand to get it flat.
7. Bake the panforte for 30 – 35 minutes; the center will feel soft, like just-baked custard; if you touch it, your finger will come away clean when it’s done. (Do not overcook it, or it will be too firm once cooled.) Let the panforte cool on a wire rack for 15 minutes, then run a knife around the edge to loosen it from the pan. Remove the springform carefully (sticky edges might tear, so keep an eye out), then let cool completely.
Once cool, remove the bottom of the springform pan and peel away the parchment paper. Sprinkle the panforte with powdered sugar and rub it in with your hands.
Storage: Panforte can be kept for several months, well wrapped, at room temperature.

Notes from JennyBakes:

- I am down one regular sized springform pan and knew I'd be cutting this up, if it worked out, to put into holiday boxes. Since I saw quite a few panforte around the internet in square forms, I felt okay baking it in my 9" pyrex with two overlapping sheets of parchment paper, which I sprayed with nonstick spray. These recipes are sticky so you want some way to get that sucker out of there.

- I have not had hazelnuts for a few years. I grew up with them and sometimes my Mom sends them for the holidays but I have not found a way to buy them online without buying in bulk or spending astronomic amounts. I thought I had almonds but they had gone bad, so all I used were walnuts. That wasn't what I would have done on purpose and I think it's best either with his mix of nuts or just some kind of variety. I did toast the walnuts I had for 10 minutes and let them cool before making the recipe.

- I wish I had followed David's direction on step 6 to put more effort into making the mixture flat on top before baking. Unlike a cake which would settle, the panforte retained the shape it started, and so when I added the powdered sugary it looked quite nobbly.

- I still am not certain of the desired texture and since my candy thermometer somehow only goes up to 222, I only know my sugar boiled beyond that. The pieces are slightly gooey but still hold up on their own so it's possible I either underboiled or underbaked, but I was equally wary of overboiling and overbaking. I may ask one of my colleagues who travels often in Italy, in case she's had the chance to eat it from the source.

- I came across this wonderful article in The Guardian about making the perfect panforte and there are so many interesting variations. I was also comforted by the one pictured from Nigella Lawson, because the top looked like mine after baking - slightly sticky, darker around the edges, maybe a bit of a feeling of goo.  That feature makes it sound like many of the ingredients are interchangeable, although at some point it is no longer a traditional recipe. I saw one recipe in my searching that was a ginger apricot version, and that sounded delicious, as did one that used dried figs.

- I am not certain how this differs from a fruitcake, although I am recognizing that there is no booze in this recipe, which I think of as central in a fruitcake.

- For even more information, check out the historical entry on Panforte di Siena from Fine Dining Lovers


Monday, December 09, 2019

Cheddar Biscuits with Pecans

Martha Stewart calls this a "Southern hors d'oeuvre" and it's true that I was first gifted a tube of these during the holidays in the south. I knew I'd want to make them as gifts in the future, and that future is now. These are a super easy food-processor recipe, you just need chilling time. I think this is similar to the mixture used for cheese straws but rolled up and sliced is a bit easier. I apply the egg white prior to pressing the pecan on, because that made more sense to me, but you should try it however it makes sense. I added very little cayenne but if you are baking for people who have higher spice tolerance, you can play with that as well.


Cheddar Biscuits with Pecans
(recipe from Martha Stewart)

4 ounces sharp cheddar cheese, grated
1/2 cup (1 stick) unsalted butter, room temperature
1 cup all-purpose flour
1 teaspoon coarse salt
Pinch cayenne pepper
30 pecan halves
2 egg whites, lightly beaten
Paprika

Directions

Place cheese, butter, flour, salt, and cayenne pepper in the bowl of a food processor; process until a dough is formed, about 10 seconds. Turn dough out onto work surface and divide into two equal pieces. Roll each piece of dough into a 1 1/2-inch-thick log; wrap with wax or parchment paper and refrigerate until dough is firm, at least 2 hours and up to overnight.

Preheat oven to 350 degrees. Line two baking sheets with parchment paper; set aside.

Unwrap dough and slice each log crosswise into 1/4-inch-thick rounds. Place dough rounds on prepared baking sheet 1 1/2 inches apart; gently press a pecan half into the center of each. Brush with egg whites and sprinkle lightly with paprika.

Bake biscuits until crisp, about 15 minutes. Let cool for 5 minutes on baking sheets before transferring to a wire rack to cool slightly. Serve warm or at room temperature.

Biscuits may be kept in an airtight container for up to 1 week.

Monday, December 02, 2019

Pecan Pie and Thanksgiving with the -Stans

We traditionally have anything but tradition at Thanksgiving - a practice born of vegetarianism and not needing to make anyone else happy but us. So we've had tamales, two years of Native American foods, paella, Italian, even Thanksgivukkah the year Thanksgiving landed on the first day of Hanukkah.

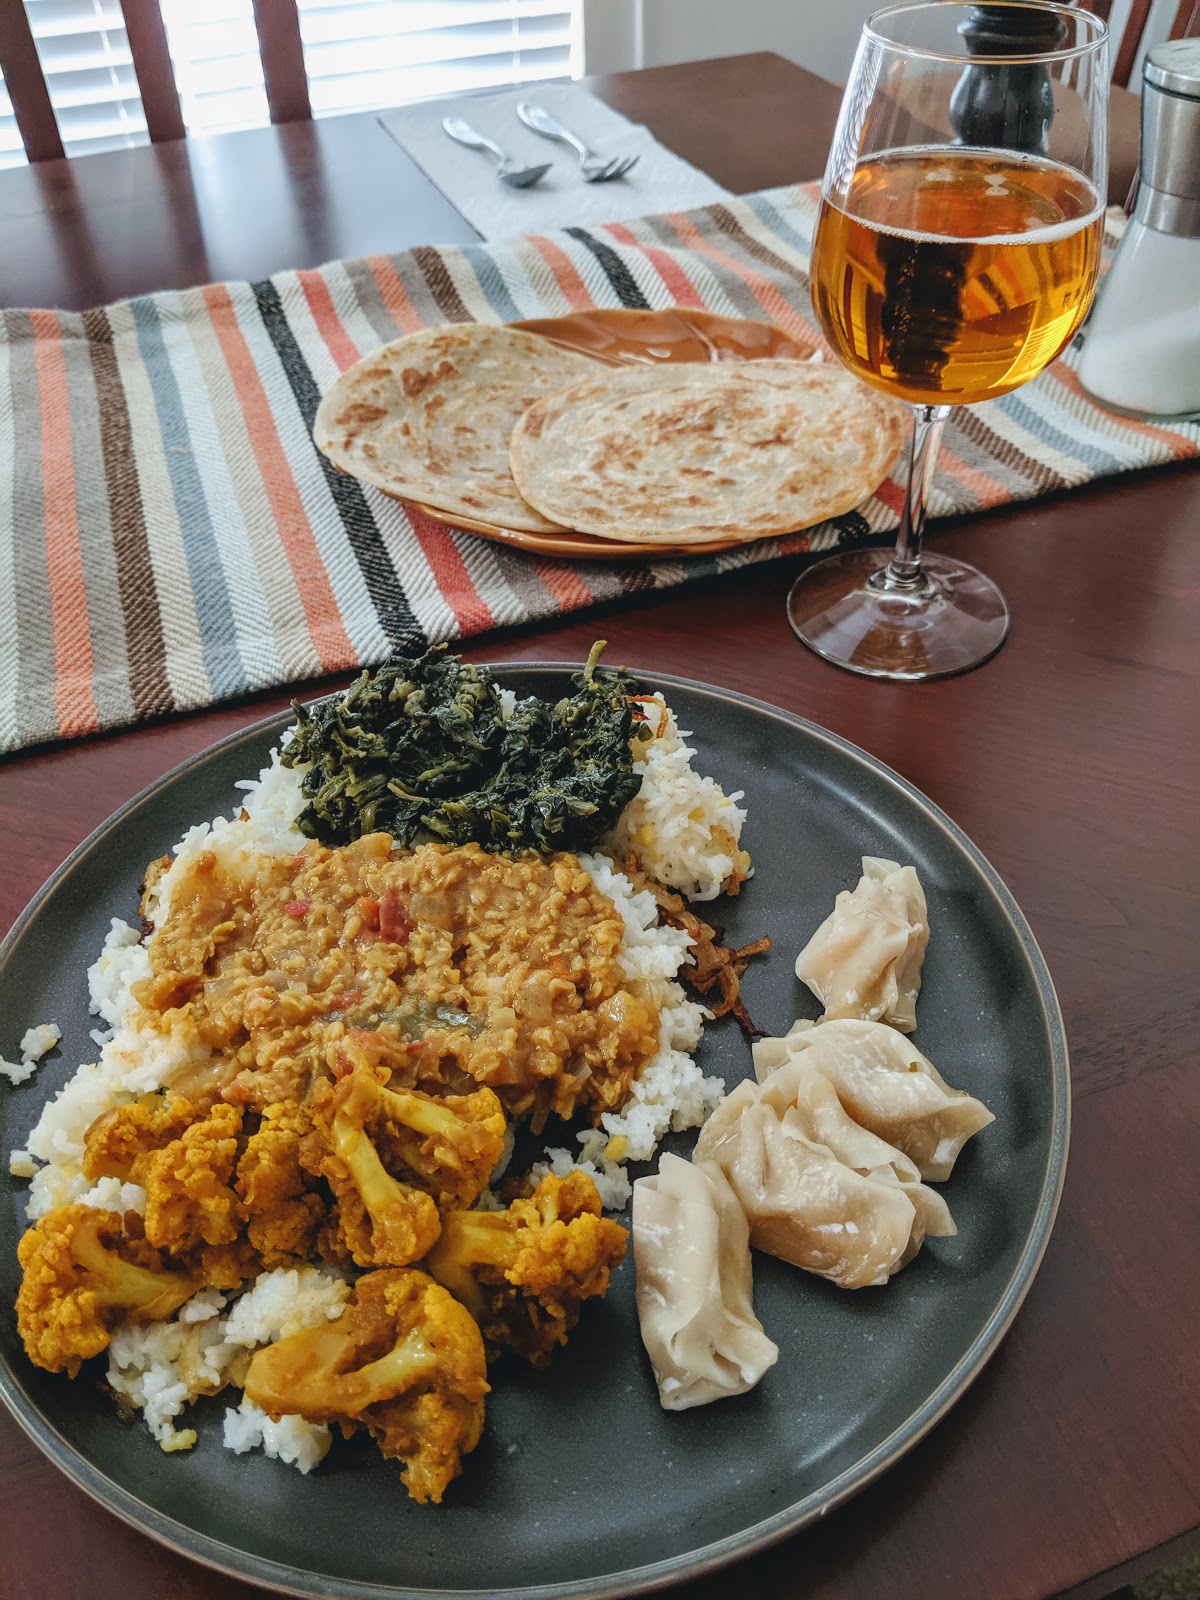
This year I took inspiration from one of my reading goals for 2019 - to finish reading a book from every country in Asia. This has opened up the steppes making up much of the former USSR and byproducts of English colonialism. I've played with some Southeast Asian cuisine but decided to dig into the -stans. I had fun researching traditional foods of Afghanistan, Pakistan, Krgyzstan, Kazakhstan, Turkmenistan, Tajikistan, and Uzbekistan. I didn't end up making food from everywhere, especially since the two most traditional foods of Kazakhstan are horse and mutton.

I made sabzi (spinach) and gulpi (cauliflower) from Afghanistan, one of many dal recipes from Pakistan, also a comfort-food rice recipe called khichri from Pakistan, and attempted dumplings from a YouTuber I found from Uzbekistan. I ended up not making a few recipes I had marked that would fulfill more -stans, but we had plenty for two people. I let Trader Joes make the flatbread because I was wiped, and I didn't fully make a pulao/plov rice recipe that is very much prominent in this region - it also usually includes meat as a main ingredient so I just didn't have a way to replicate it. I did, however, use a half-ton of onions across the board.


My husband asked for pecan pie for dessert. Somehow, in my entire life, I'd never made a normal pecan pie. I once burned a chocolate pecan pie, which wasn't a good memory. So I embarked on research. I have found if you search for "best" alongside practically any recipe, you'll find your way to some pretty good recipes. There were quite a few mentions of the Texas State Fair recipe, which I suspect is one of the standard southern versions that has made the rounds. But then I found a guy named Craig who had blogged his hunt for the best pecan pie. He ended up combining the best parts of his grandmother's pie with the best parts of the Texas State Fair pie.


I decided to use a crust recipe I liked best, but that's when I really ran into an issue - do you prebake the crust or not? Craig says to bake the crust 40 minutes (!!) while some of the recipes he had used didn't prebake at all. King Arthur Flour says 10 minutes but it was still pretty pale. I cut the difference and baked it 20 minutes. But since I didn't have any dried beans in my pantry, a few places the crust sank down a bit. (I know how to bake a pie crust but didn't do a good job doing what I know, honestly.)


I had filled the crust to its capacity, taking into account the low sides, but there was still some dark brown sugary mixture in the pan so what did I do, when I knew better? I went ahead and poured it into the crust. So it carmelized on the bottom. While I did not have a soggy bottom, I definitely had a crispy, caremlized crust that did not want to come out of the pan in a solid piece. Ah well. We ate a few pieces and threw the rest away... I guess maybe pecan pie isn't really my thing. I linked you to Craig's recipes above, so I won't repeat it here, since I'm not sure I did it right anyway.

Hope you had a Happy Thanksgiving!

Monday, November 25, 2019

Cranberry Cobbler

Back in 2018, I mentioned in a post about Grapefruit Buttermilk Cake that I hoped to someday come back to this recipe for Cranberry Cobbler. I bought all the ingredients for Cranberry Nut Bread (which I've made religiously every year since 9th grade) but wanted to do something different with some of the cranberries, so I started combing through my cookbooks until I hit inspiration. Turns out it's a recipe that inspired me once before, but I couldn't find any more fresh cranberries in the stores. This year, I made it in time.


For my taste, I think I'd either double the fruit portion or make half the biscuit portion, to have a little more fruit action. On the other hand, cranberry is pretty tart, so maybe this is the right proportion.


Cranberry Cobbler
(from Wintersweet)

Filling
12 oz (340 g) cranberries (fresh or frozen)
1 cup (200 g) granulated sugar
1/2 cup (125 ml) apple cider*
1/2 tsp vanilla extract
1/4 tsp ground ginger*

Biscuits
2 cups (280 g) all-purpose flour
1 tbsp plus 1 tsp granulated sugar, divided
2 tsp baking powder
1/2 tsp salt
3/4 cup (170 g) cold unsalted butter, cubed
1/2 cup (125 ml) plus 1 tsp milk, plus more as needed, divided

Preheat the oven to 400 F (200 C.) Butter a 9-inch pie plate.

For the filling: combine the cranberries, sugar, apple cider, vanilla, and ginger in a medium bowl. Pour the mixture into the prepared pie plate and cocver it with foil. Place it on a rimmed baking sheet and bake until the berries start to split their skins and spill their juices, 20-25 minutes.

For the biscuits: add the flour, sugar, baking powder, and salt to the bowl of a food processor and pulse to combine. Add the butter and pulse until the mixture forms a coarse meal. Dump the mixture into a medium bowl and add 1/2 cup of the milk. Fluff it with a fork until a scrappy dough forms. (If you don't have a food processor, you can cut the butter in with a pastry blender or pinch the butter apart with your fingers until the pieces look like tiny peas.

Turn the dough onto a lightly floured counter and knead it briefly, just utnil it comes together. If it seems too crumbly, add another spoon or two of milk. Press or roll it out into a disk about 1/2-inch thick. With a biscuit cutter or jelly jar, cut the dough into circles, enought to cover the cobbler.

Remove the berreis from the oven, uncover them, and stir. Arrange the biscuits on top. Brush the biscuits with the remaining 1 tsp of milk and sprinkle them with the remaining teaspoon of sugar. Bake the cobbler uncovered until the biscutis are golden brown and the mixture is bubbling, 30-35 minutes. Remove from oven and let cool 10 minutes before serving with ice cream. 

Wrap lightly and keep for a few days at room temperature.

*Notes from JennyBakes:

-I didn't have apple cider but I had orange juice, so that's what I used. It seemed to work okay.
-I doubled up on ginger and still didn't really taste it, so I think there's room for some flavor layering here.

Monday, November 18, 2019

Cardamom Cake

I continue my experiments from The Nordic Baking Book, but don't want to post all recipes just in respect to others actually buying the book. Instead I thought I'd reflect on my experience to see if I could do better next time.


I love cardamom, and love that the Swedish love cardamom, so when I saw a recipe for cardamom cake I knew I'd end up trying it. The recipe is fairly simple but I should have known when I saw it was a butter cake that I would struggle.

Why does the world want to make butter cakes when they are always dry? Or what is it that I do wrong that everyone else does right? The recipe says the batter will be quite thick, and it was. But it also took at least 20 minutes longer than specified for the toothpicks to come out mostly clean, and I still had a stripe of somewhat less baked cake in the rise of the upper half.

In the one picture of this cake in the giant cookbook, it's in a smaller bundt type shape, and it makes me wonder if it doesn't bake more evenly in that kind of shape. But the recipe calls for a loaf pan.

I liked the idea in the beginning of the recipe of adding the generous amount of spice during the butter and sugar creaming process. I would like to try that for more recipes (the only other time I have done this is when rubbing citrus zest into sugar before creaming, always with positive returns.)

This recipe also calls for 3/4 cup sour cream. I had some leftover ricotta in the fridge and almost just tried half and half on a whim, but thought I should make it as stated first. The batter was a rather unappealing gray after adding the sour cream (to the cardamom infused butter and sugar which was already a strange color.)

I'm going to try some of the "cake moistening" tips I found on the internet when I eat this for breakfast, but I'm also wondering if the conversion might be at fault, either in temperature or measurements. I was reading the section about yeast, because I want to make buns, which seem very important in nordic nations, but wow who would have expected yeast to vary so substantially in different countries? But it does. Fresh yeast is preferred and simply what is used in Scandinavia. It would be hard for me to find in South Carolina, and even if I did, it would not necessarily be the same amount by weight. And I will need to convert it to dry yeast. But - should I convert it against Scandinavian equivalents or American? Argh. It is currently clear as mud but I suppose all I can do is try one way and then evaluate.

Can I make french toast out of a cake like this? Maybe that would be a better use of it.... I can at least toast it. It's pretty dang dense.

Monday, November 11, 2019

Chokladsnittar or Chocolate Cuts

I continue to bake my way through The Nordic Baking Book by Magnus Nilsson. I started trying some of the cookie recipes to see if I wanted to give them away for the holidays. Today I made a chocolate cookie that you bake in logs and then cut while still hot, but I made the logs the wrong shape and they were never going to bake on the inside, so I made somewhat of a Swedish biscotti (cut them and baked one more time.) Not exactly a success but they smelled good and tasted good, even if I did it wrong and maybe invented something new.


Chocolate Cuts (Chokladsnittar)

7 3/4 oz (1 cup + 1 1/2 tbsp) sugar
7 oz (1 + 3/4 sticks), at room temperature
11 oz (2 1/2 cups) weak (soft) wheat flour
6 tbsp cocoa powder
1 tsp baking powder
1 tbsp vanilla sugar

To decorate:
egg wash
pearl sugar

1. Place the sugar and butter in the bowl of a stand mixer fitted with the paddle attachment, and beat until pale and fluffy.
2. Add the remaining dry ingredients by sifting them into the bowl. Work until just combined. Don't overwork the dough or you will get a poor texture.
3. Tip the dough out onto a lightly floured work counter, and divide it into four equal pieces.
4. Roll each piece out into a roll, about 3 cm/ 1 1/4 inches in diameter, and place them on the prepared baking sheets, 2 rolls on each sheet, as they will spread out a little.
5. Press each roll down lightly to flatten it slightly.
6. Preheat oven to 350 F, and line two baking sheets with baking (parchment) paper.
7. Brush each roll lightly with egg wash and sprinkle with pearl sugar, if you like.
8. Bake them for about 12 minutes. They should not get any real color from baking, but still need to be cooked through and not to become chewy. They should fluff up and crack a bit during baking.
9. Remove from the oven and leave the hot and slightly flattened rolls to cool down a little. When they are still warm and starting to firm up, use a sharp knife to cut diagonally across the rolls into pieces. Leave to cool completely.

Notes from JennyBakes:

This is a crumbly dough. I saw a few versions online that included egg, which might have helped bring the dough together a bit, but I really struggled. I added a bit of vanilla extract since I didn't have vanilla sugar. But baking them twice did make them a bit crunchy, probably perfect with coffee!

Monday, November 04, 2019

Thick Oven-Baked Pancake with Apple (Appelpannkaka)

I've been slowly baking my way through the pancakes & waffles section of The Nordic Baking Book by Magnus Nilsson, avoiding the salt-pork and blood pancake versions for now. I had some apples I still hadn't used from North Carolina and a longer morning, so I made a 1/4 version of what will follow to try to make an individual pancake. In the end I wish I'd baked it for the full time because the best parts were the fully browned parts, but it was good enough to share... knowing I'd probably improve it if I make it again.
\

Appelpannkaka (Swedish Thick Oven-Baked Pancake)

Preparation and cooking time: 1 hour
Serves: 4

250 g/9 oz (2 cups plus 1 tbsp) weak (soft) wheat flour*
4 eggs
good pinch of salt
1 litre/34 fl oz (4 1/4 cups) milk
50g/2 oz (3 1/2 tbsp butter)
2 apples, cut into slices**
sugar and ground cinnamon, to sprinkle

Preheat the oven to 220 C/425 C/Gas Mark 7.

Combine the flour, eggs, salt and half the milk in a mixing bowl and whisk until no lumps remain. Add the rest of the milk, whisking continuously.

Put the butter into a 30x40 cm/12x16 inch roasting pan and heat in the oven until the butter has completely melted.

Add the 2 sliced apples and sprinkle some sugar and ground cinnamon on top.

Pour the batter into the hot pan and bake for 25-30 minutes until it is dark golden and completely set.

Remove from the oven and leave to sit for 5 minutes, which will make it much easier to remove from the pan. Serve with your preferred combination of accompaniments.***

Notes from JennyBakes:

* - I used all-purpose flour
** - I peeled my apple and used about half of a mutsu
*** - Original non-apple recipe suggests sugared lingonberries and cream, or with jam and a sprinkling of sugar.

Monday, October 28, 2019

Pumpkin Tea Cake

 Another recipe from the revised Tartine cookbook, because I had leftover pumpkin puree in the fridge that was going to go bad otherwise. I was hoping for a loaf cake similar to the Starbucks pumpkin loaf because it is one of those things I find myself ordering too often a certain time of year.


It gets close! I held back from adding things like white chocolate chips or anything on top to respect the original recipe the first time, and this cake is very tasty, but I definitely would have liked it even more with a bit of texture, whether it came from pepitas on top or some kind of chunk throughout.


Pumpkin Tea Cake

Ingredients:


1 3/4 cups (230 g) all-purpose flour
1 1/2 tsp baking powder
1/2 tsp baking soda
1 Tbsp + 2 tsp ground cinnamon
2 tsp nutmeg, freshly ground
1/4 tsp ground cloves
1 cup (255 g) pumpkin puree
1 cup (240 ml) vegetable oil such as safflower or sunflower
1 1/3 cups (265 g) sugar, plus more for topping
3/4 tsp salt
3 large eggs

Directions
  1. Preheat the oven to 325 F (160 C). Lightly butter the bottom and sides of a 9x5 in (23x12 cm) loaf pan.
  2. Sift together the flour, baking powder, baking soda, cinnamon, nutmeg, and cloves into a mixing bowl and set aside.
  3. In another mixing bowl, beat together the pumpkin puree, oil, sugar, and salt on medium speed or by hand until well mixed. Add the eggs one at a time, mixing well after each addition until incorporated before adding the next egg. Scrape down the sides of the bowl with a rubber spatula. On low speed add the flour mixture and beat just until combined. Scrape down the sides of the bowl, then beat on medium speed for 5-10 seconds to make a smooth batter. The butter should have the consistency of a thick puree.
  4. Transfer the batter to the prepared loaf pan and smooth the surface with an offset spatula. Sprinkle evenly with 2 tbsp of sugar. Bake until a cake tester inserted into the center comes out clean, about 1 hour. Let cool in the pan on a wire rack for about 20 minutes, and then invert onto the rack, turn rightside up, and let cool completely. Serve the cake at room temperature. It will keep, well wrapped, at room temperature for 4 days or in the refrigerator for about 1 week.
 Notes from JennyBakes:
  • I used a review copy of this cookbook with this recipe in it so it may not be accurate or official, but it is the recipe I made! Ha. 
  • I actually think I only used 1/2 tsp freshly grated nutmeg or so because 2 seemed like a lot... in the end there is enough batter that it probably could have taken it.

Monday, October 21, 2019

Lacy Brown Butter and Ricotta Cookies

I follow Stella Parks (bravetart) in Instagram, and she is a baker who develops recipes for Serious Eats. She kept posting about these cookies so even though I went to the apple orchard and had a peck of apples to deal with, I made these cookies instead. I have no regrets.


Lacy Brown Butter and Ricotta Cookies
(recipe and more information about process and troubleshooting on Serious Eats)

Ingredients
  • 5 ounces unsalted butter (about 10 tablespoons; 140g)
  • 7 ounces granulated sugar (about 1 cup; 195g)
  • 2 teaspoons (10g) vanilla extract
  • 1 teaspoon (4g) kosher salt; for table salt, use about half as much by volume or the same weight
  • 1/4 teaspoon (1.25g) baking soda
  • 4 ounces cold ricotta (about 1/2 cup; 110g), strained if watery
  • 4 1/2 ounces all-purpose flour (about 1 cup, spooned; 125g)
Directions

Getting Ready: In a large skillet, melt butter over medium-low heat. When it has completely melted, add vanilla pod (if using) and increase heat to medium. Simmer, stirring and scraping with a heat-resistant spatula while butter hisses and pops. When butter is golden yellow and perfectly silent, remove from heat and pour into a medium bowl, making sure to scrape up all the toasty brown bits from along the bottom. Cool until slightly thickened and opaque, but still slightly warm, around 80°F (27°C). This will take about 75 minutes at room temperature or 25 minutes in the fridge; if refrigerating, stir butter every 6 minutes or so to prevent it from hardening around the edges of the bowl.

Make the Dough: Adjust oven rack to middle position and preheat to 350°F (180°C). When brown butter has cooled, remove vanilla pod (if using) and stir in sugar, vanilla extract, salt, and baking soda. Stir until baking soda is well distributed, about 1 minute, then fold in cold ricotta. Once ingredients are combined, stir in flour to form a soft dough.

Portioning the Dough: Divide into 1-tablespoon portions and arrange on a parchment-lined half sheet pan, leaving about 4 inches between cookies to account for their significant spread. (If you like, the dough can be placed on a parchment-lined plate and frozen until firm, then transferred to a zip-top bag for storage. It can be refrigerated for up to 1 week or frozen for up to 3 months.)

Bake until cookies are lacy, thin, and golden brown around the edges, but still rather pale in the middle, about 12 minutes. Cool completely on baking sheet, as the cookies will be doughy and soft while warm. Enjoy after cooling, or store up to 1 week in an airtight container at room temperature.


Notes from JennyBakes:

  •  I was pondering sandwich cookies after making these and so did Stella. She tried them with chocolate hazelnut spread, and I think that would be good, maybe also a fruit butter for fall!
  • Those that I baked only 12 minutes, I liked better in the coming days. More than that and they became a stale crunchy while the 12 minute bakes were soft in the best ways.
  • There are some more complicated ingredients in the original recipe, please see links for those. I removed for simplification and to reflect what I actually did.

Monday, October 14, 2019

Peanut Butter Chess Pie from Sean Brock's South

The recipes in South by Sean Brock focus on perfecting the craft for the best version of old standards. You can feel Sean's painstaking attention to detail in the recipes as well.

I was thrilled to find some creative spins on desserts and knew I needed to make this pie, especially since it had a chocolate cornmeal crust. I did have a copy from the publisher, but hey, the cookbook comes out tomorrow (October 15, 2019.)


I followed the directions carefully for this pie, which meant a lot more fridge time than I would normally give a pie. I'm not sure if I made it right but the insides settle into a pecan pie like center without the nuts, topped by some peanut butter cakey layer, which is topped with ganache. I suspect the peanut butter and the sugar were supposed to be better blended, but this all happened while t baked. The crust rolled out beautifully after letting it chill as recommended.


Peanut Butter Chess Pie

Crust
1 recipe Chocolate Cornmeal Crust dough (recipe in cookbook)

Filling
2 tbsp unsalted butter, diced, at room temperature
1/2 cup creamy peanut butter
2 1/4 cups sugar
1 tbsp unsweetened cocoa powder
3/4 tsp kosher salt
3/4 cup whole milk
4 large eggs, lightly beaten
1 tsp vanilla extract

Chocolate Ganache
6 oz 60% bittersweet chocolate, finely chopped
2/3 cup heavy cream

For the Crust: See the cookbook.

For the Filling: Preheat the oven to 325 F.

Combine the butter and peanut butter in the top of a double boiler. Fill the bottom of the double boiler with water, set over low heat, and insert the top. The water shoudl not touch thte bottom of the insert and should never be hotter than a simmer. Stir the mixture with a silicone spatula until the butter has melted and hte mixture is compeltely combined, scraping down the sides as necessary and being careful not to incorporate air. Remove the top of the double boiler and set aside.

Combine the sugar, cocoa powder, and salt in a large bowl and whisk to combine. Whisk in the milk, then whisk in the eggs and vanilla. Stir in the peanut butter mixture.

Place the piecrust on a rimmed baking sheet. Gently pour the filling into the crust and bake for 30 minutes. Rotate the baking sheet and bake for 30 minutes more, or until the filling is set and no longer jiggles in the center when the pan is gently shaken. Transfer the pie to a wire rack and cool to room temperature.

When the pie is completely cool, make the ganache: Put the chocolate in a heatproof container. Put the cream in a small saucepan and bring to a simmer over medium heat. Pour the cream over the chocolate, cover, and let stand for 3 minutes. Stir to completely combine the melted chocolate and cream.

Pour the ganache over the top of the pie, rotating the pie if necesary to ensure that the ganache topping is even. Cool for 5 minutes, then refrigerate the pie for at least 2 hours to allow the topping to set before serving.

Serve the pie chilled. Tightly cover any leftovers and refrigerate for up to 3 days.


South by Sean Brock
Available 15 October 2019

Other recipes I marked to try:

  • Sea Island Red Pea Spread with Cucumber Tomato Salad
  • Chilled Summer Squash Soup with Buttermilk and Sunflower Seeds
  • Tomato-Okra Stew
  • Sorghum Seed Crackers
  • Blackberry Cobbler
  • Magnolia Vinegar and Brown Butter Pie (what?)!
  • Buttermilk Pie
  • Hand-Churned Peach Sherbert