Monday, October 26, 2020

Caramel Apple Slab Pie with Melted Butter Crumb Topping from Pie Academy

It is pie season and I had a review copy of Pie Academy: Master the Perfect Crust and 255 Amazing Fillings, with Fruits, Nuts, Cream, Custards, Ice Cream and More by Ken Haedrich, from the publisher through NetGalley. It comes out October 27, which is the day after this post goes live. 

 If you think the title is long, you should try getting through the cookbook! I'm not sure I've made it all the way yet, but no matter, this is a book to consult for any ingredient you might make into a pie. I honed in on the apple pie CHAPTER when I came home from the NC orchards with a big bag of Mutsu apples. Would I made apple pie with cheddar cheese crust? I made a double crusted version of that 12 years ago. There were single crust pies, mock apple pies, pies with crumb and more. Despite my abiding affection for the Smitten Kitchen slab pie, I landed on the Caramel Apple Slab Pie with Melted Butter Crumb Topping.

Slice of caramel apple slab pie displayed on fall leaf plate with fall decor

One bonus I noticed in this cookbook is a wide range of new techniques. It might be daunting to someone new in the ktichen but for someone who has baked her whole life, learning new techniques is a good experience! There were multiple crumb recipes to draw from, and I had the impression one could mix and match, but I did make the one designated for this recipe, the melted butter crumb. It is made with melted butter, crumbled over a sheet pan, and frozen before use. It can also be made in larger quantities and saved in the freezer for multiple, crumb-bearing toppings. I was in love!

Side view of caramel apple slab pie on orange plate

Caramel Apple Slab Pie with Melted Butter Crumb Topping

Slab Pie Dough and Shell (from cookbook)

Filling

7 cups peeled, cored, and sliced baking apples
1/2 cup raisins
2/3 cup packed dark brown sugar
1 tbsp plus 1 tsp cornstarch
1/2 tsp ground cinnamon
Big pinch of salt
1/4 cup heavy cream
1 tbsp lemon juice

Melted Butter Crumb Topping (from cookbook)

  1. Prepare the slab pie dough and make the slab shell in a jelly-roll pan. Refrigerate the shell until needed.
  2. Adjust the oven racks so one is in the lower position and another is in the middle of the oven. Preheat the oven to 400 F (200 C)
  3. Combine the apples, raisins, sugar, cornstarch, cinnamon, salt, cream, and lemon juice in a large bowl. Mix well; with so much filling, I like to mix with my hands. Spread everything out evenly in the shell, taking care to smooth over any apple tips, which have a tendency to scorch in the oven. Spread the topping evenly over the apples; you'll probably need all of it. 
  4. Put the pie on the lower oven rack and bake for 25 minutes. Lower the heat to 375 F (190 C) and move the pie up to the middle rack, rotating it 180 degrees. Bake for 30-35 minutes longer, until the juices are bubbly and the topping is golden brown. If the topping starts to get to brown, cover it with aluminum foil.
  5. Transfer the pie to a rack and cool for at least 1 hour before serving. I prefer it lukewarm or at room temperature. Cover and refrigerate leftovers after 24 hours.

Notes from JennyBakes:

I did not have a jelly-roll pan of the right size (15x10) so I slightly downsized the recipe.

He adds a note about making sure the pan you use has at least 1" on the sides so it doesn't bubble over. Mine still did a little, so maybe a pan underneath would be smart. I didn't move my pie around to different racks so could have used something to catch the one bubble. I did rotate it 180 degrees.

I used light brown sugar because it's what I had; I left out the raisins because I didn't have any but I'm not sure I wanted them in there anyway. 

I did use all the crumb topping!


Monday, October 19, 2020

Apple Cream Cheese Cobbler (grain-free, lower-sugar)

I recently had an advanced reader copy of a new cookbook, Skinny Southern Baking: 65 Gluten-Free, Dairy-Free, Refined Sugar-Free Southern Classics by Lara Lyn Carter, which offers lower sugar versions of southern recipes and flavors. I took one of the recipes and adapted it slightly for a smaller dish and fewer servings, but taking advantage of the apples I can only get in the fall. Part of the challenge of baking this way is the look and feel of the final result. The pictures in the cookbook are accurate representations of the recipes, even when that means the bread doesn't rise as high or the coconut sugar turns your crumble pretty dark.

All to say, this dessert may not win any beauty awards, but it was really tasty. And the cream cheese in there is more like a pudding than a cheesecake, in a good way. It also keeps it from being all sweet.


Apple Cream Cheese Cobbler
(Credit: Lara Lyn Carter)

For the cobbler:

3 large sweet apples, cored and cut into 8 large slices*
1/2 cup honey or maple syrup
2 packages (8 oz each) plant-based cream cheese*

  1. Preheat the oven to 350 F degrees and spray a 9x13 baking dish with cooking spray. 
  2. Arrange the apple slices in the bottom of the baking dish.
  3. Whip the honey or maple syrup and cream cheese together until smooth and spread the mixture over the apples. 

For the topping:

3 eggs
2 cups almond flour
1/2 cup coconut sugar
1 tsp vanilla
2 tsp cinnamon*
1 tsp nutmeg*
1 tsp baking soda
1/2 tsp fine sea salt
1/2 cup chopped pecans or walnuts

  1. Combine all ingredients together in a large bowl.
  2. Pour the mixture over the apples and cream cheese mixture; bake for 45 minutes.

*Notes from JennyBakes:

I made a thirdish of this recipe by using one large Mutsu apple, the cream cheese and maple syrup as described, and roughly a third of the topping.

I'm not too invested in non-dairy, plus that's just hard to find where I live in the south. The reason I used this recipe in the first place was that I had a brick of cream cheese I needed to use. Regular old cream cheese works fine here (the eggs in the topping make it non-vegan anyway!)

I have this apple pie spice in my spice drawer that I always use with apples in place of the cinnamon and nutmeg. 

I added some walnuts but only to half the topping since my husband is mildly allergic.


Skinny Southern Baking
by Lara Lyn Carter

13 October 2020

Other recipes I've marked to try, because this is how we eat at my house:

-Ginger Cookies
-Pumpkin Spice Cookies
-Peanut Butter Banana Coffeecake
-Pumpkin Cranbrerry Nut Bread
-Gingerbread
-Almond Flour Pie Crust
-Chocolate Pie Crust
-Coconut Flour Pie Crust
-Pumpkin Cornbread
-Spinach and Feta Muffins
-Herb biscuits

(Can you tell I'm so ready for fall?! Get ready!)

Monday, October 12, 2020

Dark Chocolate Peanut Butter Bars

This recipe comes from the new cookbook from Alex Guarnaschelli, Cook with Me.  I had a copy of the book from the publisher through Edelweiss, and when I review a cookbook, I always make at least one recipe! I love how she talks about learning to cook from her mom a lot in this one too. And along with that theme, many of the recipes are spins or just really good versions of traditional dishes, but sometimes that's what you want to learn from a real chef, at least I do.

I always tend to hang out in the baked goods and dessert sections of cookbooks but the picture of this dessert captured me immediately. I made it for our 20th wedding anniversary back in June, but waited to share it with you until it was closer to release date. This is so delicious, like a cross between a candy bar and a very rich cheesecake. I would make it for a large gathering because a small piece is very rich and satisfying. See at the bottom for a few tips from my experience making this!


Dark Chocolate Peanut Butter Bars
(from Cook with Me by Alex Guarnaschelli)

Makes 16 pieces

11 tbsp (1 stick + 3 tbsp) unsalted butter, melted
2 cups (8-9 oz) finely ground chocolate crumbs*
1/2 tsp ground cinnamon
16 oz full-fat cream cheese, at room temperature
1/2 cup sugar
2 large eggs
3/4 cup (8 oz) smooth peanut butter
3 1/2 oz semisweet chocolate, finely chopped (a generous 1/2 cup)

Preheat the oven to 350 F.

Make the crust: Brush the bottom and sides of a 9-inch springform pan with about 1 tablespoon of the melted butter. In a medium bowl, combine the rmaining butter with the crushed cookies and cinnamon, and stir to combine. Transfer the crumbs to the buttered pan and press them into an even layer on the bottom of the pan (not up the sides.) Use a cup measure or a glass to press the crumbs down firmly. Place the pan in the center of the oven and bake until the crust is firm, 15-18 minutes. Set the pan aside to let the crust cool for at least 20 minutes.

Make the peanut butter filling: In the bowl of a stand mixer fitted with the paddle attachment, beat the cream cheese and sugar on medium-high speed until completely smooth, 3-5 minutes. Add the eggs and peanut butter, and beat on medium-high speed until smooth. Pour the filling over the cooled crust, using a spatula to spread it out evenly, and place the pan back in the oven. Cook until the filling is firm and doesn't jiggle when you gently shake the pan, 12-15 minutes. Remove the pan from the oven and set it aside to cool for at least 30 minutes or up to 1 hour.

Make the chocolate top: In a small saucepan, bring the cream to a gentle simmer over medium heat. Place the chopped chocolate in a heatproof bowl, set it over the saucepan like a makeshift double boiler (the bottom of the bowl shouldn't touch the cream), and shut the heat off completely. Stir the chocolate from time to time as it melts. When the cream is warm and the chocolate is somewhat melted, take the bowl off the saucepan, pour the cream over the chocolate, and stir until blended. If the cream and chocolate are similar in temperature, the result is a glossier ganache!* Gently spread the chocolate over the peanut butter layer in the springform pan and refrigerate until the chocolate is firm, at least 2 hours.

* Notes from JennyBakes
  1. For the chocolate cookies, I used the wafer cookies that at my supermarket are shelved near the ice cream, not with the rest of the cookies and crackers. I prefer them to Oreos because they are straight dark chocolate with no cream.
  2. You could do this ganache process that would require 2 bowls and 2 pans but to be honest I just zapped it in the microwave a bit and stirred in between. And I thought the end result was good enough, if not as glossy as it could be.  
  3. I think if I made this again, I would try to convert it to a square or rectangular contained. The recipe calls itself bars but it is in a circle, so really unless you cut it in a strange way you end up with wedges. And something about rectangles of these layers seemed more appealing, so I cut the circle strangely to get them.


Other recipes I've marked to try:
-Beet and Brown Rice Burgers
-Quinoa Pilaf
-Sheet Pan Blackened Salmon
-Macaroni and Cheese*
-Lentil Soup
-Exceptional Scrambled Eggs*
-Poached Eggs on Cheddar Biscuits
-Ninth Avenue Childhood Baked Ziti
-Chickpea and Celery Salad
-Red Velvety Strawberry Cake
-Tiramisu Swiss Roll

*Like I said above, I love to try all versions of classic dishes from chefs I admire.

Monday, October 05, 2020

Grain-free, lower-sugar version of my Grandma's Apple Cake

My Grandma's Apple Cake recipe is one that we make every year in my family. It heralds the fall, it's simple, it can be made so easily with pantry ingredients, and it requires no frostings or glazes or anything more than itself. But it also has a lot of sugar! This year I decided to see if I could make a grain-free, lower-sugar version of the cake, and that recipe is below. The picture is not super glamorous, and I think I should have baked it longer, but overall it was a successful experiment. (Next time I might add 1/4 cup more almond flour, or maybe try adding a bit of coconut flour in there to absorb more of the liquid.)


Frances's Apple Cake, modified to be grain-free and lower-sugar

1/2 cup oil
1 3/4 cup coconut sugar
2 eggs
5 cups apples, diced (I used Mutsu, my favorite baking apple, but you can try any combination)
2 cups almond flour
3/4 cup tapioca flour/starch
2 tsp baking powder
1 tsp baking soda
1 tsp salt
1 tsp vanilla
1 tsp apple pie spice (optional)
1/2 cup walnuts

This recipe came to me with just ingredients, but in general I mix the diced apples with sugar, then the beaten eggs and vanilla, then mix in the dry ingredients, nuts last. I often leave out the nuts or use hazelnuts instead.

Bake at 350 F for 45 minutes to 1 hour in a 9x13 pan.

Wednesday, September 30, 2020

Sweet Tahini Rolls from Falastin

I don't normally like to put two recipes from one cookbook in my blog (because I want you to look at the cookbook, obviously) but this one is all over the internet already; what's one more place? The culminating group recipe for the Rainy Day Bites Cookbook Club from Falastin is these sweet tahini rolls. They are not all that sweet, actually! 

I had an interesting jam at home that went well with them - cacao passion fruit, which also wasn't super sweet but had a murkiness to it alongside sweetness - this seemed to match the toasty tahini flavor as well. I like the suggestion in the cookbook of mixing grape molasses with tahini; I'll have to try that sometime.


SWEET TAHINI ROLLS

Kubez el tahineh
(from Falastin)

Dough:
1 1/2 tsp fast-acting dried yeast
1 tsp sugar
7 1/2 tbsp whole milk, lukewarm
Olive oil, for greasing
2 cups plus 6 tbsp (300 g) all-purpose flour
Salt
5 tbsp (75 g) unsalted butter, melted
1 egg, lightly beaten

1/2 cup (100 g) sugar
1 tsp ground cinnamon
7 tbsp (120 g) tahini
1 egg yolk, beaten
1 tbsp white sesame seeds

  1. To make the dough, put the yeast, sugar and milk into a small bowl. Mix to combine, then set aside for 5 minutes, or until it starts to bubble.
  2. Lightly grease a bowl with olive oil.
  3. Put the flour and 1/2 tsp of salt into the bowl of a stand mixer fitted with the dough hook. Mix on low speed, then slowly pour in the yeast mixture. Add the melted butter and continue to mix for about 1 minute.
  4. Add the egg to the mixer bowl, then increase the speed to medium and mix for 5 minutes, for the dough to get well kneaded. Using your hands, scrape the dough into a ball; it will be slightly sticky and elastic. Place it in the oiled bowl, turning it a couple of times so that the dough gets well greased. Cover the bowl and let rest in a warm place for about 1 hour, or until the dough is almost doubled in size.
  5. Put the 1/2 cup (100 g) sugar and the cinnamon into a small bowl. Mix well to combine, then set aside.
  6. On a lightly floured surface, roll out the dough into a large rectangle, about 14 x 20 inches (35 x 50 cm). Drizzle the tahini over the dough, then, using the back of a spoon or a spatula, spread it out evenly, leaving 1/2 inch (1 cm) clear of tahini at both the shorter ends. Sprinkle the sugar mixture evenly over the tahini and let rest for 10 minutes, until the sugar looks all wet.
  7. Starting from one of the long sides, roll the dough inward to form a long, thin sausage. Trim away about 3/4 inch (2 cm) from each end, then slice the dough into 10 equal pieces; they should each be just over 1 3/4 inches (4.5 cm) long. Sit each piece upright, so that a cut side is facing upward, then, using your hands, gently flatten it to form a 3 1/4-inch- (8 cm-) wide circle. Cover with a damp dish towel and let rest for 15 minutes.
  8. Preheat the oven to 350°F (180°C). Line a baking sheet with parchment paper.
  9. Transfer each roll of dough to the prepared baking sheet, spaced 1 inch (2.5 cm) apart. Brush the top and sides with the egg yolk, sprinkle with the sesame seeds and bake on the middle rack of the oven for 18 minutes, or until cooked through and golden. Remove from the oven and set aside for about 20 minutes — you don’t want them to be piping hot — then serve.

Makes: 10 rolls

Falastin by Sami Tamini and Tara Wigley.

So this is a great cookbook! I have enjoyed cooking and baking my way through it, with so many more recipes I want to try, especially after seeing other posts from the cookbook club in Instagram.

Previously, I made the semifreddo from the dessert section. 

Other recipes I've made:
Hassan's easy eggs with za'atar and lemon
Green shakshuka
Hummus with kofta
Roasted [squash and] zucchini with whipped feta and pistachios
[Cauliflower] musakhan (instead of chicken!)
Lemon chicken with za'atar

Other recipes I want to make:
Fruit and yogurt with sesame oat crumble and tahini-date syrup
Scrambled red shakshuka
Cauliflower and cumin fritters with mint yogurt
Mashed turnip with greens, caramelized onions, and feta
Chilled cucumber and tahini soup with spicy pumpkin seeds
Beet and feta galette with za'atar and honey
Pasta with yogurt and parsley breadcrumbs
Baked fish kubbeh
Baked fish in tahini sauce
Open cauliflower pies (sfiha)
Kofta with tahini, potato, and onion
Ma'amoul bars

Monday, September 28, 2020

Lemon Poppyseed Crinkle Cookies from Tasty Pride

If you're like me, you follow those Tasty videos that make cooking/baking anything within reach. They've started compiling recipes in different themes and publishing them, and one I had a review copy of is Tasty Pride, gathered by Jesse Szewczyk (who I follow in Instagram) and featuring 75 LGBTQ+ identifying cooks, chefs, recipe developers, food writers, and other people in the food industry. Full color pictures make all the recipes appealing but of course I gravitated toward the dessert chapter. (I also marked the "Chocolate Chip Cookie Skillet à la Mode, by the creators of Coolhaus, to try.) Growing up, my Mom made a lemon poppyseed cake so often it was like her signature cake, and we always made chocolate crinkle cookies for the holidays (although we call them wagon wheels), so this recipe was appealing to me in its flavor profile and nostalgia feels. I gave most of them to my new neighbors next door because otherwise I would have eaten them all myself~ I did change a few of the steps, so check below the recipe for my modifications.


Lemon Poppyseed Crinkle Cookies
Recipe by Justin Burke-Samson

Makes about 25 cookies

1/2 cup (1 stick) unsalted butter, softened
1 cup plus 2 tbsp granulated sugar
Zest of 2 lemons
Juice of 3 lemons
1 large egg
1 large egg yolk
1/2 tsp vanilla extract
2 1/3 cups all-purpose flour
2 tsp baking powder
1/2 tsp salt
2 tbsp poppy seeds
Confectioners' sugar, for dusting

  1. In the bowl of a stand mixer fitted with the paddle attachment, combine the butter, sugar, and lemon zest. Cream on medium-high speed for 5 minutes, until light and fluffy. Scrape down the sides of the bowl, then add the lemon juice, egg, egg yolk, and vanilla and mix on medium speed for 4 minutes, until fully incorporated. The mixture will look broken at first, but it will come together.
  2. In a large bowl, whisk together the flour, baking powder, salt, and poppy seeds.
  3. With the mixer on low speed, slowly add the dry ingredients to the wet ingredients and mix until just incorporated. Do not overmix. Finish mixing with a rubber spatula to incorporate any floury bits at the bottom of the bowl. Cover the bowl with plastic wrap and chill in the refrigerator for at least 2 hours and up to overnight.
  4. Line 2 baking sheets with parchment paper. Use a 2-tbsp cookie scoop to portion out the dough and place the balls on the pans at least 2 inches apart. Wrap the baking sheets in plastic wrap and freeze the dough for at least 2 hours or up to 1 month.
  5. Preheat the oven to 350 F.
  6.  Roll the balls of cookie dough in confectioners' sugar, then return to the baking sheets. Bake the cookies for 16 minutes, rotating the pans halfway, or until cracks form and the edges are slightly golden. Remove the cookies from the oven and let cool slightly on the baking sheets. Transfer the cookies to a wire rack to cool completely before serving.

Notes from JennyBakes:

When I'm making anything sweet that is citrus, I zest the fruit into the granulated sugar and rub it through with my fingertips. It just makes the cookies super lemony!

I skipped the freezer time. Once the dough was chilled, I didn't see a point in freezing it. The balls were fine quickly rolled in the confectioners' sugar and baked immediately. It still took a solid 16 minutes.

Monday, September 21, 2020

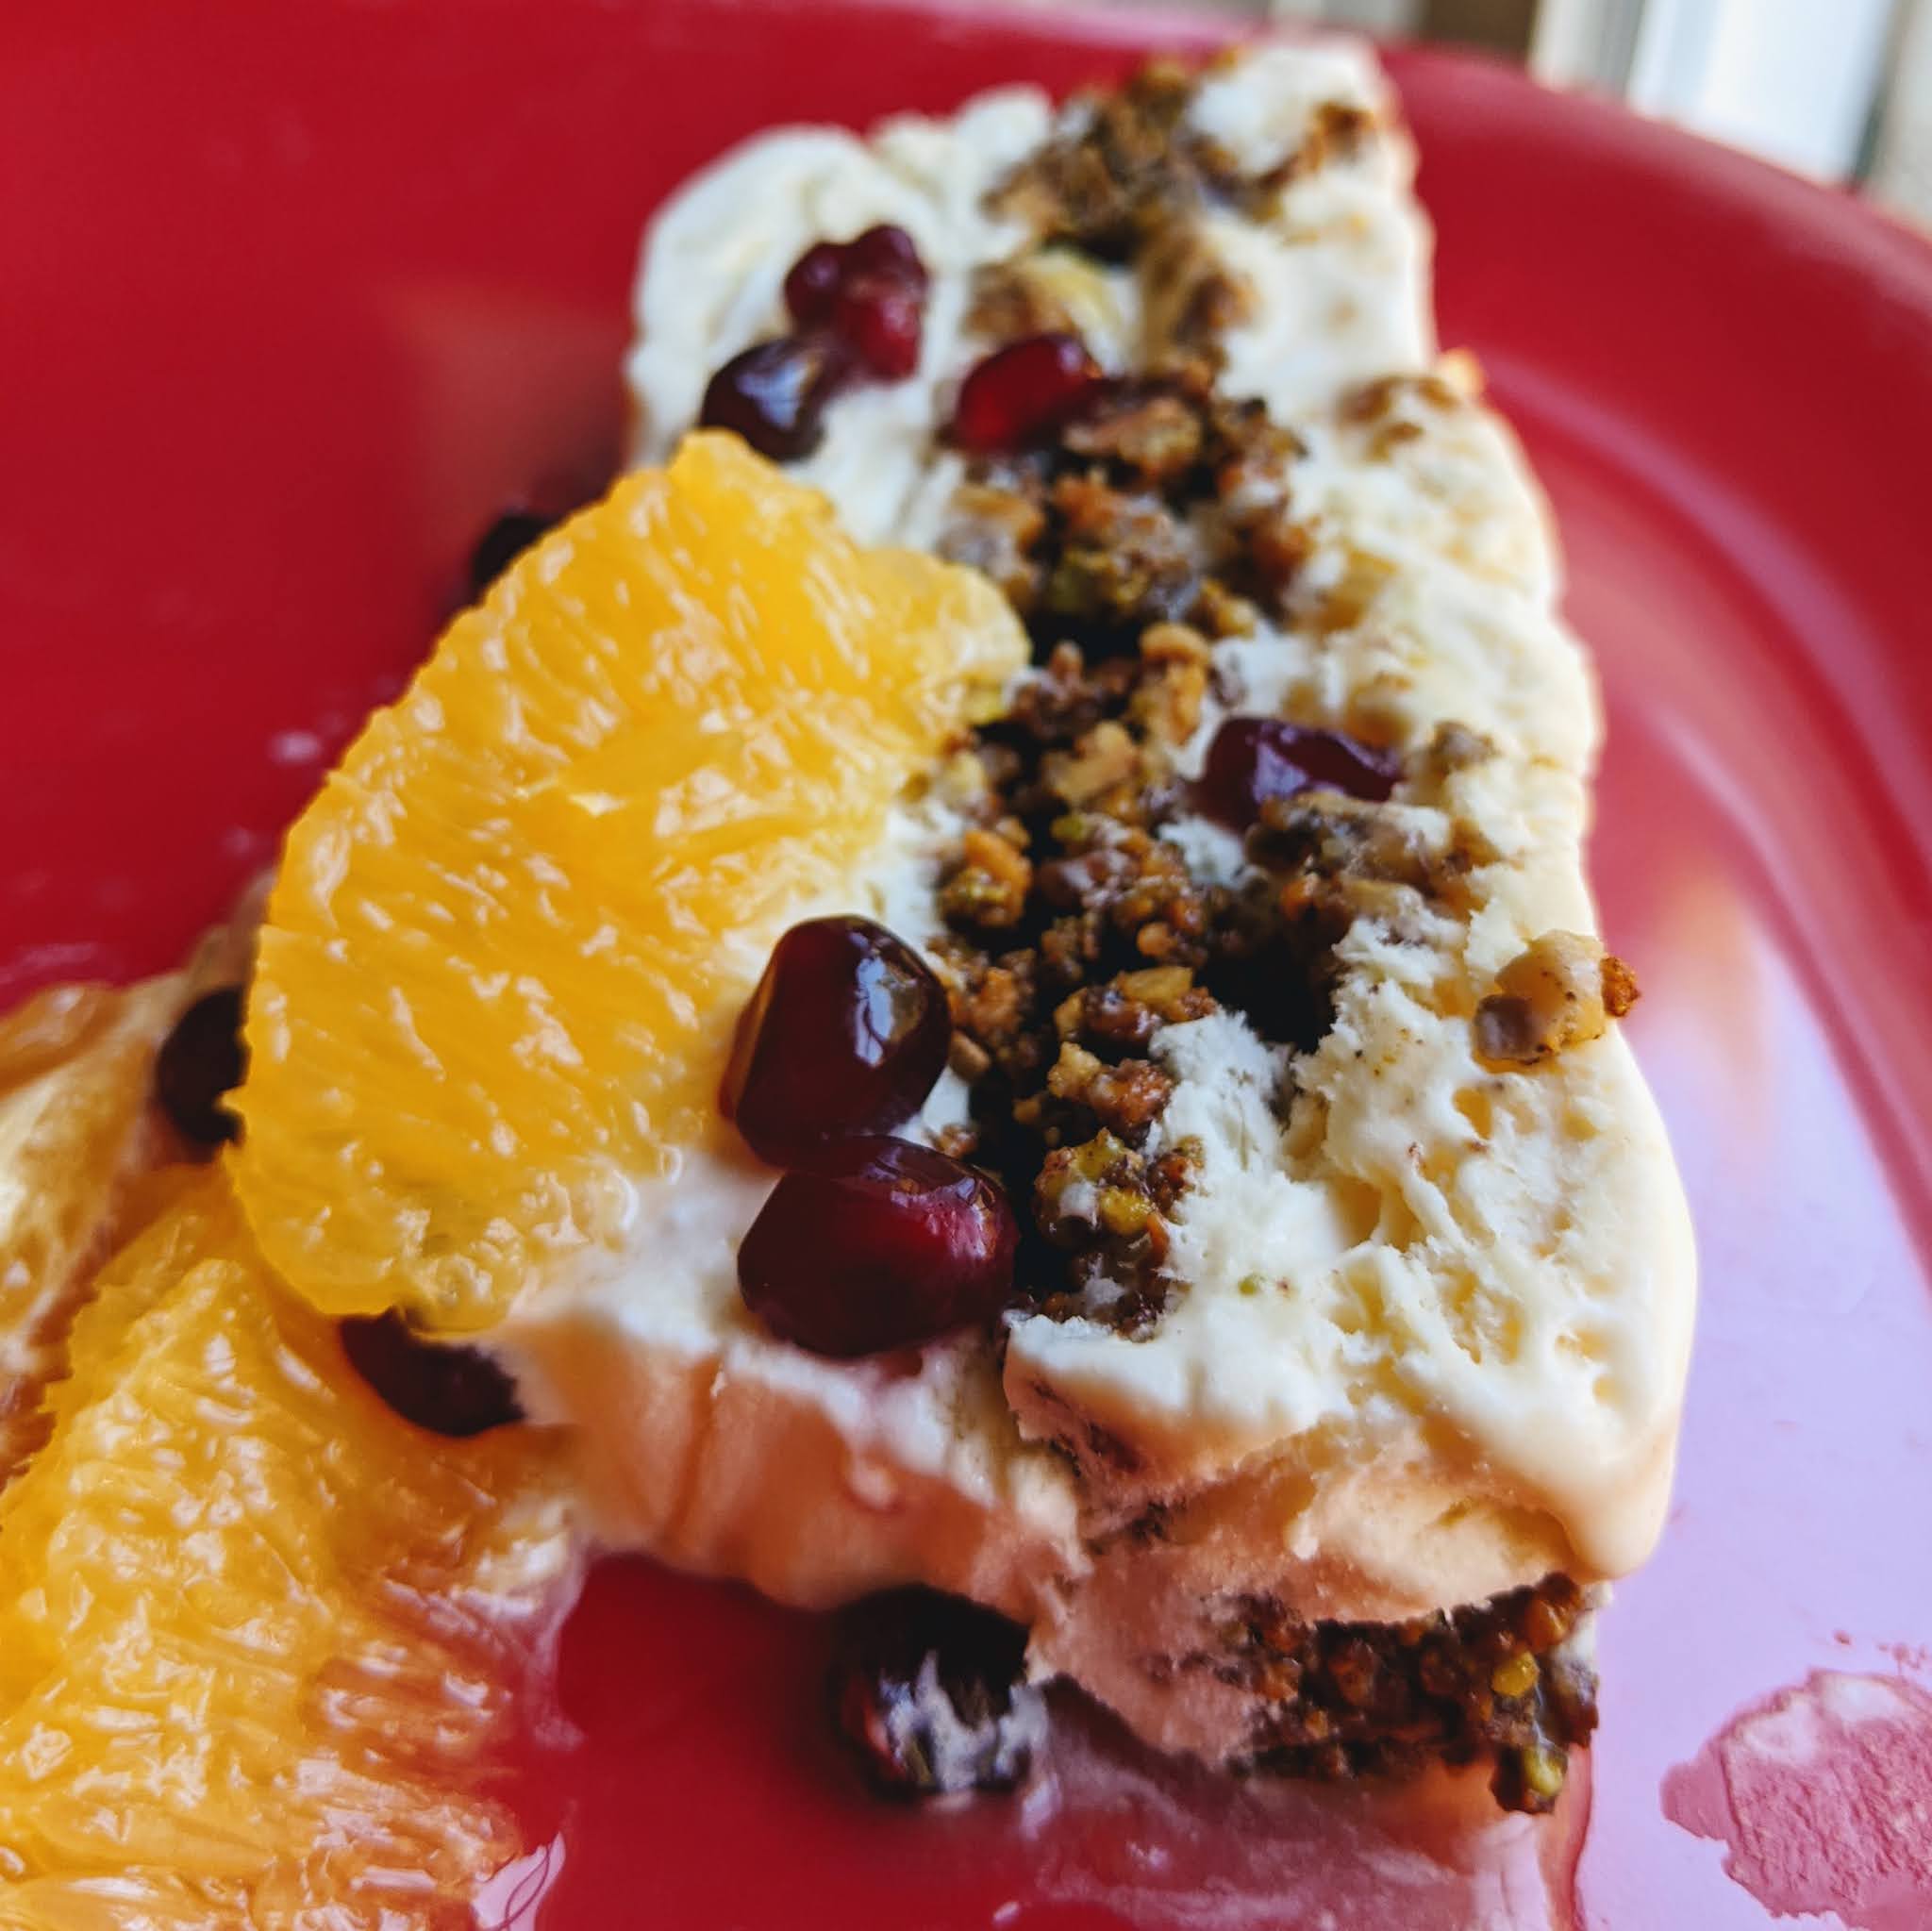
Orange blossom, honey, and baklava semifreddo

I have been participating in the Rainy Day Bites Cookbook Club in Instagram, and the cookbook of the month for September is Falastin by Sami Tamini and Tara Wigley. There are a certain number of recipes that everyone is making, and you can find them by looking for the #rainydaybitescookbookclub tag - so far I've posted hummus with kofta (made with Impossible burger) and green shakshuka. But you know me, I always linger in the baked goods and dessert sections of cookbooks. I have several recipes marked but this semifreddo really caught me, probably because it called for orange blossom water and I was so proud because I thought I had it. I did not realize I didn't actually have any anymore until I was too deep into the recipe, but I found some reasonable substitutes. I think my orange blossom water was tossed in the Big Pantry Reorganization of Pandemic Times 2020, because I know I hadn't used it all. I had been adding some to my iced coffee sometimes, a brilliant idea I got from author Monica Byrne.

This was delicious, lightly sweet and not cloying in sweetness or richness. It is the perfect end to a lighter or heavy meal. And although not traditional, it incorporates so many flavors from Palestine that I'm going to include it in my 2020 reading/baking project.


Orange blossom, honey, and baklava semifreddo

Semifreddo
1 cup heavy cream
6 tbsp granulated sugar
2 tbsp honey
2 tbsp water
1 egg, plus 2 egg yolks
1 1/2 tbsp orange blossom water

Baklava filling
2/3 cup pistachios, toasted
2/3 cup chopped walnuts, toasted
1 tsp ground cinnamon
10 cardamom pods, shells crushed and then discarded, seeds finely ground in a mortar and pestle (or 3/4 tsp ground cardamom)
1/4 tsp flaky sea salt
2 1/2 tbsp honey
1 tbsp orange blossom water

Orange sauce
2 oranges
Mounded 1/2 cup pomegranate seeds
1/4 cup mint leaves, roughly torn

Lightly grease and line the base and sides of an 8 1/2 x 4 1/2 inch loaf pan. Set aside until ready to use. 

To make the semifreddo, put the cream into the bowl of a stand mixer fitted with the whisk attachment. Beat on medium-high speed for about 3 minutes, or until medium peaks form. Transfer to a separate bowl and keep in the fridge until needed. Wash the bowl and whisk and return them to the mixer; they need to be clean and ready to whisk the eggs halfway through the next stage.

Put the sugar, honey, and water into a small saucepan and place over medium-high heat. Bring to a boil, then decrease to a simmer, stirring often. After 3 minutes, add the egg and egg yolks to the bowl of the stand mixer. Beat on medium-high speed for about 3 minutes, until pale and creamy. Decrease the speed to medium-low and slowly pour in the bubbling hot syrup, which should be foamy and glossy. Once the syrup is completely incorporated, increase the speed to medium-high and continue to beat for about 6 minutes, untiul the mixture is pale and glossy and the bowl is cool to the touch. Using a spatula, fold in the orange blossom water and whipped cream until just combined. Put half the mixture - about 7 oz/200 g - into the prepared loaf pan and smooth out the top. Wrap with parchment paper and freeze for 2 hours. Refrigerate the other half of the mixture in a separate bowl until needed.

To make the baklava filling, put the pistachios and walnuts into the bowl of a food processor and blitz roughly until crumbled. Transfer to a small bowl and stir in the spices, salt, honey, and orange blossom water. Once the semifreddo has been in the freezer for 2 hours, gently top with the baklava filling. Spread it out so that the top is covered, without pushing it in. Remove the reserved semifreddo from the fridge, give it a good whisk by hand, then pour it over the baklava filling. Spread it out until smooth, then rewrap the pan with parchment paper and freeze overnight.

To make the sauce, use a small, sharp knife to trim the tops and tails off the oranges. Cut down along their round urves, removing the skin and white pith. Release the segments by slicing between the membranes and transfer them to a bowl, discarding any seeds and squeezing what's left of the membranes to release any liquid into the bowl. Just before serving, add the pomegranate seeds and mint leaves to teh sauce.

Either spoon the sauce in a line along the top of the semifreddo before slicing or serve alongside.

Notes from JennyBakes:

-Since I knew fairly early I didn't have orange blossom water, I zested the orange and rubbed that into the sugar for the semifreddo, and substituted orange juice other places that called for the water.

-I didn't want to wash the food processor again so I just did some rough chopping of the nuts and it was just fine.

Falastin: A Cookbook
by Sami Tamini and Tara Wigley

Other recipes I've made:
Hassan's easy eggs with za'atar and lemon
Green shakshuka
Hummus with kofta
Roasted [squash and] zucchini with whipped feta and pistachios
[Cauliflower] musakhan (instead of chicken!)
Lemon chicken with za'atar

Other recipes I want to make:
Fruit and yogurt with sesame oat crumble and tahini-date syrup
Scrambled red shakshuka
Cauliflower and cumin fritters with mint yogurt
Mashed turnip with greens, caramelized onions, and feta
Chilled cucumber and tahini soup with spicy pumpkin seeds
Beet and feta galette with za'atar and honey
Pasta with yogurt and parsley breadcrumbs
Baked fish kubbeh
Baked fish in tahini sauce (I made a similar recipe from Ralph Nader's Lebanese cookbook)
Open cauliflower pies (sfiha)
Kofta with tahini, potato, and onion
Sweet tahini rolls
Ma'amoul bars

Hmm, this is probably not all going to happen in September!

Monday, September 14, 2020

Marionberry Cocoa Nib Scones

Last week I posted about the chocolate chip (cookies) of the future and I will have some of the baking products from Dandelion to play with for a while, so don't be surprised if half my posts relate to that in the near future. This recipe started with their scone recipe but I went rogue on a few ingredients and used a different process so your mileage may vary. I've been staying up late watching fire reports about where I grew up in Oregon, especially since the entire mountain I grew up on was evacuated. My Mom moved into town from there in April but that didn't meant I wasn't still worried about it. With my head in Oregon I decided to make an Oregon dessert and used some of the marionberries I had in the freezer for special occasions. I decided to try pairing them in the scone with a little chocolate but more subtly in the form of cocoa nibs (which also add texture) and just a few chocolate chips. I would make these again, but would probably bake them at least at 375 for a slightly shorter amount of time (I've never baked scones at 350, but since I did when I made this batch, I'll leave it in this post.)


Marionberry Cocoa Nib Scones

3 cups all-purpose flour
1/2 cup granulated sugar
4 tsp baking powder
1 1/2 tsp kosher salt
1 cup unsalted butter, chilled and cut into 1/2-inch dice
1 large egg
1 tsp vanilla
1/2 cup whole milk
1/3 cup chocolate chips
1/3 cup cocoa nibs
3/4 cup frozen marionberries (can use other berries, maybe not strawberries, dried fruit probably okay)
1/4 cup heavy cream
1/4 cup large crystal sugar (or use what you have)

  1. Preheat oven to 350 F.
  2. Combine dry ingredients into large mixing bowl.
  3. Blend butter into dry ingredients until texture is like rough sand. Using a food processor is okay but fingertips are even better. You don't want to overmix.
  4. Add berries or dried fruit, chocolate chips, and cocoa nibs and toss to coat with flour mixture.
  5. Mix egg with whole milk and vanilla, then trickle over dry ingredients. Use a fork or your hand to lightly mix until mixture starts coming together.
  6. Line a cookie sheet with parchment paper. Gather dough together into 1-2 circles. Cut smaller circles into 4, one large circle into 8, and separate wedges on parchment. 
  7. Brush heavy cream on the top of the scone, and sprinkle with crystal sugar.
  8. Bake 25 minutes until starting to brown, your finger pressing on one doesn't make a squish inside, but not so long the bottoms burn!

Monday, September 07, 2020

Chocolate Chip (Cookies) of the Future

 In the middle of August, I received an email from my husband with the subject line "Choco Chippies of the Future" and it contained this link. I learned about a Tesla senior design engineer who also played with chocolate and had come up with a new faceted design. 

I thought, "Cool!" My husband thought, "We need to try this" and just a few days later I opened a box from Dandelion Chocolates (and the chocolate hadn't melted, which might be the most amazing part of this story) - it contained a cookbook that also had their story in it, large chocolate chips, cacao nibs, melting chocolate, and cacao passion fruit jam. It looks like you can order the bundle minus the cookbook from their site, but it is currently sold out. Probably because of all the people who had to order it after reading the article!

Not surprisingly, the cookies are delicious.


Maybe the Very Best Chocolate Chip Cookies
(from Making Chocolate, by the people who also brought us the chocolate chips of the future)

Ingredients:

 1 cup unsalted butter, room temperature
1 cup granulated sugar
3/4 cup packed light brown sugar
1 large egg
1 tsp vanilla extract
2 1/2 cups plus 2 tbsp all-purpose flour
1/2 tsp plus 1/8 tsp baking soda
1/2 tsp plus 1/8 tsp baking powder
1 tsp kosher salt
1 1/2 cups chopped 70% tempered chocolate

Directions:

In a stand mixer fitted with the paddle attachment, cream the butter and both sugars on medium speed, about 3 minutes. Add the egg and vanilla, and mix on low speed until combined.

In a separate bowl, whisk together the flour, baking soda, baking powder, and salt. Add the flour mixture to the wet ingredients in two additions, mixing on low speed to just combine after each addition. Scrape down the sides of the bowl with a spatula as necessary. Mix on low speed until just combined, about 2 minutes. Add the chopped chocolate and mix on the lowest speed, just until the chips are distributed evenly throughout the dough.

Although you can bake the cookies at this point, we recommend refrigerating the dough overnight (chilling the dough for at least a few hours produces a chewier, more flavorful cookie with better color and even spreading.) When you're ready to bake, scoop out 1/4-cup portions of the dough, roll each into a ball, and press the dough balls down slightly.

Preheat the oven to 350 F and line 2 baking sheets with parchment paper or silicone baking mats. Place the dough on the prepared baking sheets, but do not crowd the cookies; we recommend no more than 6 cookies per baking sheet. They will look enormous.

Bake for 12 minutes, until golden brown on the edges, rotating the baking sheets 180 degrees halfway through to ensure even coloring. These are delicious served warm, or cool them completely on the baking sheets and store in an airtight container for up to 2 days.

Monday, August 31, 2020

Sweet Potato Bebinca from Season by Nik Sharma

I thought I was done with this cookbook (Season by Nik Sharma) but every time I see someone in the Rainy Day Bites Cookbook Club (in Instagram) try another recipe from it, I am drawn back in to the other recipes I've marked. I baked the sweet potatoes for this before realizing I didn't have coconut milk, so this recipe was made over the period of a week. See beneath the recipe for a link to the cookbook as well as how I simplified the recipe process.

This is a take on a traditional Goan custard, but I found it to be more firm than I was expecting. To me the firmness was an asset. It makes it easier to cut, serve, store, and more. The flavor is divine. If any people actually gather for Thanksgiving, I volunteer to bring this! It's the flavors of a sweet potato dessert but easier than pie, and I think I like it better than pie texture. It could be dressed up with whipped cream and nuts or something but I don't think it needs it.


Sweet Potato Bebinca

(recipe is from Season by Nik Sharma but I'm taking this from the New York Times, which you should visit for more contextual info and a picture of a greater smooth texture than I achieved)

Ingredients

  • 2 to 3 medium to large sweet potatoes (1 1/4 pounds total)
  • 6 tablespoons/85 grams unsalted butter, melted, plus more for the pan
  • 6 large eggs
  • 1 cup/200 grams grated jaggery, muscovado, panela or dark brown sugar
  • ¼ cup/60 milliliters maple syrup
  • 1 teaspoon freshly grated nutmeg
  • ½ teaspoon ground turmeric
  • ¼ teaspoon fine sea salt
  • 1 (13.5-ounce/400-milliliter) can full-fat coconut milk
  • 1 cup/130 grams all-purpose flour

Preparation

  1. Heat the oven to 400 degrees. Rinse the sweet potatoes to remove any dirt, pat them dry with paper towels and poke several holes in them with a fork. Put the potatoes in a baking dish or on baking sheet lined with aluminum foil. Roast until completely tender, 35 to 45 minutes. Cool completely before handling. Peel the sweet potatoes, discard the skins, and purée the flesh in a food processor. Measure out 1 2/3 cups/400 grams and set aside, saving the rest for another purpose. (The sweet potatoes may be roasted 1 day ahead and stored in an airtight container in the refrigerator.)
  2. Reduce the oven temperature to 350 degrees.
  3. Line the bottom of a 9-inch round baking pan with 2-inch sides with parchment paper and grease lightly with butter. Put the pan on a baking sheet. In a large bowl, whisk together the cooled sweet potato purée, melted butter, eggs, sugar, maple syrup, nutmeg, turmeric and salt until smooth. Add the coconut milk and flour and whisk until the mixture is smooth, with no visible streaks of flour.
  4. Pour the batter into the prepared pan and put the pan, still on the baking sheet, in the oven. Bake for 55 to 60 minutes, rotating the baking sheet halfway through. The pudding should be firm to the touch in the center and light golden brown around the edges. Remove from the oven and cool completely in the pan on a wire rack. Wrap the pan with plastic wrap and refrigerate to set for at least 6 hours, preferably overnight.
  5. Once the bebinca has set, run a sharp knife around the sides of the pan, flip the pan onto a baking sheet lined with parchment paper, and tap gently to release. Peel the parchment off the top. Invert onto a serving dish, and peel off the second sheet of parchment paper.
  6. To serve, use a sharp serrated knife to cut the chilled bebinca into wedges. Store the leftover bebinca, wrapped in plastic wrap, in an airtight container in the refrigerator for up to 1 week.

Notes from JennyBakes

 I have no idea why the directions don't use a springform pan - half the steps described are unnecessary if you just use a springform pan. I guess there's a little bit of a ledge that forms on the bottom outside, but it's so much simpler! That's the only change I made. (This is also true about his chai masala apple cake which I made the day I'm writing this post - made the same change for that one, and it didn't sag on the edge at all.

I used brown sugar, just light, because that's what I have. I did some looking for jaggery and decided I didn't need to buy it when it wasn't required.

The recipe says to just use a whisk but my sweet potato was still pretty chunky and didn't completely incorporate, which you can really see in the second picture. This had little effect on end result or flavor but the full blend of the cookbook picture and the NYT photo does look slightly more impressive. Next time I'd either run the mixture through the food processor (not the blender or mixer as I don't think it would be wise to introduce more air into it necessarily) or better puree the sweet potato. I bet if you take it directly from the oven and it hadn't been in the fridge a few days, this may not be a problem.

THIS IS SO GOOD; MAKE IT TODAY.

Monday, August 24, 2020

Bombay Frittata from Season by Nik Sharma

I decided this baked egg dish belonged on JennyBakes because it is so delicious! It's actually the first thing I made from Season by Nik Sharma, the cookbook I mentioned last week for the Margherita Naan Pizza. It was the perfect light dinner with massive flavor.

Bombay Frittata

12 large eggs
1/2 cup (100 g) Crème Fráiche*
1/2 cup (70 g) finely chopped red onion*
2 scallions, thinly sliced (white and green parts)
2 garlic cloves, thinly sliced
4 Tbsp fresh cilantro leaves
1/2 tsp garam masala
1/2 tsp fine sea salt
1/2 tsp freshly ground black pepper
1/2 tsp ground turmeric
1/4 tsp dried red chili flakes
2 Tbsp Ghee or vegetable oil
1/4 cup (30 g) crumbled Paneer or feta*

Position a rack in the upper third of the oven and preheat the oven to 350 F (180 C).

In a large bowl, combine the eggs, crème fráiche, onion, scallions, garlic, cilantro, garam masala, salt, pepper, turmeric, and chili flakes and beat with a whisk or fork; do not overbeat. 

Heat the ghee in a 12 in (30.5 cm) ovenproof skillet, such as cast iron, over medium-high heat, tilting the skillet to coat evenly with the fat. When the ghee bubbles, pour the eggs into the center of the skillet, shaking to distribute evenly. Cook, undisturbed, until the frittata starts to firm up on the bottom and along the sides but is still slightly jiggly on top, about 5 minutes. Sprinkle with the paneer and transfer the skillet to the oven. Cook until golden brown, 20-25 minutes. Serve warm.

*Notes from JennyBakes: I used sour cream instead of crème fráiche and it worked just fine. I had shallots so used those in place of red onion, and feta for the paneer. I actually sauteed the onions and garlic a bit before adding the eggs because I didn't want them to have the "sharp bite" the cookbook author enjoys.


Season by Nik Sharma

Other recipes I have marked to try:

-Toasted Cumin and Lime Cucumber Salad (after seeing it on Deborah Balint's Instagram! Yum!)
-Cocoa-Spiced Bean and Lentil Soup
-Eggplant Pilaf
-Sweet Potato Bebinca
-Apple Masala Chai Cake
-Rhubarb, Cardamom, and Rose Water Sharbat
-Salted Tarragon Lassi
-Spiced Mango Milkshake

Recipes I've already made:

-Margherita Naan Pizza
-Egg Salad with Toasted Coriander
-Cardamom Iced Coffee with Coconut Milk

Monday, August 17, 2020

Margherita Naan Pizza from Season by Nik Sharma

 I invited myself along to the Rainy Day Bites Cookbook Club in Instagram and the August cookbook is Season by Nik Sharma. The recipes are Indian with some traditional elements and some spins on traditional recipes. The default is always from scratch and as fresh as possible, from roasting and grinding your own spices to making your own naan. That's what I did for this recipe, a week late or so, but I finally did it! I'll include the naan recipe but not the full pizza recipe; please see the cookbook for that! 

Naan pizza

I never feel quite comfortable with pizza. My stove isn't gas, I don't have a pizza stone, and I can't get quite to the crispness I would like. However I thought the end result was tasty flavor-wise. I ended up just making the two pizzas from the dough rather than making half into garlic naan, which was my original inclination.

Naan
(from Season, with far more directions and narrative and photos)

1/2 cup (120 ml) whole milk, heated to 105 to 115 F (41 to 46 C)
1 large egg
2 Tbsp plain full-fat Greek yogurt
1 Tbsp unsalted butter, melted
1 Tbsp sugar
1 tsp fine sea salt
1 Tbsp active dry yeast
2 cups (280 g) all-purpose flour or whole-wheat pastry flour, plus more for rolling out the naans

Using a fork, whisk the milk, egg, yogurt, butter, and salt in a small bowl. Sprinkle with the yeast and let it sit for 5 minutes. The mixture should be bubbly on the surface.

Put the flour in a large bowl or mound on a clean work surface and make a well in the center. Pour the yeast mixture into the middle of the well.* Using clean hands or a large wooden spoon, gradually mix the flour from the inside wall of the well into the liquid to form a sticky dough. Knead well for 4-5 minutes.

Fold the dough by grabbing it from the underside and stretching it and folding it back over itself. Rotate a quarter of a turn and repeat three or four times. Brush a large bowl with a little oil and put the dough in the bowl. Cover with plastic wrap and allow to rise in a dark, warm place until doubled in size, about 4 hours.

Divide the dough into four equal parts and shape into balls. On a clean, lightly floured work surface, use a rolling pin to roll out the balls of dough, one at a time, into circles about 1/8 in (4 mm) thick and about 6 in (15 cm) in diameter.

To cook the naan, heat a large skillet with a lid over medium-high heat. Slap a circle of dough into the hot skillet and cover the pan to trap the steam. Cook for 3-4 minutes, flip the dough, and turn the ehat to low. Cook, covered, until the naan blisters, with a few big bubbles, 1 to 2 minutes. Remove from the pan and wrap in a clean kitchen towel. Repeat with the remaining three circles of dough.

*If you are an amateur bread or pasta maker, this well concept might not be as easy as it sounds. I had a break in my wall and ended up with less of the flour and less of the yeast mixture than I started with. What a mess! I wish I'd used a bowl. 

Season by Nik Sharma

Other recipes I have marked to try:

-Toasted Cumin and Lime Cucumber Salad (after seeing it on Deborah Balint's Instagram! Yum!)
-Cocoa-Spiced Bean and Lentil Soup
-Eggplant Pilaf
-Bombay Frittata
-Sweet Potato Bebinca
-Apple Masala Chai Cake
-Rhubarb, Cardamom, and Rose Water Sharbat
-Salted Tarragon Lassi
-Spiced Mango Milkshake

Recipes I've already made:

-Egg Salad with Toasted Coriander
-Cardamom Iced Coffee with Coconut Milk


Monday, August 10, 2020

Gluten-Free Blueberry Muffins Made with Coconut Flour

I'm always on the hunt for the best blueberry muffin recipe that fits with the way we eat. I found one on King Arthur Flour that only used coconut flour, which was great because for a few weeks there I couldn't buy all-purpose flour or almond flour.

Thank goodness for companies like King Arthur Flour and Bob's Red Mill who make all these great alternative flours and then provide recipes as well. Coconut flour is really tricky and has to be handled differently. These were rather moist, but I may have been exuberant with my blueberry measuring. I usually have the opposite problem with coconut flour as it absorbs a considerable amount of liquid. I'd like to try this same base recipe again with chocolate chips or nuts.


Gluten-Free Blueberry Muffins Made with Coconut Flour
(from King Arthur Flour)

Ingredients: 
  • 1/4 cup (32g) coconut flour, sifted after measuring
  • 1/4 teaspoon baking powder
  • 3 large eggs
  • 3 tablespoons (43g) butter, melted
  • 3 tablespoons (64g) honey*
  • 1/4 teaspoon salt
  • 1/4 teaspoon vanilla extract
  • 1/8 teaspoon almond extract*
  • 1/2 cup (85g) blueberries (make sure they're thoroughly dry)
Directions:
  1. Preheat the oven to 400°F. Lightly grease six wells of a standard muffin pan, or line them with lightly greased muffin papers.
  2. Sift together the coconut flour and baking powder, and mix until well blended.
  3. Stir together the eggs, butter, honey, salt, and vanilla and almond extracts until smooth.
  4. Mix the dry ingredients into the wet ingredients until there are no lumps. Gently fold the blueberries into the batter until evenly incorporated.
  5. Scoop the batter into the prepared muffin cups, filling each about half full.
  6. Bake the muffins for about 16 to 18 minutes, or until a toothpick inserted into the center comes out clean. Let them cool for about 5 minutes in the pan, then transfer them to a rack to cool.
 *I did not use any almond extract, and subbed coconut sugar for the honey (and still they were very moist.)


The day I made these, it was an impulse Second Breakfast kind of bake. I had been looking through a cookbook I had for review called Good Drinks: Alcohol-Free Recipes for When You're Not Drinking for Whatever Reason by Julia Bainbridge. It comes out from Ten Speed Press on October 6, 2020. This adult version (but not too adult, as there is no alcohol, obviously) of an Orange Julius was easy and delicious - I actually left out the simple syrup so it just contained the sweetness of the orange juice and that was good enough!

Monday, August 03, 2020

Blueberry Hand Pies (grain-free)

I found this recipe when I went looking for blueberry recipes, and I was so intrigued by the technique in Ashley's Blueberry and Goat Cheese Hand Pies that I could not let it go, and made a version of them not long after. I didn't have any goat cheese on hand so went more in the direction of cooking down the blueberries a bit and adding cinnamon and coconut sugar.  But these really do crisp up and this technique would work well for all sorts of fillings. They are definitely best the day they are made. I've made little pie pasties before with pie crust and this technique is completely different from that. It might be helpful to watch her video with the peach version to see how she does it. It really does work.


Blueberry and Goat Cheese Hand Pies
(from Ashley at my heart beets)

Handheld Pie Crust:
  • ½ cup almond flour
  • ½ cup tapioca flour
  • 1 cup coconut milk, canned and full fat
  • egg wash
Filling
  • 1 cup frozen or fresh blueberries
  • 4 ounces chèvre
  • Drizzle of honey (or sweetener of choice)

Instructions
  1. In a bowl combine almond flour, tapioca flour, and coconut milk to form a batter.
  2. Pour ¼ cup of the batter onto a pre-heated non-stick pan over medium heat.
  3. Let the batter cook until the bottom of the flatbread is firm enough to move.
  4. Using a spatula, lift the bread and move it onto a parchment-lined baking sheet, flipping it over so that the sticky side is down.
  5. Repeat this until the batter is done – for a total of six hand pies.
  6. Spread goat cheese on one side of the flatbread, then add about 1 tablespoon of blueberries in the middle of the bread (or as many as will fit). Drizzle honey on top, then seal the pie shut with egg wash. Pinch the dough closed.
  7. Brush egg wash on the pie and repeat about five more times.
  8. Place baking sheet in oven at 350F for 30-40 minutes or until crispy outside.

Monday, July 27, 2020

Chocolate Chip Tahini Cookies

Edd Kimber recently published his first cookbook, One Tin Bakes, not yet available in the USA. He recently posted a picture from one of the recipe sin it - Salted Tahini Chocolate Chip Cookie Bars. If I know anything about recipes, it is that cooks tend to "borrow" from one another, intentionally or not. So I went looking, and found that Julia Moskin had posted Danielle Oron's Salted Tahini Chocolate Chip Cookies in New York Times Cooking about two years ago, which was a very popular recipe. Between cookie form and bar form, I'd be surprised if these two recipes had any differences. I found that David Lebovitz had also played with the NY Times recipe and made a few tweaks to the sugars and chocolate component. I decided to use his recipe for Chocolate Chip Tahini Cookies since it is available on his blog and isn't behind a pay wall.


One comment I saw frequently between David and Danielle's recipes was that people liked the dough more than the cookie itself, that the tahini flavor was not as apparent once the cookies were baked, etc. So I did some experimenting when I baked the cookies, like not adding salt to the top, or adding sesame seeds before baking. I found that my favorite of the three was just the plain cookie, no added salt or sesame. But the comments are also right in that the dough is pretty damn spectacular and I went with eating the dough rather than baking the cookies for probably half the batch. I'm not ashamed. I used bittersweet chocolate chips from Ghiradelli because it's what I had; David makes a big thing of using chocolate shards and I have no doubt those would be tasty, just not as easy for me to acquire.


(Salted) Tahini Chocolate Chip Cookies
(as adapted from Danielle Oron by David Lebovitz, please see his recipe for more recipe and ingredient information as well as other tips)
8 tablespoons (115g, 4 ounces) unsalted butter, at room temperature
1/2 cup (120ml) tahini, well stirred
1/2 cup (100g) granulated sugar
1/2 cup (90g) packed light brown sugar
1 large egg, at room temperature
1 large egg yolk
1 teaspoon vanilla extract
1 cup plus 2 tablespoons (150g) flour
3/4 teaspoon baking soda
1 teaspoon kosher or sea salt
2 cups (280g) bittersweet or semisweet chocolate chunks, or chocolate chips
flaky sea salt (optional)
1. In the bowl of a stand mixer, beat the butter, tahini, granulated sugar and brown sugar on medium speed for 2 to 3 minutes, until fluffy. (The dough can also be made in a large mixing bowl, stirred with a spatula.)
2. Stop the mixer and scrape down the sides. Add the egg, the yolk, and vanilla, and continue to mix for another minute, stopping the mixer to scrape down the sides of the bowl during mixing, to make sure the eggs are getting incorporated.
3. In a small bowl, whisk together the flour, baking soda, and kosher or sea salt. With the mixer on low speed, add the dry ingredients until just combined, then add the chocolate chips. Do not overmix. Cover the dough and refrigerate overnight.
4. Preheat the oven to 325ºF (160ºC). Line two baking sheets with parchment paper or silicone baking mats.
5. Form the cookies into rounds using an ice cream scoop, or your hands. For small cookies make each 1 1/2-inch (3,5cm), for larger cookies, make them 2-inches (5cm) round. Place them evenly spaced on the baking sheets, 3-inches (8cm) apart). Bake one sheet at a time, so you can keep an eye on them, in the middle rack of the oven.
6. Bake the cookies, turning the baking sheet in the oven midway during baking, until the cookies are golden brown around the edges but still pale in the center. For small cookies, about 12 minutes, for larger cookies, about 14 to 15 minutes. Remove from the oven, sprinkle cookies with a bit of flaky sea salt, and let the cookies cool on the baking sheet. Bake the remaining cookies the same way.
Storage: These cookies will keep for two or three days at room temperature, but are definitely better the same day they're baked. The unbaked dough can be refrigerated for up to one week, and frozen for up to two months.
 

Monday, July 20, 2020

Cornmeal Blueberry Cake (grain-free)

We have two blueberry plants in our backyard and they are producing a good number of blueberries (for some reason the birds don't seem interested this year.) I went looking for recipes that use berries and cake across Martha Stewart's Cornmeal-Berry Sheet Cake. I decided that since it's just in a 9x13 pan (not really a sheet pan) I could probably adapt it to be grain-free and slightly lower-sugar. So I did. Follow the links to the original recipe; my recipe is below. I baked this on July 4th but in reality we ate it for breakfast on July 5th.


Cornmeal Blueberry Cake
(a riff on Martha's Cornmeal-Berry Sheet Cake) 

Ingredients

1 1/2 sticks unsalted butter, room temperature, plus more for pan
1 1/2 cups almond flour
3/4 cup fine yellow cornmeal
1/4 cup tapioca flour (could also use arrowroot or leave out)
1 1/2 teaspoons baking powder
3/4 teaspoon coarse salt
1 1/2 cups coconut sugar
3 large eggs
1 1/2 teaspoons pure vanilla extract
3/4 cup buttermilk*
1 1/2-2 cups blueberries

Directions

Preheat oven to 325 degrees. Butter a 9-by-13-inch baking pan and line with parchment, leaving overhang on long sides. Butter parchment.

Whisk together flours, cornmeal, baking powder, and salt in a bowl.

Beat butter and sugar on medium-high speed until well combined, about 2 minutes. Add eggs, one at a time, beating well and scraping down sides of bowl as needed. Beat in vanilla. Add flour mixture in 3 batches, alternating with 2 batches of buttermilk and beating until just combined. Spread batter in prepared pan. (If using my adapted version here, batter is rather loose and soft, do not despair!)

Sprinkle berries over top or gently incorporate into batter. Bake until golden brown and a toothpick inserted into center comes out clean, about 1 hour. Let cool completely on a wire rack. Remove cake with parchment and cut into pieces (3 or 4 on short side, then 4 or 6 on long side).

Monday, July 13, 2020

Pupusas de Queso (Cheese Pupusas)

One of the last places we ate in "normal times" was a local pupuseria - a place that sells pupusas (and more). A pupusa is a corn griddle cake filled with a variety of ingredients. Since COVID-19 shut down the ability to go out to eat, we've been using our local delivery apps to try some of the random local restaurants. My husband loves all Latin American foods and would happily eat inside that cuisine every day, so we've tried everything from Dominican to Colombian to Salvadoran. (I seem to prefer Colombian the most, with the arepas and empandas.)


Both El Salvador and Honduras claim the pupusa, which is his absolute favorite, so much so that we declared Sunday to be Pupusa Sunday. Most of the time, we get them from a place that makes Salvadoran and Honduran food. I like the chicharron & frijol, Nathaniel usually gets hongos (mushroom) and espinaca (spinach.)


I hate long food blog intros but I promise this is all relevant. Two months ago, I noticed one of my Instagram friends posting food she'd made that was part of the "Rainy Day Bites Cookbook Club." I looked into it and it was started by Deborah Balint. She picks a cookbook each month and specific recipes and posting dates for the dishes. I loved this idea and invited myself along (it seems to work that way anyway) and meant to do the June cookbook but time got away from me. For July, though, I couldn't pass up a chance to make pupusas after everything I've explained previously.

The cookbook for July is We Are La Cocina. La Cocina is an "incubator kitchen" in San Francisco, a nonprofit working to provide commercial kitchen space for women, immigrants, and people of color. The cookbook is beautiful and contains profiles of women who have started business there, found a passion, etc. Most have at least one recipe; several have multiple, and the variety of backgrounds is reflective of that community. This is a cookbook to keep on my shelf for when I'm curious about a specific cuisine (there are a few recipes from the elusive filipino cuisine that I read about but haven't tasted, for instance.)

The pupusa recipe comes from Maria Del Carmen, who owns a business called Estrellita's Snacks.  She walked to California from El Salvador and ended up starting this successful business. I would love to try her pupusas someday, but for now I was happy to try her recipe. There are pictures in the cookbook showing the process but I found even more detailed steps on her Instagram account.

I won't include the recipe here because really, you should buy the cookbook of course, but so much of a pupusa recipe is about feel. I feel I may have not hydrated the corn flour enough, and totally meant to use beans in these but discovered we didn't have any after everything else was already ready. I clearly need to try the recipe again. I did make Maria's recipe for curtido, that's what looks a bit like coleslaw but is more of a quick pickled cabbage with a little bit of a kick from a pepper you can't see. Instead of the traditional (somewhat thin) salsa we always get from the restaurant, we prefer our pupusas with Cholula chipotle hot sauce (not a paid advertisement, we just like it.)

Before I tried the recipe for the first time, I also watched a bunch of YouTube videos since I usually learn a lot from real home cooks. One video is Curly and his Abuelita making pupusas together, another is all in Spanish but uses an unknown (to me) ingredient called loroco (which seems pretty popular on the internet for pupusas) and she makes them very differently from most Salvadorans I've watched, and then one that was really fun where three Salvadoran Moms try each other's pupusas and vote for the best. They have opinions!