Red Velvet Cake has been a theme in my life lately. First, we had a library cake walk to raise money for Relay for Life. One person paid for five rounds of the cake walk just to try to win the red velvet cake that had been contributed.
Then, one of my favorite baking blogs made Red Velvet Cupcakes for the March challenge of a group of baker bloggers called Daring Bakers (which I'm joining starting in May!). Her post also lists what everyone else made, and after seeing post after post of red velvet cakes, I simply had to make one.
The night I made this cake was somewhat of a comedy of errors - I don't like to force butter to come to room temperature (no microwaving allowed, in other words) and didn't take it out of the fridge until I got home at 5 that day. Then I discovered that somehow I only have one 9-inch cake pan, meaning I had to bake the cake one layer at a time. It was 10:30 before I even thought about making icing, and I had to be at work at 8 the next morning. It made for a late night, but my students seemed to enjoy the cake.
This red velvet cake recipe comes from a new cookbook - The Lee Bros. Southern Cookbook. I made Pimento Cheese from it and featured it in my vegetarian cooking blog two weeks ago.
Red Velvet Cake
Makes one 2-layer, 9-inch cake; enough for 12 people.
For the cake:
2 3/4 cups plus 1 tbsp sifted cake flour or 2 1/2 cups sifted bleached all-purpose flour, plus more for flouring the pans
2 tsp salt
2 tsp baking powder
1/4 tsp baking soda
1/4 cup natural cocoa powder such as Hershey's
1 ounce red food coloring
1 1/2 tbsp water
1 cup (2 sticks) unsalted butter, softened, plus more for greasing the pans
2 cups sugar
3 large eggs
1 1/2 tsp natural vanilla extract
1 tbsp orange zest (from 1-2 oranges)
1 cup whole or lowfat buttermilk
For the icing:
3/4 cup (1 1/2 sticks) unsalted butter
1 pound cream cheese (2 packages), softened
1 pound (4 cups) sifted confectioners' sugar
2 tbsp whole milk, if needed
1. Preheat the oven to 350 degrees. Grease and flour two 9x2-inch cake pans or line their bottoms with greased, floured waxed paper.
2. Sift the flour, salt, baking powder, and baking soda together twice. In a small mixing bowl, whisk the cocoa, red food coloring, and water to a smooth paste, about 1 minute, and reserve.
3. In a large mixing bowl, beat 1 cup butter with an electric mixer until creamy, about 30 seconds. Add the sugar, 1/4 cup at a time, beating about 15 seconds after each addition and scraping down the sides of the bowl if necessary, until the mixture has lightened in color and become fluffy, about 2 minutes. Add eggs, 1 at a time, the vanilla, and orange zest, beating for 15 seconds after each addition. Add the red cocoa paste and mix until evenly incorporated.
4. Add the flour mixture to the butter and egg mixture in thirds, alternating with 2 additions of half the buttermilk. To avoid overworking the batter, gently mix with a wooden spoon or rubber spatula after each addition, until the ingredient is just incorporated. Once all ingredients are incorporated, beat the batter 10-12 strokes with your spoon or spatula if using cake flour, 2-3 strokes if using bleached all-purpose flour.
5. Divide the batter between the cake pans and spread the tops evenly with the wooden spoon or spatula. Bake until a cake tester or toothpick emerges clean, about 30 minutes. Remove from the oven and let the cakes cool in their pans on a rack for 10 minutes, then slide a thin paring knife around the edge of the pan and invert the cakes. Lift away the waxed paper if using. Cool the cakes completely on a rack, with their tops facing up.
6. In a large bowl, beat 3/4 cup butter with the mixer until creamy, about 30 seconds. Add the cream cheese and beat until the mixture is fluffy, white, and very smooth, about 1 minute. Add the confectioners' sugar 1 cup at a time, beating for 30 seconds after each addition, until the mixture is creamy, fluffy, and smooth. If the frosting is too stiff, beat the milk into it to loosen it.
7. Gently ice the cake layers generously. Spoon 1 cup of icing in the center of the first cake layer. Working an icing or rubber spatula in gentle swirling motions, spread the icing from the center towards the edges of the cake until it forms an even layer 1/3 to 1/2 inch thick .
8. Carefully set the second cake layer on top of the first and ice the second layer in the same manner, beginning with a dollop in the center and working it out to the sides. Then ice the sides of the cake.
9. Store the cake at room temperature, beneath a cake cover. If you don't plan to eat it for 24 hours, put it on a plate, tent it with plastic wrap, and store it in the refrigerator for up to 3 days. Remember to remove the cake from the refrigerator 1 hour or more before serving to take the chill off.
Jenny's notes: I didn't pay close attention to beating times on this cake, and wonder if my overbeating contributed to a slightly dry cake texture. I also didn't sift the dry ingredients (shh! don't tell!), so that could have contributed.
I don't ice cakes in the way this recipe recommends - I do the middle, then the sides, and then the top, just like I was trained when working as a cake decorator. You may find it easier to do it this way as well.
The icing makes a bunch more than the cake needs, even when icing generously. I saved the rest and used it on top of cinnamon rolls Easter morning (adding orange juice and zest to it for orange rolls!).
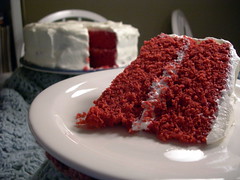
Make sure you check your amounts on food coloring - most dye bottles sold in sets are only about 1/3 ounce, and you really need a full ounce. I had added a tube of red food coloring gel and it made it a nice pink, but I had to add an entire separate bottle to end up with the red cake that I picture here.
Categories: Cake, Cream Cheese, Red
1 comment:
I love Red Velvet Cake like most mothers love their children. I want to eat it up now!
Dang, I'm gonna have to come back here all the time to drool on myself. :)
Post a Comment