Tuesday, December 26, 2017

Mexican Hot Chocolate Cookies

Growing up, I lived in an area with many people from various parts of Latin America. This meant that most grocery stories had aisles of Hispanic foods, and several of them made them into the staples at my house. One was Abuelita hot chocolate tablets (not a paid advertisement), where you could drop a chocolate tablet and hot milk in a blender and in no time, you would have a delicious, spicy hot chocolate. Coffee shops would sell Mexican mochas, which would be a spicy mocha. These were delicious times.

I came across a recipe from Aaron Sanchez on the Food Network website for "Cinnamon-Spiced Hot Chocolate Cookies." I adapted it slightly and renamed it to what I think he meant. Chocolate mixed with spices has Mexican heritage and we should be proud to say so!


Mexican Hot Chocolate Cookies

1 cup all-purpose flour
1/2 cup unsweetened cocoa powder
1 1/2 tsp ground cinnamon
generous pinch black pepper
generous pinch cayenne pepper
1/4 tsp baking soda
1/2 tsp salt
6 tbsp unsalted butter, at room temperature
1/2 cup packed light brown sugar
1/2 cup granulated sugar
1 tsp vanilla extract
1 egg
1/2 cup dulce de leche (or more if you are making sandwich cookies)
1/4 cup almonds, toasted and chopped

  1.  Mix flour, cocoa powder, spices, baking soda, and salt together in a small bowl.
  2. Cream butter and sugars until sugar is well incorporated. Beat in vanilla and egg, scraping down the bowl.
  3. Gradually add dry ingredients, mixing until just blended.
  4. Lay out sheet of plastic wrap and dump dough into a pile on top, using plastic to form it into a log shaped roll.
  5. Chill about 30 minutes, and take out to roll into smoother cylinder.
  6. Let chill at least another hour but preferably overnight.
  7. Preheat oven to 350 F. Line cookie sheet with parchment paper.
  8. Slice cookies to desired size but try to make them close in size.
  9. Bake 10-11 minutes, but do not overbake!
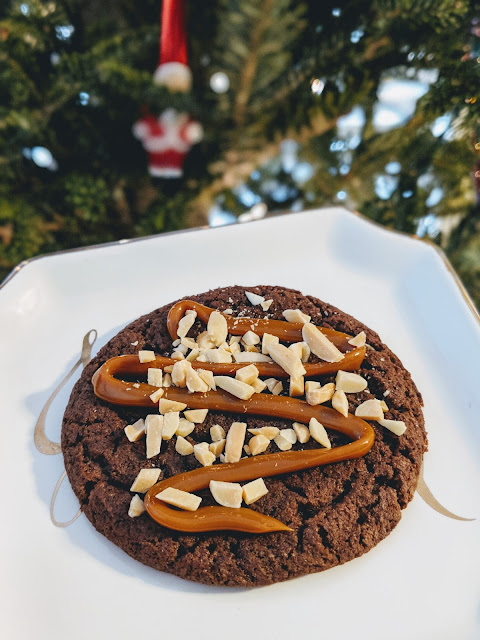
  10. When completely cool, you can choose to make sandwich cookies by spreading one cookie with 1 tbsp dulce de leche and sandwiching on another. Or you can "drizzle" dulce de leche on top and sprinkle with almonds. (To drizzle dulce de leche it is likely you will need to heat it, otherwise it is more accurate that you will just glomp it on the cookie. Tasty but not as attractive. Cookie pictured had dulce squeezed on from a ziploc that had been heated for about 15 seconds in the microwave.)
I found I preferred these after they'd sat around with the dulce, at least overnight. You could leave the dulce and almonds out if you needed a cookie that was easier to transport, but it's definitely an elevation of the entire recipe!

Monday, December 18, 2017

Double Chocolate Almond Biscotti

This is based on the Chocolate Biscotti recipe in Baking: From My Home to Yours by Dorie Greenspan. It made the rounds a few years ago during the Tuesdays with Dorie baking series a bunch of bloggers participated in, but I didn't make that recipe.

Mom, don't read this! Ha.

I have not done a lot of holiday baking this year.

Partly because of a trip in early December, partly because the weather is wrong, partly because holidays are strange after a death in the family, and traditions are all wrapped up in memories.

What I should really do is make peanut brittle and fudge, the two things my Dad would spend an entire day making around the holidays. But I'm not there yet.

My Mom asked me if I could make her some biscotti, so I decided to try a new recipe. I will have some on the way to her the day this posts.

Biscotti should be shipped separately from other baked goods, because extra moisture in other items may soften the cookies. And with biscotti, it's all about the "twice-baked" texture.

Double Chocolate Almond Biscotti

2 cups all purpose flour
1/2 cup unsweetened cocoa powder
1 tbsp instant espresso powder
1/4 tsp baking soda
1/2 tsp baking powder
1/2 tsp salt
3/4 stick (6 tbsp) unsalted butter, at room temperature
1 cup sugar
2 large eggs, lightly beaten
1 tsp vanilla extract
1/4 tsp (at most) or a drop of almond extract (it's strong! don't add more!)
1 cup slivered almonds
3/4 cup mini chocolate chips

1. Preheat the oven to 350 F. Line a baking sheet with parchment.
2. Sift together the flour, cocoa, espresso powder, baking soda, baking powder, and salt.
3. Beat the butter and sugar together on medium speed until pale, about 2 minutes. Add the eggs and extract(s), scraping down the sides of the bowl, and beat for another 2 minutes. Reduce mixer speed to low and add the dry ingredients in three additions, mixing only until a dough forms. Scrape down the sides of the bowl. Mix in the nuts and chocolate, then turn the dough out onto a work surface and press in escaped ingredients.
4. Divide the dough in half. Working with one half at a time, roll the dough into 12-inch-long logs. Flatten the log with the palm of your hand, so that it is 1/2 to 1 inch high, about 2 inches across and rectangular in shape. Lift onto baking sheet. Repeat for second half of the dough.
5. Bake the logs for about 25 minutes, or until they are just slightly firm. Remove the baking sheet from the oven, put it on a cooling rack and cool for 20 minutes. Leave the oven on.
6. Using a long serrated knife, cut each log into slices between 1/2 and 3/4 inch thick. Stand the slices up on the baking sheet with space between each and bake again, this time for 10 minutes. Let cool.

Monday, December 11, 2017

Afternoon Tea in St. Augustine, Florida

It appears that the options I will describe below are temporary and linked to the Dressing Downton exhibit at the Lightner Museum, but I hope either site changes its mind and starts offering afternoon tea on a regular basis. Why not?


My husband and I recently spent half a week in St. Augustine, one of our favorite places to visit in the southeast. This time around we decided to do more of the historical places, including the Lightner Museum, the Castillo de San Marcos, the Flagler history tour, a carriage ride, and even a tour at the place we stayed, The Collector Inn. Since the Dressing Downton exhibit was also at the Lightner, they offered afternoon tea at the Cafe Alcazar (now through January 4, 2018.)

The tea required reservations, and we were very fortunate that someone working there took pity on us and added a table, as they were technically booked when we tried making reservations. The cafe is in what used to be the pool of Flagler's second huge hotel in St. Augustine, and is now the center of the Lightner Museum. Tea started with a soup or salad course along with iced tea, while they took our hot tea orders (pretty smart, I thought!). The rest of the tea is portrayed above, with sandwiches on the bottom, scones and a cookie in the middle, and tiny sweets on the top. While we had tea, they played music from Downton Abbey. They sent us home with samples of the hot teas on offer, so everyone was able to try at least two kinds - one in the pot, and one in loose leaf brewed at home.

It looks like after this particular exhibit moves on, and afternoon tea goes along with it, you can continue to lunch at the Cafe Alcazar.

I recently discovered that you can also have afternoon tea and view Gosford Park at the nearby Corazon Cinema and Cafe.  That's a place we will want to visit in the future, because we didn't make it this time around.

Monday, December 04, 2017

Pumpkin Spelt Scones with Maple Glaze

I have been watching the new episode of Martha Bakes (not a paid advertisement) and this season she is focused on what she calls healthy baking and is really more about alternative flours. (I clarify this because just using an alternative flour does not necessarily cut down on carbs, but can, so your mileage will vary as to if the alternatives are healthier.) Many of the recipes seem to come from a newer cookbook by Martha, A New Way to Bake.

The pumpkin spelt scones she made looked good and I had not yet tried spelt in baking, which is not low-carb but is supposed to be easier to digest than all-purpose flour. One of the blogs I use frequently, Chocolate Covered Katie, seems to use spelt flour most often! Most places that discuss spelt recommend using only half spelt in a recipe because using all spelt flour can cause structural problems. Martha referred to this as creating a "tender" texture, and I decided to go with it for the first time. Next time I'd mix spelt with other flours, because the others were right! But these were still tasty. I did use coconut sugar instead of real, to try to cut back some on the carbs.


Pumpkin Spelt Scones with Maple Glaze
(recipe from Martha Stewart via Martha Bakes on PBS.org)

Ingredients 
 
2 cups spelt flour
1/3 cup natural cane sugar
2 teaspoons baking powder
¾ teaspoon ground ginger
¾ teaspoon ground cinnamon
½ teaspoon freshly grated nutmeg
Coarse salt
1 stick (1/2 cup frozen unsalted butter, grated on large holes of a box grater; plus 1 tablespoon melted
2 tablespoons heavy cream, plus more for brushing
1 large egg, room temperature
1/3 cup canned unsweetened pumpkin puree
½ cup confectioners’ sugar
2 to 3 tablespoons pure maple syrup

Directions
  1. Preheat the oven to 375 degrees. In a bowl, whisk together flour, cane sugar, baking powder, ginger, cinnamon, nutmeg, and ¾ teaspoon salt. Stir in grated butter.
  2. In another bowl, whisk together cream, egg, and pumpkin; stir into flour mixture just until dough forms. (It will still be crumbly.) Pat into a 6-inch round on a parchment-lined baking sheet. Brush with cream. Using a knife or bench scraper, cut dough into 8 wedges, and pull 2 inches apart.
  3. Bake, rotating sheet halfway through, until scones are golden brown, about 20 minutes. Let cool completely on sheet on a wire rack.
  4. In a small bowl, stir together melted butter, confectioners’ sugar, 2 tablespoons maple syrup, and a pinch of salt until smooth. If glaze is too thick, add additional maple syrup, 1 teaspoon at a time. Dip tops of scones in glaze and transfer to rack set on baking sheet. Allow glaze to set for 30 minutes before serving. (Scones are best the day they’re made but can be kept in a single layer in an airtight container up to 1 day.)

Monday, November 27, 2017

Chocolate Tahini Challah Buns and Thanksgiving 2017

Sometimes I linger over a recipe, waiting for the right time to make it, and Deb at Smitten Kitchen's recipe for chocolate tahini challah buns has been one of those. Last December I made chocolate tahini cookies and thought they were delicious, so I was curious how that flavor combination would do in this challah bun configuration. My husband and I eat low-sugar most of the time, and sometimes on holidays we overdo it on the sweet department and feel less than great for the holidays. So I was also interested because Deb mentions that the dough, being challah instead of cinnamon roll dough, is less rich, and that overall they are not super sweet. I decided this might be the perfect Thanksgiving breakfast for us, and also went light on the glaze.

Pictured: buns before glaze (I used the orange juice version.)

I liked these okay. I am a bit out of practice with yeast and feel like the dough wasn't as risen as I wanted it to be, but true to form for most Thanksgiving Eves I had waited longer than I intended to start them and I was impatient.

I did go up through all the steps up to placing the cut rolls in the pan, and then stuck the pan covered in the fridge, already with egg wash.

In the morning, it was Nathaniel's day to get up early with the dogs so he took the pan out and they sat around for an hour before I baked them.

I used bittersweet chocolate because I had a bar of it leftover from a previous baking project that was exactly the right amount. I would say that the type of chocolate you choose will heavily influence whether or not the rolls are received as sweet or not; with bittersweet they really aren't very sweet at all. I did notice that the chocolate burns a bit cooking so long in the bun, and I'm not sure how to avoid that fate.

I'm going to copy and paste her recipe here, but only because I worry about it disappearing, and know it's okay to do so with a recipe based on USA copyright law. But this recipe is not mine, and you should buy her cookbooks, because she does a lot of recipe testing until a dish is right! And if you follow my many links to her recipe, you will see step by step directions. I have erased the metric measurements because some of the comments on her blog said they were incorrect, and she may update them, so check back there.

Chocolate Tahini Challah Buns
Source: Smitten Kitchen

Dough

2 large eggs
1 large egg yolk
1/4 cup granulated sugar
1/2 cup vegetable or another neutral oil, or melted butter
2/3 cup milk or water, plus an additional tablespoon if needed
3 3/4 cups all-purpose flour, plus more for the counter
1 packet (2 1/4 teaspoons) instant yeast
1 1/4 teaspoons coarse or kosher salt
Butter or nonstick spray for baking pan

Filling and assembly

4 ounces dark (semi- or bittersweet) chocolate (or approximately 3/4 cup chocolate chips)
1/2 cup unsalted butter, cold is fine
Scant 1/2 cup powdered sugar
1/4 cup cocoa powder
1/4 cup tahini, well-stirred
1 large egg, beaten
Sesame seeds

Glaze (optional)
2 cups powdered sugar
3 to 4 tablespoons lemon or orange juice

Make dough: Whisk eggs, yolk, sugar, oil and milk or water in the bottom of a stand mixer bowl. Add flour, yeast and salt and combine with dough hook until it comes together, then let machine knead it for 5 to 7 minutes. Oil a large bowl and let dough rise in it at room temperature for 2 to 2 1/2 hours, until slightly shy of doubled. 
 Were your ingredients really cold? This is fine, but if so, it might take 30 to 45 minutes longer. You can speed this process along by turning your oven on to 150 degrees F and turning it off and then placing bowl the dough inside. Keep an eye on it because it will rise more quickly.
Butter a 9×13-inch or equivalent size baking dish, or coat it with nonstick spray.

Make filling: Melt butter and chocolate together until smooth. Stir in powdered sugar, cocoa and tahini; mixture should be a spreadable consistency. [New note:] If your filling is thin, pop it in the fridge or freezer (if freezer, keep a very close eye on it) for a few minutes to let it thicken a bit.

Assemble buns: On a very well-floured counter, roll out dough into a rectangle about 18 inches wide (side facing you) and as far away from you (i.e. length) as it comfortably goes, usually 12 to 15 inches. Dollop chocolate mixture over and spread it smooth. Roll dough in a tight spiral.
Cut log very gently — it’s going to be a soft mess, use a sharp serrated knife, sewing thread works well here too — into 1 1/2-inch to 2-inch segments. Arrange cut side up in prepared pan. Beat egg in small bowl. Brush tops of buns and tops of sides with egg and cover with plastic wrap. You can either fefrigerate overnight, along with leftover egg wash or leave it at room temperature to proof for another 60 to 90 minutes, until puffed a bit.

Bake buns: If in fridge, remove buns from fridge and let warm up for 30 minutes before baking. Heat oven to 350 degrees F. Brush tops tops of sides with egg with egg wash again (I forgot and skipped the sides, which is why they are pale in the photos) and sprinkle with sesame seeds. Bake for 30 minutes, until bronzed all over and buns have an internal temperature of 190 degrees F. Let cool slightly before serving.

To glaze (optional): If using glaze, whisk ingredients until smooth. You can drizzle this over the buns or serve it alongside with a spoon. If drizzling over, it’s best to let the buns almost fully cool before putting it on or it may melt off.

***

Just a brief note about the rest of our Thanksgiving meal - I made dishes that were lightly influenced by Native American recipes. We had salmon with potlatch spices, roasted root vegetables with a mustard seed vinaigrette (from the Mitsitam cookbook), wajapi made from cranberries and blueberries, fry bread, and apricot juice. Many traditional cookbooks had "apricot drink" made from "field apricots" but I don't even really understand what those are! It was a delicious meal and not too heavy, just the two of us.


Monday, November 20, 2017

Gluten-free, Grain-free Pumpkin Waffles

I looked at some protein waffles, paleo waffles, and various other pumpkin waffle recipes online and decided to make up my own. These were tasty and the morning after I made them, we all agreed we should have just made these pumpkin waffles again!


Pumpkin Waffles (grain-free, gluten-free)

¾ cup rice flour
½ cup sorghum flour
¼ cup tapioca flour
¼ cup coconut sugar
1 tsp pumpkin pie spice
1 tsp baking powder
½ tsp baking soda
¼ tsp salt
1 cup pumpkin purée
1 cup milk
2 eggs

Mix everything together and make waffles.  (Some waffle recipes separate the eggs and fold beaten egg whites into the rest but I didn't care that much and they were good anyway!)

Monday, November 13, 2017

Carrot Cake Truffles (aka Dealing with Cake Disasters)

Let's face it, even if you've been baking forever, and feel like you know how to properly grease a pan, sometimes a series of choices and events beyond your control will cause a delicious cake to refuse to release from a pan in one piece. In my case, I started baking at 8, I didn't wait for the browned butter to cool, I hadn't properly greased the pan, and when I started to unmold it after it had cooled 10 minutes, it was not even budging an inch,.

Here's the marvelous carrot cake from The Artful Baker, or rather, the pan after I finally got the majority of the cake out.


Suffice to say, I did not salvage the cake in one servable chunk. I decided early on to make either a cake trifle or cake truffles but I was really short on time prior to the evening I had volunteered to bring dessert.

So my first strategy was to cut the largest pieces down into mini cakes that were roughly the same size, put a dollop of cream cheese icing on each, and sprinkle on some pecans. The cake recipe was delicious so they were tasty, and after a filling meal, the little cake bites were a nice size.


I still had the pieces I cut from these mini cakes and a bowl of crumbs salvaged from the inner workings of the rose pan, so with these I made a smaller batch of carrot cake truffles. This is easy, you just have to have time for the various stages to firm up. I'm going to put the official recipe below but real talk, I used canned frosting and Ghiradelli white chocolate melts and those were the only ingredients I bothered with. I had to cover a few of the truffles twice in order to stick pecans to them as the Ghiradelli melts reset incredibly quickly.


These are overly sweet for my tastes, more white chocolate than carrot cake. But they may be to some people's tastes, so I will bring them to work with me and see what happens.

But this strategy could work with any cake failure, with any flavor of icing and a chocolate candy coating. A former co-worker used to make delicious oreo truffles in a similar way and people loved them!

Carrot Cake Truffles
(as seen on the Inspired by Charm blog, and let me tell you, you should check out their photos and process because they are beautiful and perfect!)


Makes about 40 truffles

Here's what you will need:

1 prepared carrot cake (13x9" pan, no frosting)
1 cup cream cheese frosting (recipe here)
1 bag (12 ounces) pure white candy melts
1 bar (4 ounces) white chocolate baking bar, roughly chopped
2 tablespoons vegetable shorting (Crisco)
1 cup orange candy melts
Carrot sugar candies, optional

In a large bowl, crumble the carrot cake with your hands. Using a spatula, stir in about 3/4 cup of the cream cheese frosting. Add more as needed. The mixture should stay together when rolled into a ball, but not be overly sticky.

Roll the cake mixture into 1-inch balls. Set the cake balls on a plate and refrigerate until cool, about 30 minutes.

In a medium bowl, add the white candy melts, white chocolate, and vegetable shortening. Microwave at 30-second intervals, stirring after each until melted.

Dip the cooled cake balls into the melted white chocolate mixture and coat completely. Set on wax paper and allow chocolate to set completely.

In a small microwave-safe bowl, melt the orange candy melts by microwaving them at 30-second intervals, stirring after each, until melted.

Add the melted orange candy melts to a piping bag or plastic baggie. (Use caution if using a plastic bag. If your melted candy is too warm, it can cause the bag to break.) Cut a small tip off one corner of the bag and drizzle the melted candy onto the coated cake balls. Top with a carrot sugar candy, if desired.

Once the candy coating is completely set, pack and store the truffles in an air-tight container.

Monday, October 30, 2017

Double Chocolate Bundt Cake

I have spent hours pouring over The Artful Baker, and had my eye on two cakes in particular. But when it came time to bake one today, I realized that I didn't have enough chocolate for one and the carrots disappeared from the fridge that I needed from the other. So I gravitated toward a recipe I have seen others from the ABRAMS Dinner Party making, the double chocolate bundt cake. So while I am not going to win an award for originality, we all need a few go-to recipes that come together quickly and are crowd-pleasers. Well I have your chocolate cake!

What I love about this cookbook is that the author, Cenk Sonmezsoy, details the process he has undertaken for each recipe. For many, this means he explains where he started, what worked, what he changed, how it evolved. For this one, he does not see any improvements on the horizon, it is done, it is the best it can be, etc. He made many chocolate bundt cakes on the way to this one. And we can all benefit from its deliciousness. Not too sweet, good structure, can be dressed up or down. Basically, this is the little black dress of cakes.


CAKE

14 tablespoons (7 oz, 200 grams) unsalted butter, softened, plus more for pan
5 oz (140 grams) bittersweet chocolate (70% cacao), coarsely chopped
1/2 cup (50 grams) Dutch-processed unsweetened cocoa powder
2 tsp (10 grams) pure vanilla extract
1/2 cup (120 grams) very strong brewed coffee or espresso
1/2 cup (120 grams) heavy cream
2 cups (280 grams) all-purpose flour
1 1/2 tsp (6 grams) baking powder
1/2 tsp (3 grams) baking soda
1/2 tsp (4 grams) fine sea salt
1 3/4 cups (350 grams) granulated sugar
4 large eggs, at room temperature

Set a rack in the lower third of the oven and preheat the oven to 325 F (160 C).

Generously butter a 10-cup (2.4 liter) Bundt pan. If your pan has an intricate design, use a pastry brush to reach all the nooks and crannies.

To make the cake, in a medium heatproof bowl, combine the chocolate, cocoa powder, and vanilla.

In a small saucepan over medium-high heat, bring the coffee and cream to a boil, stirring occasionally. Take the pan off the heat, pour the coffee mixture over the chocolate mixture, and whisk until the chocolate melts and the cocoa powder dissolves. Let cool completely.

In a medium bowl, whisk together the flour, baking powder, baking soda, and salt.

In the bowl of a stand mixer fitted with the paddle attachment, beat the butter at medium-high speed until creamy, about 2 minuteness. Add the sugar and beat until light and fluffy, about 3 minutes. Add the eggs, one at a time, and beat for 1 minute after each addition, scraping down the sides of the bowl as needed. Reduce the speed to low and beat in one-third of the flour mixture, followed by half of the chocolate mixture. Repeat with another third of the flour mixture and the remaining chocolate mixture. Finally, add the remaining mixture and beat just until incorporated.

Remove the bowl from the mixer and scrape down the sides of the bowl with a silicone spatula, reaching down to the bottom to incorporate any unmixed dry ingredients. Scrape the batter into the prepared pan and smooth the top.

Bake until a wooden toothpick inserted into the cake comes out clean, 50-55 minutes Set the pan on a wire rack to cool for 10 minutes. Invert the cake onto the rack, set the rack over a baking sheet lined with parchment paper, and let cool completely.

GLAZE

5 ounces (140 grams) bittersweet chocolate (70% cacao), coarsely chopped
3/4 cup (180 grams) heavy cream
2 tbsp (25 grams) granulated sugar
1 tsp (5 grams) pure vanilla extract

To make the glaze, put the chocolate in a medium heatproof bowl.

In a medium saucepan over medium-high heat, bring the cream, sugar, and vanilla to just below a boil, stirring frequently. Take the pan off the heat and pour about half of the hot cream mixture over the chocolate. Stir gently with a silicone spatula until blended. Add the rest of the hot cream mixture, stirring gently until the chocolate melts completely. Immediately pour it over the cake, allowing it to drip down the cake.

Using a cake lifter, transfer the cake onto a serving plate.

The cake will keep under a cake dome at room temperature for up to 3 days.

This post is sponsored by ABRAMS Books, as part of the ABRAMS Dinner Party. All experiences and opinions are my own!
Monday, October 16, 2017

Cardamom-Cognac Apple Cake

Being a part of the ABRAMS Dinner Party has pushed me to try more new recipes than I think I normally would during my busy time of year. Cook Beautiful is enticing because it is divided into seasons, contains beautiful photography, and contains suggestions for decorating a seasonal table. I was also impressed how many recipes did not contain meat, helpful when you are married to a vegetarian!


When I encountered this recipe in Cook Beautiful, I decided this would be a great candidate for recipe modification. I like to modify recipes to be lower carb and grain/gluten free so that everyone in my household can consume them. Recipes like this, that are baked and served out of the same pan, are prime candidates because there are fewer concerns about structure. Just the same, my end result had a satisfying enough structure that it would have stood on its own.


I will start by posting the original recipe as it appears in the cookbook, and then go on to discuss the changes I made and why.


Cardamom-Cognac Apple Cake
(from Cook Beautiful by Athena Calderone)

Serves 8-10

1 cup (125 g) all-purpose flour
3/4 tsp ground cardamom
3/4 tsp baking powder
1/4 tsp kosher salt
2 large eggs, at room temperature
3/4 cup (150 g) granulated sugar
3 tbsp cognac (Calvados, rum, or bourbon work well, too)
1/2 tsp vanilla extract
1/3 cup (75 ml) well-shaken buttermilk, at room temperature
3 medium Honeycrisp apples
1 stick (4 oz/115 g) unsalted butter, melted and cooled, plus more for greasing the pan
1 tbsp turbinao sugar
Confectioners' sugar, for dusting

Preheat the oven to 350 F (175 C.) Nestle a piece of parchment paper into an 8- or 9- inch (20- or 23-cm) cast-iron pan and grease it with butter.

In a bowl, whisk together the flour, cardamom, baking powder, and salt. In a separate large bowl, beat the eggs until foamy. Whisk in the granulated sugar, cognac, and vanilla extract. Pour in the buttermilk and whisk to combine.

Peel, halve, and core 2 1/2 of the apples, then cut them into 1/2-in-thick (12-mm-thick) cubes. Reserve the remaining half apple, unpeeled, and cut it into 1/4-inch (6-mm) slices, for the top.

Add half of the flour mixture to the wet ingredients, stirring until just combined, then gently fold in half of the melted butter. Repeat with the remaining flour mixture and melted butter. Gently fold in the cubed apples, reserving the slices. Transfer the batter to the pan and arrange the apple slices in a circular pattern on top of the batter. Sprinkle with the turbinado sugar. Bake until the cake turns a deep golden brown and a cake tester inserted in the center comes out clean, 55 to 65 minutes. Transfer the skillet to a cooling rack and let it sit for 5 minutes. The cake may be served warm or at room temperature, directly from the skillet; whichever you choose, make sure to dust it with confectioners' sugar before serving.


I have learned through years of experimentation and recipes (both good and bad) that the key to gluten/grain-free baking is never to use just one flour. Since I have all these flours on hand already, it isn't a big deal for me, but if you are starting from scratch, you might even consider just buying a gluten-free flour mix like King Arthur Flour. Per cup of all-purpose flour, I used 1/3 cup sorghum flour, 1/3 cup brown rice flour, and a heaping 1/3 cup tapioca flour. For the granulated sugar, I used 1/2 cup coconut sugar. Now this was a crap shoot, and I tasted the batter before baking, because coconut sugar is not as sweet as granulated, but too much of it can really alter the color and texture of the batter. It makes it appear as though molasses had been added. As sugar substitutes go, we prefer natural substitutes over chemical, even though they are higher calorie. As sugars go, coconut sugar is very low on the glycemic index, which suits our purposes.

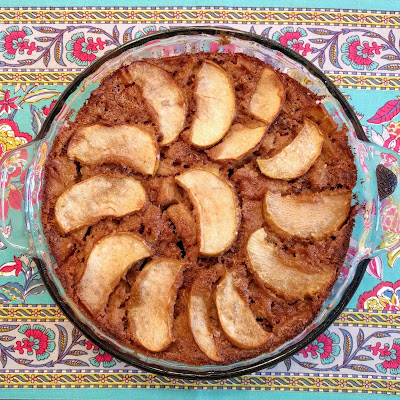
Other changes I made to the recipe - I had bourbon so I used that in my cute little OXO cup as pictured. I had Mutsu apples from the local NC orchards, but they are huge: I used 1 1/2 diced in the batter and 1/2 unpeeled on top. I did not sprinkle with confectioners' sugar for presentation, nor did I use a cast-iron pan, just a pie plate.

This was a successful modification, and I'm sure the original recipe is a delight, and would be a quick dessert to stick in the oven while dinner was consumed. I did make dinner that same night from the cookbook: Meyer Lemon Ricotta Toasts with Blistered Grapes and Roasted Pumpkin and Brussels Sprouts with Poached Eggs. Everything was a success!


This post is sponsored by ABRAMS Books, as part of the ABRAMS Dinner Party. All experiences and opinions are my own!

Monday, October 09, 2017

Morning Loaf from Simple Fare: Fall/Winter

Usually when I get a new cookbook, I look for baked goods and sweet treats to make. While Simple Fare: Fall/Winter is full of savory dishes and beautiful photography, I was pulled in by this simple vegan chocolate bread, one where I would have the ingredients on hand on a typical day. I brought it to work and some people snatched second servings, praising it for its taste and texture. I believe the word "silky" was used. I found myself just a little sad that I'd decided to share.


The recipe includes one version plus two variations. The original encourages serving with crème fraîche and cyprus flake salt. I couldn't find crème fraîche at the store, and looking for recipes online sent me down a rabbit hole where I discovered that technically one could never make crème fraîche that could truly be like the French version. Later I discovered that the earlier volume of this cookbook, Simple Fare: Spring/Summer has a recipe for a homemade version. Regardless, I did not have this on hand. Variation 1 says to use mascarpone and sel de guérande to replace the two ingredients, both also difficult to find (although I have made mascarpone from scratch before.) Inadvertently I used Variation 2 without realizing it, (butter/cinnamon) because my husband had picked up a small round of cinnamon, cardamom, and ginger butter. The slices of this loaf are fine without any topping, if I'm being honest, but any one of these combinations truly takes it over the top.  (Also I should note that while the loaf recipe is vegan, none of the suggested toppings are. The cookbook does not tout it as a vegan recipe, it was just something I realized as I went along - I triple checked that I didn't need eggs.)


Morning Loaf

1/3 cup (75 ml) coconut oil, plus more for greasing
1/4 cup (25 g) unsweetened cocoa powder, plus more for dusting
1 1/2 cups (190 g) all-purpose flour
1 1/4 cups (250 g) sugar
1 tsp baking soda
1/2 tsp sea salt
1/4 cup (60 ml) brewed espresso, cooled
1 tsp vanilla extract
1 tsp distilled white vinegar

For serving
3/4 cup (180 ml) good quality store-bought or homemade crème fraîche
Cyprus flake salt

Preheat the oven to 350 F (175 C.) Lightly grease a 9x5 inch (23 x 12 cm) loaf pan with coconut oil and line it with parchment paper. Grease the parchment paper with more coconut oil and lightly dust the pan with cocoa powder, tapping out the excess.

In a large bowl, sift together the flour, sugar, cocoa powder, baking soda, and salt.

In a medium bowl, combine the coconut oil, espresso, vanilla, vinegar, and 1 cup (240 ml) water and mix until incorporated. Add the wet ingredients to the dry ingredients and whisk until smooth.

Pour the batter into the prepared loaf pan. Bake for 50-55 minutes, until a tester inserted into the center comes out with a few moist crumbs, but not raw batter. Remove from the oven and let cool in the pan on a wire rack. Once cooled, remove the loaf from the pan. Cut into slices, and dollop each slice with crème fraîche and sprinkle with flaky salt to serve.

Variation 1
Replace crème fraîche with mascarpone and cyprus flake salt with sel de guérande.

Variation 2
Replace crème fraîche with butter and salt with cinnamon.

This post is sponsored by ABRAMS Books, as part of the ABRAMS Dinner Party. All experiences and opinions are my own!

Monday, October 02, 2017

Quark Pancakes

A few weeks ago, I made quark for a German recipe. I needed to do something with the leftovers so I found a recipe for quark pancakes. I would imagine, lacking quark, you could use ricotta. These are light and fluffy, and highly recommended. The blogger that provided the original recipe served them with peaches and thyme, which would be even better. I just ate them with butter and syrup.


Quark Pancakes
(Recipe by Sarah Coates on The Sugar Hit)
 
Ingredients
  • ½ cup quark
  • 2 eggs, separated
  • ¾ cup (185ml) milk
  • 1 tsp vanilla bean paste (or extract)
  • 1 cup (150g) plain flour
  • 1½ tsp baking powder
  • pinch salt
  • 2oz (50g) butter, melted
Instructions
  1. Place the quark, egg yolks (place the whites in a separate bowl), milk and vanilla into a mixing bowl and whisk together.*
  2. Stir in the flour and baking powder until just combined (don't stress about lumps) and then fold through the butter.
  3. Throw the salt in with the egg whites, and whisk until they're foamy - don't worry about peaks or anything. Fold through the batter and put a large, heavy based non-stick pan on to heat.
  4. These pancakes cook fine without any oil in a non-stick pan, but I like to add a little butter (your call), and then ladle in heaping spoonfuls of the batter into the pan (about ¼ cup). Cook until bubbles appear on the surface of the pancake, and then flip and cook until the other side is golden brown.
  5. Continue until all the batter is used.
JennyBakes' notes:

* - I did not separate the eggs nor did I whisk anything separately. As you can see from my photo, they are still the fluffiest. You might like them even more with these steps but I just dumped and mixed and cooked.


Monday, September 25, 2017

Cinnamon Roll Pie with Apples from Lomelino's Pies

I often get access to advanced reader copies of cookbooks through Edelweiss, and usually flip through and note a few recipes to try. This is a recipe I could not get out of my head! So while I need to give a disclaimer and say that I was given a digital copy of this cookbook, the desire to make this pie is all my own. Lomelino's Pies: A Sweet Celebration of Pies, Galettes, and Tarts, comes out October 24.

This is a crowdstopper pie, a centerpiece pie, and it does take a little bit of extra effort, a little more than a typical two-crust pie would take. But I made it inside an afternoon, so it's absolutely doable.


What a genius idea is this, to use pie crust like cinnamon roll and make that into a crust? It is a stunning visual and I couldn't wait to try it, but I've been biding my time until I had local apples (Mutsu from Granddad's, just like last week) and time to make it.


The apples are mixed with dulce de leche, orange juice, and a few spices, so it isn't quite the typical apple pie inside.

Piecrust
2 1/4 cups all-purpose flour
3 tbsp granulated sugar
1/4 tsp salt
16 tbsp (8 oz) cold butter
5-7 tbsp ice-cold water

Apple Filling
2 3/4 lbs apples*
2 tbsp (1 oz) butter
3/4 cup dulce de leche
1/2 tsp ground cinnamon
1/4 tsp sea salt
4 tbsp cornstarch
3 tbsp freshly squeezed orange juice

Crust Filling
5 1/4 tbsp (2 2/3 oz) butter, at room temperature
1 tbsp ground cinnamon
1 tsp ground cardamom

Glaze**
1 egg
1 tbsp milk
pinch of sea salt
1-2 tbsp pearl sugar, Turbinado, or raw cane sugar


Pie Crust
  1. Mix the flour, granulated sugar, and salt in a bowl.  Dice the butter and add it to the flour mixture. Use your fingers to pinch in the butter until the dough is crunchy.
  2. Add the water (begin with the smaller amount and gradually add more if the dough feels too dry) and mix it with a fork. If you pick up a bit of the dough and it coheres when pressed together, it has enough water.
  3. Lay a piece of plastic wrap over the dough, flatten the dough somewhat, and t hen cover the dough completely with plastic wrap. Refrigerate the dough for at least 1 hour, preferably overnight.

Apple Filling
  1. Peel and core the apples. Cut them into thin slices and place them in a large bowl.
  2. Melt the butter in a large saucepan. Add the apple slices and saute them for 2-3 minutes, until the apples soften slightly. Carefully stir occasionally.
  3. Add the dulce de leche, cinnamon, and salt. In a small cup, dissolve the cornstarch in the orange juice and stir it into the saucepan. Let the mixture simmer over low heat as you stir for a few more minutes, until the mixture has thickened. Let the filling cool completely.

Rolling Out the Crust and Baking the Pie***
  1. Preheat the oven to 425 F.
  2. For the crust filing, mix the butter with the cinnamon and cardamom. Take the dough out of the refrigerator and divide it into two equal pieces. On a floured work surface, roll out one half of the dough into a rectangle about 15 3/4 and 13 3/4 inches. Spread this dough with half of the butter mixture and roll up the dough from the long side. Repeat with the other half of the dough and the remainder of the crust filling. Place the rolls on a cutting board and then put in the freezer for 5-10 minutes.
  3. Remove one roll from the freezer and cut it into 3/8 inch slices (just as if you were preparing cinnamon buns).  Fill a pie pan with the slices, covering the bottom and sides (the spaces should have a little space between them). Press the slices together so they form a pie shell. Transfer the pie pan to the freezer.
  4. Take the other roll out of the freezer and slice it in the same way, but arrange the slices in a circle (large enough to cover the top of the pan) on parchment paper and then roll them out a little to firm up the circle. If the slices don't want to cohere, you can brush a little water between them. If it is difficult to roll the slices together, press them together.
  5. Take the pie shell out of the freezer and pour in the apple filling. Brush the edge with a little water and add the top crust. It is easiest to leave the crust on the parchment paper and fold it out over the pie filling, then remove the parchment. Cut away any overhang, leaving a rim about 1 1/4 inches wide all around if you want to make a decorative edge. Put the pie in the freezer for 15 minutes (to help it hold its shape better in the oven while baking).
  6. Remove the pie from the freezer. To make the glaze, whisk the egg, milk, and salt in a small bowl. Brush the pie dough with the egg mixture and sprinkle the pearl sugar on top. 
  7. Bake the pie on the lower rack of the oven for 10 minutes. Reduce the temperature to 350 F and bake for another 45-50 minutes until the piecrust is golden brown. Remove the pie from the oven and let it cool completely. Serve the pie with vanilla ice cream, if desired.****
 Jenny's Notes:

 * - I found this article from King Arthur Flour on converting apples between pounds and cups  incredibly helpful! So I sliced up the equivalent of 8 cups of apples, which was 3 huge Mutsu apples.
** - Not gonna lie, I skipped this entire section and just brushed the pie with some heavy cream and sprinkled with granulated sugar, lacking any fancy sugars.
*** - I'm not sure the crust filling shouldn't have a little sugar in it, but it really does bake well on both top and bottom in the time allotted, should that be a concern. I had to steal some slices from the second log to adequately cover the bottom and sides, but still ended up with enough for the top. I think I should have made the top crust and frozen it before attempting to apply it because although it flipped onto the pie from the parchment, the paper was still hard to get off and pulled up several of the roll pieces. I didn't do the overhang, just pressed the top into the bottom and it worked out okay.
In general I'd recommend baking the pie on a cookie sheet since there is a lot of sugar in there.
**** - I offered my eaters vanilla and dulce de leche, and both flavors of ice cream worked well. Pictured is the dulce de leche.

Disclaimers and credits galore: While this is not a post affiliated with the ABRAMS Dinner Party, the ice cream scoop pictured was sent as part of their commercial partners. Many thanks to OXO!

And as always, the publisher of Lomelino's Pies (Roost Books) provided access to the cookbook in exchange for an honest review. 

Monday, September 18, 2017

Apfel Quark Kuchen - Apple Quark Cake

I am always on the hunt for a new apple recipe, and when I decided to make the quark recipe from Slow Cook Modern, the hunt became a hunt for a recipe for apple and quark. I have encountered recipes calling for quark before, usually from Germany, and was excited to try this soft cheese. The end result was good, halfway between a cheesecake and a custard, at least how the recipe turned out with the quark mixed in with other things.

In the slow cooker, the recipe called for one ingredient - 1/2 gallon of buttermilk, which you cook on low for 2-8 hours, until the curd starts to set and separate from the whey. Mine cooker for 3.5 hours before I decided it was ready; I'm not sure if I should have left it longer but didn't want to overcook it. Then it went into a cheesecloth lined strainer for another 4 hours. Then the solids went into the fridge overnight, because I was going apple picking the next day.


Hendersonville, NC, is only about 45 minutes north of where we live. There is a magical road between it and Chimney Rock, NC, called Chimney Rock Road. It contains apple orchard after apple orchard. We've tried several places along there, and really like the apple selection at Granddad's Apples n' Such. It was packed full of people this weekend with long lines for the bakery and the apple line. I was relieved to find my favorite baking apple - the mutsu - in abundance. Last year I waited too long and they didn't have any.


Quark - check. Apples - check. I guess I had everything I needed!


Since quark is a German ingredient, the best recipes I found were also in German. I also discovered I only had a smaller springform pan, having thrown mine away because it no longer closed. So this was a big risk, both using Bing to translate a recipe and attempting to cut it in half. I'll leave the recipe with the same amounts as the normal recipe, and you can picture me cutting eggs in half. 


Apfel-Quark-Kuchen aka Apple Quark Cake
(recipe translated and slightly adapted from Annemarie Wildeisen's Kochen)

Crust ingredients:
1/2 cup butter, at room temperature
1/2 cup granulated sugar
3 eggs
1 cup plus 2 tbsp all-purpose flour
1 tsp baking powder
1/4 cup milk

Filling ingredients:
1 orange
1 tsp vanilla extract
2 tbsp cornstarch
1/4 cup granulated sugar
3 eggs
2/3 cup quark
2-3 apples
powdered sugar to taste

1. Butter and flour a 9" springform pan and chill in fridge while making the crust. Preheat oven to 350 F.
2. Cream butter and sugar. Stir in eggs and don't worry about curdling.
3. Sift flour and baking powder and mix into the butter mixture. Stir in the milk. Transfer to springform pan and pull up slightly along the edge using a small spatula or spoon. Put back in fridge.
4. Zest the orange and squeeze it for juice. Blend orange juice, vanilla, cornstarch, sugar, eggs, and quark until smooth. 
5. Peel, quarter, and core the apples, then dice. Mix with quark mixture and spread on crust.
6. Bake about 50 minutes. If it browns too quickly, cover with foil.
7. When baked, rest at least 10 minutes before removing from the mold. Sprinkle as desired with powdered sugar.


This post is sponsored by ABRAMS Books, as part of the ABRAMS Dinner Party, well, partly. I was provided a copy of Slow Cook Modern, which is where the quark recipe comes from, but I found the cake recipe elsewhere.

I did make the eggplant tian with olive marinated mozzarella from Slow Cook Modern, the same weekend as this cake.  


Monday, September 11, 2017

Chocolate Chip Cookies and Salted Honey Butter

I thumbed through F*ck That's Delicious: An Annotated Guide to Eating Well by Action Bronson with Rachel Wharton, and found a lot of delicious things. The host of the show of the same name on VICELAND has created a book that seems a lot like him - a mixture of recipes from family and chef friends, some foods that are comfort or memory-based, like a cheese bagel, some recipes from his travels, and others that are just plain delicious. The cookbook is loud and randomly organized and has a big pasta section, but the recipes in here are the real deal.

Since I'm a baker first, I elected to make a baked good, although read through the end of this post to see a picture of the pasta recipe I had to try.

This cookie recipe is one he got from another chef. I will put shorter directions below, but you can find more background information and more detailed directions in the cookbook. (It's late and I don't want to type that much!)


Milton A. Abel Jr.'s Chocolate Chip Cookies and Salted Honey Butter

2 1/2 cups packed all purpose flour
1 tsp baking soda
1 tsp salt
1 cup (2 sticks) unsalted butter, softened
1 3/4 cup packed dark brown sugar
2 large eggs
1 tbsp vanilla bean paste*
1 pound chocolate chips
Salted Honey Butter, for spreading on the cookie


1. In a large bowl, whisk together the flour, baking soda, and salt.
2. In a stand mixer fitted with a paddle attachment, cream the butter and sugar at medium speed until fluffy and well blended.
3. Add the eggs and vanilla paste and mix until fully incorporated.**
4. Reduce the mixer speed to low, add the dry ingredients, and mix until the dough just comes together.
5. Stir the chocolate chips in by hand.
6. Line a baking sheet with parchment paper. Divide the dough into 2-ounce portions*** and roll them into rounds with your hands. Put them in one layer on the prepared baking sheet and chill for 30 minutes. You may freeze them in a zip-top bag if you're not baking them in the next day or two.
Preheat the oven to 350 F (325 if you have a convection oven.)
7. Line a second sheet with parchment paper, place 6 dough rounds on it, and flatten them slightly, keeping about 2 inches of space around them on all sides.****
8. Place the cookies in the oven and bake for 8 minutes, then rotate the sheet, and bake for an additional 4 minutes, or until the cookies are golden brown around the edges and look like they are just set on the top.*****

Action watching to make sure I use carry-over cooking technique.

Salted Honey Butter

1 cup (2 sticks) unsalted butter, at room temperature
1/2 cup honey
1/2 tsp salt

Place all the ingredients in a large bowl and beat with a stiff rubber spatula until light and slightly whipped. To get it really light, use a paddle attachment in a stand mixer.

Notes from JennyBakes:

 * - I live in the south where vanilla bean paste is not stocked in the stores so I just used 1 tbsp vanilla extract.
** - I usually scrape down, add the vanilla and one egg, beat and scrape down, add another egg, repeat.
*** - Okay I didn't weigh this but 2 oz is usually 1/4 cup so that's how big I made them but WOW these are huge. Because of this I baked for 9 minutes and 4 before removing for carryover cooking to take care of the rest.
**** - HE REALLY MEANS THIS. My last batch got too close and made two giant cookies.
***** - I had to play with this timing because my cookies were huge and 1 more minute in the first round worked perfectly.

And now, gaze upon the wonder that is "Egg Noodles with Feta and Paprika," which is simple yet delicious. I mean, f*ck, that's delicious. Of course.


This post is sponsored by ABRAMS Books, as part of the ABRAMS Dinner Party

Monday, September 04, 2017

Balsamic Zabaglione with Peaches

I have long been intrigued by vinegar in desserts, ever since making my Grandma's pie crust recipe for the first time. She calls for vinegar, which I would later learn helps prevent the formation of gluten (and allowing for a flakier crust.) I have experimented with roasting strawberries with balsamic and using them with crepes for breakfast, mashed into sauce for pound cake, even turning the flavors into ice cream. My favorite pavlova has a tiny bit of balsamic vinegar, balancing the other flavors and adding depth.

I was asked this year to participate in the ABRAMS Dinner Party, so you will see a series of posts with recipes from their cookbooks. But of course, this is a baking blog, so when the first book was Acid Trip by Michael Harlan Turkell, I knew it would be fun to focus on the dessert aspect. I still really want to make the recipe for vinegar pie, but my tart pan is missing its middle at the moment.

Instead I was drawn to the zabaglione recipe. Traditionally, zabaglione (also sometimes called sabayon) is made with egg yolks, sugar, and wine. This recipe had fruit marinated in vinegar and vinegar in the custard. I was uncertain if it would work and that's why I had to try it! During my brief year of restaurant work, I spent the month of May making sabayon (featured for Mother's Day brunch but also served as a dessert special), so I knew the technique. With this recipe, the custard is much darker in color because of the balsamic, but by the time it has been whipped to coolness and the whipped cream is folded into it, the color is quite light.

I'm going to make a few notes and recommendations to the recipe below, so keep reading!


Balsamic Zabaglione with Peaches in Champagne Vinegar 
from Michael Friedman, The Red Hen, Washington, DC

4 peaches, cut in half, pits removed*
1/4 cup (60 ml) champagne vinegar**
1 cup (240 ml) heavy cream
1/3 cup (75 ml) balsamic vinegar
1/3 cup (75 ml) honey
5 large egg yolks
zest of 1 lemon, about 1 tbsp

In a medium bowl, toss the peaches in the champagne vinegar and marinate for an hour in the fridge.

In a stand mixer, whip the heavy cream until soft peaks form, about 5 minutes. Transfer the whipped cream to a bowl and reserve in the refrigerator.

Fill a medium saucepan halfway with water. Heat the water until it comes to just under a boil - you want a good amount of steam. Maintain medium heat on the pot for the steam.

In a medium bowl, combine the balsamic vinegar, honey, egg yolks, and lemon zest. Place the bowl over the saucepan (it shouldn't be touching the water) and begin whisking. Rotate the bowl while whisking to ensure all the sauce is being moved.

After 5 to 7 minutes, the zabaglione should have almost doubled in size - if you run your whisk through it and the trail holds in the zabaglione, you're done. Remove the custard from the heat and whisk vigorously until it is cool to the touch.***

Fold the whipped cream into the zabaglione. This will help keep its structure and add great texture and body. Reserve in the refrigerator or immediately spoon over peaches.

Jenny's notes:
* - I sliced the peaches instead of halving them, but this means there is more vinegar flavor. If you slice, use less vinegar. This will be best with fruit that is ripe and sweet, because that balances the other flavors.
** - If I made this again, I'd either not marinate the fruit in vinegar or just sprinkle.
*** - To save your arms, just hook it back up to the stand mixer you used for the whipped cream. Set the timer for ten minutes and check back. If the bottom of the bowl is cool, you can move on to the folding step.


This post is sponsored by ABRAMS Books, as part of the ABRAMS Dinner Party

Monday, August 28, 2017

Cocoa Pomegranate Pavlova

This comes from one of my favorite winter cookbooks, Wintersweet. Pavlovas are not that difficult to make, but this one has a lot of nuance from the combination of cocoa, cardamom, and balsamic. Don't leave them out, it is subtle and sophisticated. And this was a hit with my book club, even if I made it in the heat of summer.


Cocoa Pomegranate Pavlova

Ingredients:
  • 1 cup (200 g) granulated sugar (or a scant cup of superfine or caster sugar)
  • 4 large egg whites, at room temperature
  • 2 tablespoons cocoa powder
  • 1 teaspoon cornstarch
  • 1 teaspoon balsamic vinegar
  • ⅛ teaspoon ground cardamom (optional)

For the topping:

  • ¼ cup Pomegranate Jelly*
  • ½ pomegranate, seeded (½ cup of seeds)
  • 2 cups heavywhipping cream
  • ⅛ teaspoon vanilla extract
  • 2 teaspoons confectioners’ sugar

Preparation:

Preheat the oven to 350°F (l75°C). Trace a 7-inch (l8-cm) circle on a sheet of parchment paper in heavy-handed pencil using a bowl or cake pan as a guide. Flip the parchment paper over and set it on a cookie sheet (the circle should be visible through the paper).

For the pavlova, process the granulated sugar for 60 seconds in a food processor or blender until finely ground (superfine and caster sugar require no grinding).

In the bowl of an electric mixer, beat the egg whites on medium- high speed for 3 to 4 minutes, or until they form stiff peaks that don’t droop when the beaters are lifted.

With the mixer still running, add the finely ground sugar one tablespoon at a time, beating well, until the meringue is stiff and shiny. Once all of the sugar is added, beat the meringue for 4 to 6 minutes more on medium-high speed, scraping down the sides of the bowl, or until the mixture is no longer gritty when rubbed between your fingers. The mixture should cling tightly to the bowl and feel very dense. Sift the cocoa on top. Add the cornstarch, vinegar, and cardamom, if using. Fold everything together with a rubber spatula, rotating the bowl and using light, circular strokes that lift the whites from the bottom and deposit them gently on top of the dry ingredients, until no streaks remain.
Working quickly, dab dots of the soft meringue under each corner of the parchment paper to glue it down so it doesn’t slide around annoyingly while you’re trying to work. Mound the meringue within the marked circle in a big pile. Smooth it into a circular pillow about 2 to 3 inches high with a slight depression in the middle. Don’t bother trying to make it look too perfect—it should be free-form. The batter will spread a bit during baking.

Place the pavlova in the oven and immediately turn the heat down to 300°F (l50°C). Bake for about 1 hour and 15 minutes, or until the meringue is set and crisp on the outside, but the center still feels soft underneath. Do not open the oven door until the very end. I know the suspense is killing you, but the more you check, the more it’s going to want to sink and the more you’re going to want to check it again. Where does it end? When it’s finally done, turn off the heat and let the pavlova sit in the oven, with the door propped open with a wooden spoon, to cool down slowly. Remove the pan from the oven when it is completely cool. (The pavlova can be made up to a day ahead of time. Cover it gently with plastic wrap and store it at room temperature.)

At this point, the pavlova should not look particularly pretty. It will likely be cracked and fissured like a volcanic crater, with the center threatening to collapse. All normal. When ready to serve, loosen the pavlova from the parchment paper with a spatula, and gently transfer it to a serving plate or cake pedestal.

For the topping, warm the pomegranate jelly in a microwave or in a small pot on the stove just until loose. Whisk in up to a teaspoon of warm water to loosen the jelly to a syrupy consistency. Drizzle the pomegranate syrup over the middle of the pavlova. Sprinkle half of the pomegranate seeds over the syrup.

In a medium bowl with a whisk or an electric mixer, whip the cream with the vanilla and confectioners’ sugar until soft peaks form and the cream mounds nicely in a pile, 1 to 2 minutes. Mound the cream on top of the pomegranate topping, and sprinkle with the remaining pomegranate seeds. Serve right away.

*Don't want to make pomegranate jelly? I used red currant this time around. Cherry would be fine too!

Monday, August 21, 2017

Lime Yogurt Bread

I originally made key lime yogurt cake with raspberry coulis ribbon back in 2009, after seeing it on the blog formerly known as Culinary Concoctions by Peabody, now Sweet ReciPEAs. I needed to make a quick bread for an orientation offered by the library, and pulled the recipe back out. I had even more limited time, so I simplified it a bit both with ingredients and parts, and thought I'd share it again. After all it's been eight years! Eight! Years!


Lime Yogurt Cake
(based on Peabody's original and recommended key lime and raspberry yogurt cake)

1 ½  cups all-purpose flour
2 tsp baking powder
½ tsp salt
8 oz. key lime or lime flavored yogurt*
1 1/3 cups sugar, divided
3 large eggs
2 tsp grated lime zest
½ tsp pure vanilla extract
¼  cup vegetable oil
¼ cup cream cheese**
1/3 cup lime juice

Preheat the oven to 350 degrees F. Grease an 8 1/2 by 4 1/4 by 2 1/2-inch loaf pan. Line the bottom with parchment paper. Grease and flour the pan.

Sift together the flour, baking powder, and salt into a medium sized bowl.

In another bowl (large), whisk together the yogurt, cream cheese, 1 cup sugar, the eggs, lime zest, and vanilla.

Slowly whisk the dry ingredients into the wet ingredients.

With a rubber spatula, fold the vegetable oil into the batter, making sure it's all incorporated.

Pour the batter into the pan. Bake for about 50 minutes, or until a cake tester placed in the center of the loaf comes out clean.

Meanwhile, cook the 1/3 cup lime juice and remaining 1/3 cup sugar in a small pan until the sugar dissolves and the mixture is clear. Set aside.

When the cake is done, allow it to cool in the pan for 10 minutes. Carefully place on a baking rack over a sheet pan. While the cake is still warm, pour the lime-sugar mixture over the cake and allow it to soak in. Cool.

JennyBakes' notes:
* - Peabody uses vanilla or plain but I thought this would be an easy way to increase the flavor profile of the lime
** - Peabody uses mascarpone but I find it difficult to locate in the summer. I used one of the spreadable pots of cream cheese, or room temperature brick cream cheese would be fine. You can also make mascarpone from scratch, but I was going for easy and with only 1/4 cup, it wasn't going to make or break the bread!

This would probably work with different citrus combinations, definitely lemon, but lime is more interesting!

Monday, August 14, 2017

Apricot Clafouti

Apricot season! Is there any better time? I know it's here when there is a practical avalanche of almost overripe apricots in the produce section. It only lasts a week or so but I was lucky enough to catch it this year. And then I went looking for apricot recipes and decided to make this one.

So many apricot recipes calling for fresh apricots really have you make a jam first. What's the point? I wanted a dish where you could see and taste the actual apricot.


What is the difference between clafouti and cobbler? I think the real question is the difference between a clafouti and an oven pancake. There is slightly more sugar and slightly less flour in a clafouti, and it takes almost twice as long to bake. And when you add this amount of fresh fruit, it takes even longer to get it to brown on top. I could have baked this another ten minutes.

Apricot Clafouti
(recipe from Real Simple)

Unsalted butter, for the pan
1/3 cup granulated sugar, plus almost as much more for the pan
3/4 pound apricots (about 5), pitted and halved
1/4 cup all purpose flour
1 tsp vanilla extract
3/4 cup half and half
2 eggs, lightly beaten
powdered sugar and/or whipped cream, for serving
  1. Preheat the oven to 375°F.
  2. Coat a shallow 8-inch ovenproof round dish with butter and sprinkle lightly with sugar.
  3. Place the apricots in the dish in a 
single layer.
  4. Whisk together the flour, sugar, vanilla, half-and-half, and eggs in a bowl until smooth. Pour over the apricots and bake for 40 to 45 minutes, until puffed and golden. Sprinkle with powdered sugar and serve with whipped cream.