Monday, August 26, 2019

Classic Tiramisu

My book club has its first meeting of the season tonight, and for our first book of the season we read The Delight of Being Ordinary by Roland Merullo, a fictionalized imagining of the Pope and Dalai Lama on a road trip through Italy. In addition to a lot of pop philosophy and anti-fascist sentiments, there are a lot of scenes with food, including tiramisu.

“We finished our pasta, and decided to order coffee and a bowl of tiramisu. Why not? We’d been up most of the night. We were on vacation. At that point my lovely wife was kind enough to bring up the story – commonly heard in Italy – that tiramisu (in Italian the word means 'pick me up') originated in the bordellos, where the working women needed a dose of espresso and a measure of liqueur in order to make it through the long nights. Rosa went into some detail. Neither the Pope nor the Dalai Lama could think of anything to say in response.”
Quite the story! Whether or not it is true, I feel there are many different opinions about what makes a traditional tiramisu. I was surprised to find that everyone agrees that egg yolks are involved. Some argue whipped egg whites should also be included but I used a recipe that used cream instead. I also used instant espresso, which I'm sure I'll regret, it probably is weak. This recipe also only said rum or cognac but all I had was amaretto - in the research I did, amaretto should be one of the most accepted, so that's what I used.

Tiramisu is hard to capture - this is right after assembly through the container. We will eat it after it sits over 24 hours.
Classic Tiramisu
(as labeled by the New York Times) 

Ingredients

For the cream:

  • 4 large egg yolks
  • ½ cup/100 grams granulated sugar, divided
  • ¾ cup heavy cream
  • 1 cup/227 grams mascarpone (8 ounces)

For the assembly:

  • 1 ¾ cups good espresso or very strong coffee
  • 2 tablespoons rum or cognac
  • 2 tablespoons unsweetened cocoa powder
  • About 24 ladyfingers (from one 7-ounce/200-gram package)
  • 1 to 2 ounces bittersweet chocolate, for shaving (optional)

Preparation

  1. Using an electric mixer in a medium bowl, whip together egg yolks and 1/4 cup/50 grams sugar until very pale yellow and about tripled in volume. A slight ribbon should fall from the beaters (or whisk attachment) when lifted from the bowl. Transfer mixture to a large bowl, wiping out the medium bowl used to whip the yolks and set aside.
  2. In the medium bowl, whip cream and remaining 1/4 cup/50 grams sugar until it creates soft-medium peaks. Add mascarpone and continue to whip until it creates a soft, spreadable mixture with medium peaks. Gently fold the mascarpone mixture into the sweetened egg yolks until combined.
  3. Combine espresso and rum in a shallow bowl and set aside.
  4. Using a sifter, dust the bottom of a 2-quart baking dish (an 8x8-inch dish, or a 9-inch round cake pan would also work here) with 1 tablespoon cocoa powder.
  5. Working one at a time, quickly dip each ladyfinger into the espresso mixture -- they are quite porous and will fall apart if left in the liquid too long -- and place them rounded side up at the bottom of the baking dish. Repeat, using half the ladyfingers, until you’ve got an even layer, breaking the ladyfingers in half as needed to fill in any obvious gaps (a little space in between is O.K.). Spread half the mascarpone mixture onto the ladyfingers in one even layer. Repeat with remaining espresso-dipped ladyfingers and mascarpone mixture.
  6. Dust top layer with remaining tablespoon of cocoa powder. Top with shaved or finely grated chocolate, if desired.
  7. Cover with plastic wrap and let chill in the refrigerator for at least 4 hours (if you can wait 24 hours, all the better) before slicing or scooping to serve.

Monday, August 19, 2019

Coconut Bars from Keto Sweet Tooth Cookbook

My husband and I try to eat pretty low-sugar, low-carb. Another version of that diet is the Keto diet, and while we are not strict Keto practitioners, recipes from that realm are often aligned with how we eat. So when I saw Keto Sweet Tooth Cookbook in NetGalley, I requested a copy to look at. I found a lot of recipes I thought I could make, although a few had ingredients I would have to buy for a few of them. I went for one where I had everything on hand.

When you eat consistently in this lower-sugar way, you don't need as much sweet to taste sweet. So to an outsider, the use of ingredients like straight unsweetened chocolate may seem strange, but it makes sense to the people in it. This recipe is lightly sweetened but is mostly high-fat ingredients. They will be shown plain but we are probably going to melt some of our Stevia-sweetened chocolate chips to drizzle on the top.


Coconut Bars

Makes: 6
Serving Size: 1

2 cups (100g/3.5 oz) unsweetened desiccated coconut
1/2 cup (115g/4 oz) salted butter, melted*
1/4 cup (40g/1.2 oz) granular erythritol*
  1. In a large bowl, combine the coconut, butter, and erythritol. Stir well.
  2. Line a 8.5x5 inch (22x13 cm) loaf pan with parchment paper. Transfer the mixture to the pan and use a spoon to press it down flat. Transfer to the freezer to set for 1 hour.
  3. Cut into 6 equal-sized bars. Store in an airtight container for up to 2 weeks.
Tip: I find using a small bread loaf pan works best for these bars. You can use the confectioners erythritol if you don't have a granular erythritol.

* Notes from JennyBakes: I usually only keep unsalted butter on hand, so I looked it up and found a recommended 1/4 tsp per 1/2 cup butter, and went with it. I had powdered Swerve on hand so that's what I used.

I found quite a few recipes in this cookbook that I would try:
  • Vanilla Cake with Fresh Berries
  • Lemon Coconut Cake with Cream Cheese Icing
  • Chocolate Chia Seed Pudding
  • Raspberry Souffle
  • Chocolate-Covered Cheesecake Fat Bombs
  • Chocolate Espresso Truffles
Thanks to the publisher for granting me access to a copy through NetGalley; it came out July 9, 2019.

Monday, August 12, 2019

Blackberry Flognarde from Everyday Dorie

Dorie Greenspan writes the best cookbooks - go ahead and fight me, I know I'm right. So I ran into Everyday Dorie in the New Books section of the library where I work and brought it home with me.

In the dessert section, I came across the flognarde which turns out to be clafoutis for any fruit but cherries. I had very good blackberries in season and decided to use them in this recipe. The official recipe in the cookbook is for plums, but then she gives variations for berries, apples, and the original cherry. I have made the changes in the recipe below that are specific to berries, although I only used blackberries. Please read the notes afterward to find out how I made a few ingredient replacements to make it a bit lower carb, since that matters at our house (I figure with a baked pancake like cake, it's easy to adapt in these ways without losing a lot of the recipe integrity.)


Berry Flognarde

It's best to use blueberries, raspberries, and/or blackberries for flognarde. Figure on 1 pint berries. You want them to loosely fill the pie plate. While you can use brandy or cognac, berries are ovely with kirsch (a flora cherry liqueur), grand marnier, or (in lesser quantities, say 1 tbsp) a nut liqueur like amaretto or frangelico.

1 pint berries
1/2 cup (68 grams) all-purpose flour*
1/2 tsp baking powder
1/4 tsp cinnamon or a few scrapings of fresh ginger
pinch of fine sea salt
4 tbsp (2 oz; 57 grams) unsalted butter
1/2 cup (100 grams) sugar*
3 large eggs
2 tbsp Kirsch, Grand Marnier or 1 Tbsp Amaretto or Frangelico
1 1/2 tsp pure vanilla extract
1 cup (240 ml) whole milk
about 1/4 cup (25 grams) sliced almonds, for topping (optional)
confectioner's sugar, for dusting (optional)

Center a rack in the oven and preheat to 350 F. Choose a 9-inch pie plate, a porcelain quiche pan, or another oven proof pan (preferably not metal) with the capacity of 1 quart. Butter the pan and place it on a baking sheet lined with parchment paper.

Toss the berries into the pie plate and jiggle them around until you get an even layer.

Whisk together the flour, baking powder, spice, and salt.

Melt the butter in a medium saucepan. Remove the pan from the heat and whisk in the sugar. When the mixture is homogeneous, beat in the eggs one at a time, followed by the liqueur and vanilla. Whisk in the dry ingredients. The mixture will be thick, so get it as well blended as you can without beating it, and then start stirring in the milk, which will thin the batter considerably. You'll have a pourable batter that might have a few lumps - ignore them. Pour the batter over the berries and scatter over the almonds, if using.

Bake for 60-70 minutes, until the flognarde is puffed all the way to the center, feels firm to the touch, and is golden and cracked across the surface; the juice from the berries might be bubbling - so much the better. A skewer inserted into the center will come out clean. Transfer the flognarde, on the baking sheet, to a rack and let cool to room temperature.

Dust the flognarde with confectioner's sugar, if you'd like, slice and serve.

Storing: Some people think you must eat the flognarde at room temperature the day it's made. I (Dorie) love it like that, but I also think it's nice straight from the refrigerator the next day. If you've got leftovers, cover and chill them, and see what you think.

Notes from JennyBakes:

I replaced the flour with almond flour and the sugar with coconut sugar, which is why my flognarde is a bit darker in color. It still worked! 

I used Amaretto with the blackberries. Also, because I had Amaretto.

In my household we use the Viking pronunciation of flognarde which can probably be typed as FLOGNARD!!!! RAH!!

Monday, August 05, 2019

Peanut Butter Cookies from Dessert Cooking for Two

It can be difficult to bake for just two people. If you make a cake, it feels like you have obligated yourself to each eat half that cake! I was poking around the cookbook section of NetGalley and encountered Dessert Cooking for Two: 115 Perfectly Portioned Sweets for Every Occasion by Robin Donovan, so I requested it for review. I'm not sure why the author decided to call it "dessert cooking" rather than baking but what you'll find inside are baked goods galore. I went with a simple recipe - peanut butter cookies. The recipe makes just six small cookies, enough for each person to have three, unless one of those people dumps three of them on the floor while taking their picture. (If said cookies in said picture appear cracked or otherwise damaged, this may have occurred and should not be connected to a flaw in the recipe but rather the baker.)


This recipe is a good one to have on hand because it is made of items usually found in your pantry, can be easily adapted to be lower sugar (see my notes at the end,) and comes together and bakes quickly.

Flourless Peanut Butter Cookies
(from Dessert Cooking for Two)

1/3 cup creamy peanut butter, at room temperature
1/3 cup sugar
1 large egg yolk
1/3 tsp vanilla extract
1/4 tsp baking soda

  1. Preheat the oven and prepare the baking sheet. Preheat the oven to 350 F. Line the baking sheet with parchment paper.
  2. Mix the ingredients. In a medium bowl, stir together the peanut butter and sugar until creamy and well combined. Add the egg yolk, vanilla, and baking soda and stir until smooth.
  3. Form the cookies. Form the dough into six even balls and place them on the prepared baking sheet, leaving at least 2 inches of space in between each ball. Using the tines of a fork, press the balls and create the classic crisscross pattern.
  4. Bake the cookies. Bake for about 10 minutes, until the edges of the cookies are set. Let the cookies cool on the sheet. 
 Notes from JennyBakes: 

 In the interest of baking something my husband would actually eat, I decided to finally experiment with the Swerve sugar substitute I had bought at Fresh Market. I bought the powdered sugar kind, and just decided it would do well enough. I used the same amount but I think my dough was a little more dry than the recipe would have been otherwise.

Ten minutes was at least 1 minute too long, but this might also relate to my Swerve experiment.

Other recipes I marked to try in this cookbook:

  • Whipped Lemon Ricotta Mousse
  • Frozen Raspberry Hot Chocolate
  • (those super cute)Ice Cream Sandwiches
Thanks to the publisher for approving my request to look through this cookbook ahead of time. It comes out August 13, 2019.

Monday, July 29, 2019

Tennessee Peach Pudding

I ended up with an abundance of peaches, so I knew I had to try making another regional dish that looked like cobbler to me - peach pudding! Specifically - "Tennessee Peach Pudding," a recipe I got from Teresa at "Can't Stay Out of the Kitchen," although she also adapted it from several other sources. If you need step-by-step photo instructions, definitely visit her blog.


In the end it comes out like a peach cobbler with a thick crust and a sauce built in. I would pay attention to her pan size direction - I used a 9x13 and ended up with charred sugar on the bottom of my oven. But this was more substantial than several of the crisp and cobbler recipes I've made, so I think it's worth slightly downsizing to make it another time. (I also feel I slightly overbaked as my edges are pretty dark!)


Tennessee Peach Pudding

Peach filling:

2 cups all-purpose flour
1 cup granulated sugar
4 tsp baking powder
1 tsp kosher salt
1 tsp cinnamon
1 cup milk
5 cups peeled and diced peaches

Topping:

1 cup granulated sugar
1 cup brown sugar
2 tbsp unsalted butter
3 cups water
1/2 tsp nutmeg


Instructions:
  1. In a large mixing bowl, combine flour, sugar, baking powder, salt, and cinnamon.
  2. Add milk and peaches and stir just until combined.
  3. Pour into a greased 10x15" glass baking dish.
  4. Prepare the topping: combine topping ingredients over medium heat in a medium saucepan. Bring to a boil and stir until sugar is dissolved.
  5. Pour topping over peach layer.
  6. Bake at 400 F for 50-60 minutes or until done.

Monday, July 22, 2019

Peach Rosemary Biscuit Cobbler

Here in the South, we mean a lot of things when we say the word "cobbler." Here in the Upstate of South Carolina, "cobbler" often means a batter where you pour a thin, almost pancake or cake batter in the bottom of the pan, toss the fruit (mixed with spices and sugar) on top, and the batter bakes up around the fruit. I think the French call that clafouti! But where I grew up in the Pacific Northwest, "cobbler" always meant Bisquick topping, aka biscuit topping, with the fruit and spices mixed in and layered first.


It all started with a smoothie I had at the Swamp Rabbit Cafe - I'm a sucker for drinks with savory elements so when they started advertising the peach rosemary smoothie I had to try it. It was great, the rosemary didn't overpower the peach, but it just tasted like the fresh ingredients, not a lot of extra sugar or syrupy sweetness. After just a few sips, I knew I had to recreate the flavor in a cobbler. At that point we had just hit peach season, which is always cling first, and freestone soon after. I poked around for recipes and decided to adapt one from Sally's Baking Addiction. I liked that her biscuit batter was homemade and included buttermilk, as I had some in the fridge I needed to use up. I also liked that her biscuit batter was not actually full biscuits, which would dwarf the peaches after baking, but just enough to give a clear sense of biscuitness. I cut the recipe in half and baked it in an oval dish but could have used a 9" square pan. I will include the recipe below as I made it, but if you want the full-size recipe, please go visit Sally. She also has recommendations for storage, etc.


Peach Rosemary Biscuit Cobbler

Ingredients
  • 4-5 medium peaches, peeled and cut into 2 inch chunks (about 5 cups)
  • 2 tbsp packed light or dark brown sugar
  • 1/2 Tablespoon cornstarch
  • 1/2 Tablespoon lemon juice
  • 1/2 teaspoon pure vanilla extract
  • 1 teaspoon ground cinnamon
  • 1/4 teaspoon ground nutmeg
  • 1/8 teaspoon salt
  • 1-2 sprigs fresh rosemary
Rosemary Buttermilk Biscuit Topping
  • 1 cup all-purpose flour
  • 1/4 cup granulated sugar
  • 1 Tbsp fresh rosemary, broken into pieces or roughly chopped
  • 3/4 teaspoon baking powder
  • 1/4 teaspoon baking soda
  • 1/4 teaspoon salt
  • 1/4 cup (4 Tbsp) unsalted butter, cold and cubed
  • 1/4 cup buttermilk, cold
  • egg wash: 1 large egg beaten with 1 Tablespoon milk or buttermilk
  • optional: 1 Tablespoon granulated sugar mixed with 1/4 teaspoon ground cinnamon
Instructions
  1. Preheat the oven to 350°F (177°C) and grease a 9x9 inch pan.
  2. Make the filling: In a large bowl, stir the peach chunks, brown sugar, cornstarch, lemon juice, vanilla, cinnamon, nutmeg, and salt together until thoroughly combined. Spoon filling into prepared pan, tuck in sprigs of rosemary, and bake for 10 minutes. Remove from the oven and set aside as you prepare the topping. Keep oven on.
  3. Make the topping: Whisk the flour, sugar, baking powder, baking soda, and salt together in a large bowl. Add the rosemary and butter. Using a pastry cutter or two forks, cut the butter into the mixture until it resembles coarse meal (pea-sized bits). While slowly stirring, slowly drizzle in the buttermilk. Mix until evenly combined. Take handfuls of dough and gently flatten out. Place dough all over the top of the peach filling. It doesn’t need to be perfect or look pretty– some peach filling can be showing.
  4. Brush the top of the biscuit dough with egg wash, then sprinkle with cinnamon-sugar if using.
  5. Bake for 40-45 minutes, or until lightly browned and biscuit topping is cooked through. (Stick a toothpick into the biscuit topping, if it comes out clean– it is cooked through and the cobbler is done.) Set the pan on a wire rack, then cool for 5 minutes before serving. Serve warm with vanilla ice cream or whipped cream.
  6. Cover and store leftovers in the refrigerator for up to 4 days.

Monday, July 15, 2019

Lemon Ricotta Pancakes with Blueberry Syrup

It's almost the end of blueberry season where I live, so I wanted to squeeze this recipe in despite the fact that I posted about pancakes last week. Sorry. Pancakes are delicious. This recipe comes from The Bacon Bible, from which I formerly made a delicious sweet-savory bread pudding. But this recipe is the only one without any bacon, thrown in because they make it at their restaurant for people who aren't feeling the bacon. But my husband and I have a funny memory about $16 lemon ricotta pancakes so I always feel drawn to recipes for them.


Lemon Ricotta Pancakes with Blueberry Syrup
(from The Bacon Bible)

1 cup maple syrup
1 cup blueberries
4 large eggs, separated
1 1/3 cups ricotta
6 tbsp unsalted butter, melted and cooled slightly
1 1/2 tbsp lemon zest, from about 2 lemons
1/2 cup all purpose flour
1 1/2 tbsp granulated sugar

In a medium saucepan, bring the maple syrup to a boil over high heat. Add the blueberries and cook for 1 minute. Remove from the heat, cover, and let steep while you make the pancakes.*

In a medium bowl, combine the egg yolks, ricotta, butter, and lemon zest and whisk until smooth. In a large bowl, stir together the flour and granulated sugar.

In a separate large bowl, with a clean whisk, whip the egg whites until they hold soft peaks.

Add the egg yolk mixture to the flour mixture and whisk until just combined (do not overmix.) Fold in the egg whites until just incorporated.

Heat a griddle or cast-iron pan over medium heat and brush with butter or spray with nonstick spray. Working in batches, pour the batter onto the griddle by 1/4-cup measures and cook the pancakes for 1-2 minutes on each side, or until they are golden, brushing the griddle with more of hte melted adidtional butter as necessary.

Serve 2-3 pancakes per person, ladled with the blueberry syrup and dusted with confectioners' sugar. 


Makes 10-12; Serves 4.

Notes from JennyBakes:

I made a different kind of blueberry syrup since I had blueberries that were close to the brink. I used 2 cups, added a little water and sweetener and lemon zest. I sometimes make a sauce like this for ice cream, where I usually add a cinnamon stick, but I didn't want it to overpower the lemon. I let it boil and simmer away while I made the pancakes.

I was trying to make the recipe lower carb, so went with brown sugar splenda and half almond flour, but really there is so little flour I wish I hadn't bothered. This made them harder to turn, although that's also partly because I'm trying to make pancakes in a skillet pan on the stove and really just need a griddle.

 
Like pancakes? I seem to make them from around the world! Check out the Finnish pannukakku, Icelandic pönnukökur, Papua New Guinean banana pancakes, the Danish ebleskiver, the Hungarian palacsintas, Austrian kaiserschmarm, the Swedish pancakes from Alaska, and what we call the German oven apple pancake. I also made ratio pancakes from Michael Ruhlman's book, which we can call American, but Rosa Parks might be giving Michael a run for his money with her "featherlite" pancakes.

Monday, July 08, 2019

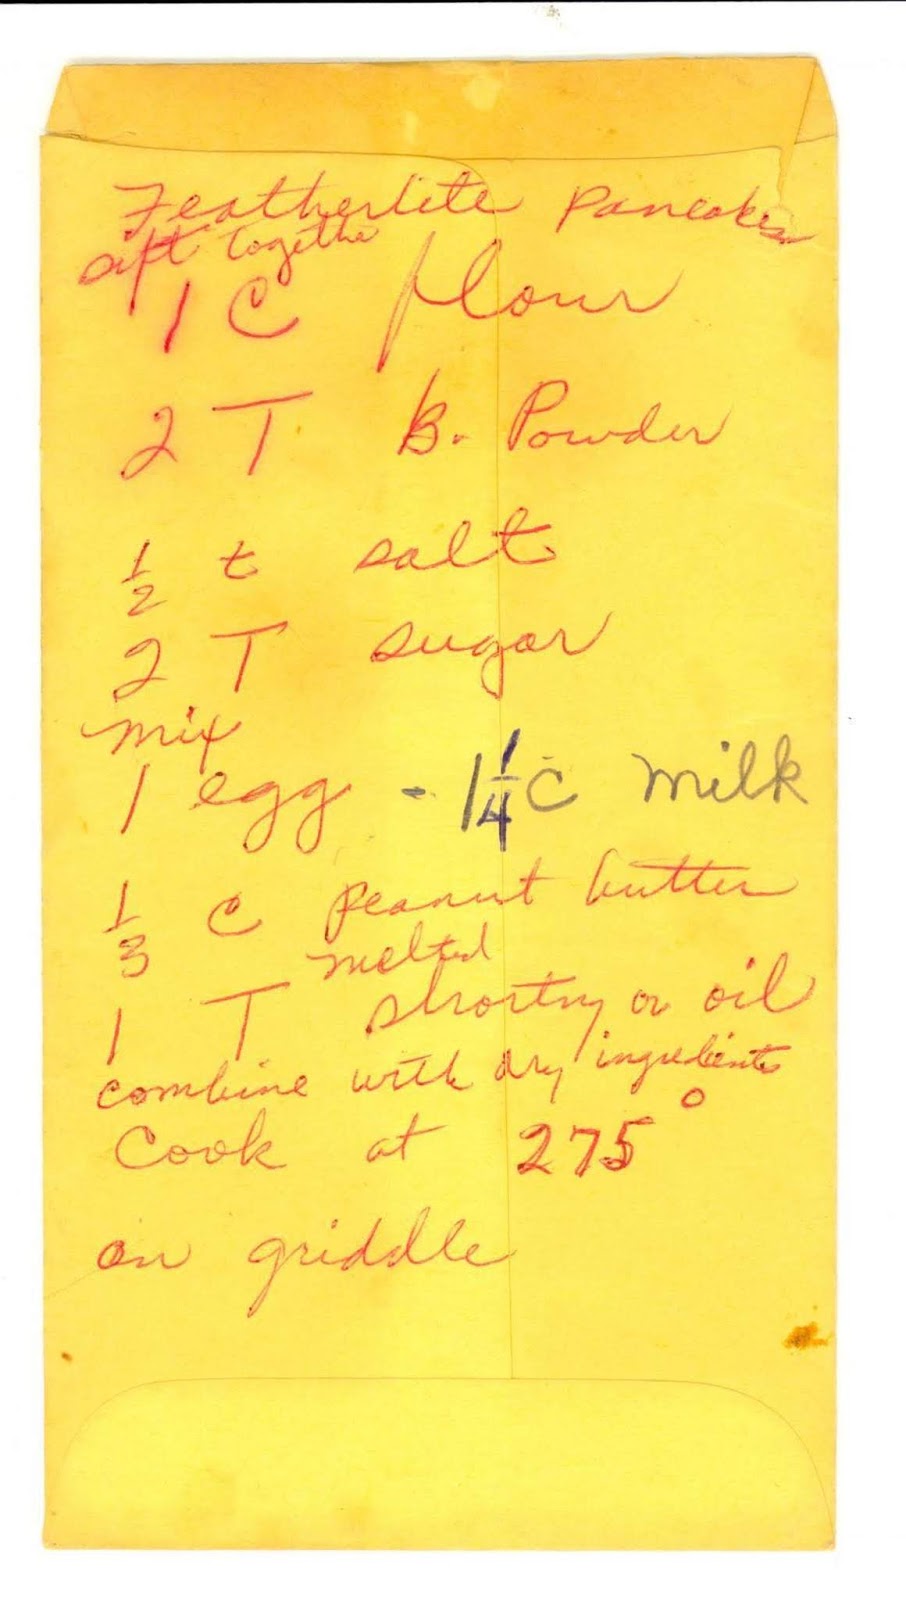
"Featherlite" Pancakes from Rosa Parks

Christy, my work colleague, was recently at the Library of Congress during the American Library Association Conference. She picked up a postcard for me that had a recipe from Rosa Parks for "Featherlite" Pancakes. You know I had to try them! We've been collecting blueberries every day from our two bushes in the yard so I added some of them. And keep reading to find out how a mistake I made in reading the recipe may have created even more deliciousness.


"Featherlite" Pancakes

Ingredients

1 cup all-purpose flour
2 tablespoons baking powder
1/2 teaspoon salt
2 tablespoons sugar
1 egg
1 1/4 cups whole milk
1/3 cup peanut butter*
1 tablespoon shortening, melted, or any neutral oil, like canola

  1. In a large mixing bowl, combine the dry ingredients. In a separate, medium mixing bowl, combine the egg, whole milk, and peanut butter. Whisk together the wet ingredients until combined.
  2. Pour the wet ingredients over the dry ingredients and mix until just combined.
  3. Add the shortening or oil to a skillet and bring to 275° F. Spoon roughly one-fifth of the batter into the pan, into a roughly 4-inch pancake. Cook for about 2 minutes until bubbles form around the edges and the pancakes look dry and airy. Use a thin spatula to gently lift it and flip over to the other side. Cook for 2 to 2 1/2 minutes, until cooked through and golden-brown. Repeat with the rest of the batter and serve warm.

Notes from JennyBakes:

I made a half recipe, but just went with 1/2 cup milk and used the whole egg. I added the oil to the batter and cooked the pancakes in butter but when Food52 played with this recipe and made up instructions, they assumed the oil was for cooking. Rosa doesn't actually say that though.

I mixed the dry ingredients and just dumped the wet ingredients in on top, but you can see the word combine goes after the shortening/oil rather than before. To me this means it's part of the wet ingredients. 

I don't have a griddle so I cooked mine one by one in a pan, which is why they are rather imperfect in shape. 

I also misread the recipe and melted the peanut butter in the microwave, ha! But interestingly the Food52 recipe said it was okay if the peanut butter still showed in the recipe; melting it took care of that.

There is a lot of baking powder in this recipe (capital T = tablespoon; lower t = teaspoon), 2 Tbsp per cup of flour. So the batter is very frotty and stretchy and that is what makes them "featherlite."

Recipe image courtesy of the Library of Congree:
Parks, Rosa. Rosa Parks Papers: Miscellany, -2005; Recipe for featherlite pancakes, undated. - 2005, 1934. Manuscript/Mixed Material. https://www.loc.gov/item/mss859430324/.

Speaking of pancakes...

Like pancakes? I seem to make them from around the world! Check out the Finnish pannukakku, Icelandic pönnukökur, Papua New Guinean banana pancakes, the Danish ebleskiver, the Hungarian palacsintas, Austrian kaiserschmarm, the Swedish pancakes from Alaska, and what we call the German oven apple pancake. I also made ratio pancakes from Michael Ruhlman's book, which we can call American, but Rosa might be giving Michael a run for his money.

Thursday, July 04, 2019

London Fog Cake with Earl Grey Buttercream

Earlier this year I made a cake from Tessa Huff in her Icing on the Cake cookbook. Loved it! And I found myself making another cake from an earlier cookbook of Tessa's, a recipe that had lingered on my Birthday Cake Pinterest board for a few years, since I love a good London Fog (the drink, but yeah, also the fog in London.) But since my birthday was on a Monday this year, I knew I'd have to make my own cake (most bakeries being closed Sundays and Mondays!) I was very wishwashy about it and had Instagram decide in a poll. This cake beat out the paradise chiffon cake 76% to 24%. The only change I made in the recipe was to use buttermilk instead of cream because I didn't want to go to the store. Scroll past the pictures and recipe to see what I thought!


London Fog Cake with Earl Grey Buttercream
from Layered by Tessa Huff

Ingredients

Classic Chocolate Cake:
  • butter or nonstick cooking spray, for the pans
  • 2 and 1/2 cups (315 grams) all-purpose flour, plus more for the pans
  • 1 cup (95 grams) unsweetened non-alkalized cocoa powder
  • 2 and 1/2 teaspoon baking powder
  • 3/4 teaspoon baking soda
  • 1 teaspoon kosher salt
  • 1/2 cup + 2 tablespoons (150 ml) grapeseed oil
  • 2 cups (400 grams) granulated sugar
  • 2 large eggs, room temperature
  • 1 large egg yolk, room temperature
  • 2 teaspoons pure vanilla extract
  • 1/2 teaspoon pure almond extract
  • 1 and 1/2 cups whole milk, room temperature
  • 1 cup (240 ml) hot, strong-brewed coffee
Salted Caramel Sauce:
  • 3/4 cup  (150 grams) granulated sugar
  • 2 tablespoons light corn syrup
  • 1/2 cup (120 ml) heavy cream, at room temperature
  • 2 tablespoons diced unsalted butter
  • 3/4 teaspoon kosher salt
  • 1 teaspoon pure vanilla extract
Earl Grey Buttercream:
  • 2 cups (4 sticks/450 grams) unsalted butter, at room temperature
  • 1/4 cup (12 grams) loose Earl Grey tea
  • 1/2 cup + 2 tablespoons (150 ml) large egg whites
  • 1 and 1/4 cup (250 grams) granulated sugar
  • 1 and 1/2 teaspoons vanilla bean paste 

Instructions

For the Cake:
  1. Preheat the oven to 350 F (175 C). Grease and flour three 8-inch (20-cm) cake pans and set aside (*see the note section for tips if you do not own three pans).
  2. Sift together the flour, cocoa powder, baking powder, baking soda, and salt and set aside .
  3. In a bowl of a stand mixer fitted with a paddle attachment, beat together the oil and sugar on medium speed for 2 minutes. With the mixer on, add the eggs, egg yolk, vanilla, and almond extract. Stop the mixer and scrape down the bowl.
  4. Turn the mixer to low and add the flour mixture in three batches, alternating with the milk, beginning and ending with the flour mixture. Stop the mixer and scrape down the bowl. With the mixer on low, stream in the coffee. Mix on medium-low for no more than 3o seconds, or until combined.
  5. Evenly divide the batter among the prepared pans. Bake for 23 to 25 minutes, or until a toothpick inserted into the center of the cake comes out clean. Let them cool on a wire rack for 10 to 15 minutes before removing the cakes from their pans. Allow to cool completely.
Prepare the Salted Caramel:
  1. Place the sugar, corn syrup, and 2 tablespoons water in a heavy-bottomed small or medium saucepan. Stir to combine.
  2. Heat over high heat, occasionally swirling the pan, until it turns a medium golden amber color, 8 to 10 minutes. The sugar mixture will begin to rapidly boil before slowing down and darkening in color. Remove the saucepan from the heat once the correct color is reached and the bubbles start to subside.
  3. Slowly and very carefully whisk in the room temperature cream. The mixture will foam up and sputter, so stand clear and keep stirring.
  4. Add the butter and continue to stir until melted. Add the salt and vanilla and stir to combine. Pour the caramel into a heat-safe container and let it cool until it reaches the desired consistency or refrigerate it until ready to use. It will thicken as it cools.
  5. The caramel should be room temperature for cake assembly, but any leftover caramel can be stored in an air-tight glass jar in the refrigerator for up t0 10 days.
Earl Grey Buttercream:
  1. Place 1 cup (2 sticks/225 grams) of the butter in a saucepan with the loose tea. Heat over medium heat until the butter melts, then reduce the heat to low and simmer for 5 minutes. Remove from the heat and let the tea steep for 5 minutes more. Strain the butter through a fine-meshed sieve set over a bowl and refrigerate it until it reaches the same consistency as softened butter, 20 to 30 minutes. Small bits of tea may remain in the butter.
  2. Place the egg whites and sugar in the bowl of a stand mixer. Whisk them together by hand to combine. Fill a medium saucepan with a few inches of water and place it over medium-high heat. Place the mixer bowl on top of the saucepan to create a double boiler. The bottom of the bowl should not touch the water. Whisking intermittently, heat the egg mixture until it reaches 160 F (70 C) on a candy thermometer or is hot to the touch. Carefully fit the mixer bowl onto the stand mixer.
  3. With the whisk attachment, beat the egg white mixture on high speed for 8 to 10 minutes, until it holds medium stiff peaks. When done, the outside of the mixer bowl should return to room temperature and no residual heat should be escaping from the meringue out of the top of the bowl. Stop the mixer and swap out the whisk attachment for the paddle.
  4. With the mixer on low speed, add the vanilla, tea infused butter, and remaining 1 cup (225 grams) butter, a couple tablespoons at a time. Once incorporated, turn the mixer to medium high and beat until the buttercream is silky smooth, 3 to 5 minutes.
Assemble the Cake:
  1. Once the cakes have completely cooled, level them and choose which layer will be the bottom (tip: pick the sturdiest layer). Place it on a cake plate, turning table, or serving dish. Spread on 1/2 cup (120 ml) of the buttercream with an offset spatula. Top with the next layer of cake and repeat, ending with the third layer (tip: pick a level, attractive layer for the top). Frost the cake with the remaining buttercream and refrigerate it until set, 15 to 20 minutes.
  2. Pour the caramel onto the top of the cake, letting it drip over the edges. Begin by adding 1/2 cup (120 ml) of caramel to the center of the cake and then smooth it out with an offset spatula. Add more caramel as necessary until desired look is achieved.
  3. The cake will keep in the fridge for up to 4 days; it may also be frozen. Store any remaining caramel sauce separately in the fridge for up to 2 weeks.


Notes from JennyBakes:

I used Earl Grey Bella Luna Tea from Adagio, and it was very strong and flavorful. I had never steeped tea in butter before, so that was a new experience. I wish I'd let the tea infused butter soften a bit more before making the icing because I ended up with a few chunks (just don't chill it longer than you need to, I'd say.)

I did not like the texture of the cake and I'm willing to assume user error. I substituted the oil type and buttermilk for the cream, and I could tell when dividing the batter that it hadn't really fully combined, so it was uneven. But in the end it was ragged-fluffy instead of moist and dense like I like. And not nearly chocolately enough.

But that didn't really matter in the end because we did not like this cake! I couldn't even finish my one birthday slice and we threw the rest away. I never throw away baking fails unless they are inedible, and I'm sorry to say that this flavor combination just 100% did not work for me. Typically a London Fog drink is a vanilla steamer with an earl grey tea bag steeped in it. I can see the caramel going okay with that, just adding a sweet dessert element. But chocolate is really not a component of that drink and doesn't work here. All three of the strong flavor elements were at huge odds with each other.

I do like the idea of earl grey in a dessert. I know I have another recipe marked to make that is an earl grey tea cake with a rhubarb glaze and I still want to try that one. I also think earl grey would do nicely pre-steeped in the milk/cream for pannacotta, cheesecake, or some other creamy dairy concoction where it could be the primary flavor.

Happy birthday to me!


Monday, June 24, 2019

Abrams Dinner Party - Invitation and Roundup 2018-19


What a fun year I've had, participating in the Abrams Dinner Party! (You can apply to be a member this next season; please see farther down this post.) It was my second and final year (you can see last year's roundup here.) I tried to do a better job this year at capturing the recipes I was interested in, things I tried, recipes in the making, all in my Instagram Stories. I still have many pages marked in these cookbooks of other recipes I want to try - I still need to make pizza from Genuine Pizza (I got sidetracked by the cookie recipe everyone was making), and I need to try more seasons in The Modern Cook's Year. I will post my favorites from the year at the end. But maybe you missed some of these posts, and want to know what I made!


Fall 2018

Matty Matheson: A Cookbook
Chicken cacciatore in Instagram

Korean Home Cooking by Sohui Kim
Tofu and kimchi pancake in Instagram

Home Made Christmas by Yvette van Boven
Vegetable Spiral Tart in JennyBakes
Vegetable Spiral Tart in Instagram
Cauliflower Curry Christmas Pasty with Apricots & Almonds in JennyBakes
Cauliflower Curry Christmas Pasty with Apricots & Almonds in Instagram

Ibiza, Land and Sea by Francoise Pialoux
Mauritius Fish Curry in Instagram 

Cali'Flour Kitchen by Amy Lacey
Spinach Artichoke Dip Pizza in Instagram 

Spring 2019

Pescan by Abbie Cornish and Jacqueline King Schiller
Spicy Buffalo Tofu Fingers in Instagram
Spicy Buffalo Tofu Fingers in JennyBakes
Banana Pancakes with Cardamom Spiced Berries in JennyBakes

Eat Clean, Play Dirty by Danielle Dubois and Whitney Tingle
Roasted Radish and Turmeric-Ginger Bowl in Instagram stories

The Modern Cook's Year by Anna Jones
Whole-wheat spelt, date, and molasses scones in Instagram
Whole-wheat spelt, date, and molasses scones in JennyBakes

Cauliflower rice with fried eggs and green chutney in Instagram

The Power of Sprinkles by Amireh Kassem
Sprinkle Cake Experiment in JennyBakes

The Bacon Bible by Peter Sherman and Stephanie Banyas
Bread Pudding French Toast with Bacon and Rosemary-Orange Maple Syrup in Instagram
Bread Pudding French Toast with Bacon and Rosemary-Orange Maple Syrup in JennyBakes

BBQ&A with Myron Mixon
Banana Pudding in Instagram
Banana Pudding in JennyBakes

Icing on the Cake by Tessa Huff
Orange Honey Cake in Instagram
Orange Honey Cake in JennyBakes

Genuine Pizza by Michael Schwartz
Chocolate Chunk Cookies in Instagram
Chocolate Chunk Cookies in JennyBakes

I enjoyed cooking and baking from all of these cookbooks, but these are my top four! The Modern Cook's Year is innovative, seasonal, vegetarian food with some formula based recipes (I still haven't tried that curry chart and really want to.) Icing on the Cake has complex yet doable recipes with good photography and very clear instructions. Home Made Christmas
is homey and full of cheer, and enjoyable to flip through.  Korean Home Cooking simplifies a cuisine I can't access very easily locally but of which I am a huge fan, so I remain excited to keep this on hand for experimentation. How else could I have fish cakes and rice cakes in my freezer and gochujang in my fridge?

I also enjoyed getting to know the other members of the Abrams' Dinner Party, who would post triumphs and challenges and cheer each other on. And I so appreciate Mamie VanLangen, who kept us organized and excited.

You can also apply to participate in the ABRAMS Dinner Party for 2019-20! I've seen some good looking cookbooks in their upcoming season. The application is here, and is due July 22.

Monday, June 17, 2019

Beaten Biscuits from Gone with the Wind


"She dropped her eyes to her plate and nibbled daintily on a beaten biscuit with an elegance and an utter lack of appetite that would have won Mammy's approval."
I co-hosted a joint readalong of Gone with the Wind this summer with Chris Wolak and Emily Fine of the Book Cougars podcast. The discussion episode posts tomorrow, June 18th.

There are several memorable passages in Gone with the Wind, but nothing more than Scarlett when she decides:
"As God is my witness, I'm never going to be hungry again!"
What we often forget is what came right before that - finding radishes in the ground at Tara, her family's plantation, and really only having that to live on.
"A spicy, sharp-tasting radish was exactly what her stomach craved."
I decided to make a meal in tribute to Gone with the Wind. I knew it had to have beaten biscuits and radishes. When we discussed the book, Emily mentioned eating baguettes with radishes and butter, and it reminded me of a time I made radish butter when I was trying to grow vegetables in my backyard. I decided to do something similar, and also to cook radish and turnip greens, since Scarlett would have had those available too.

Beaten biscuits were a whole other exploration. They traditionally were made by beating a dough for an hour or so, keeping down the gluten and turning them into something more like a cracker. It's no mistake these were served in wealthy southern homes, as it is definitely a by product of slave labor (and a lack of baking powder.) 

I tried making the best decisions from a bunch of historical recipes and I'm not sure I chose right, so instead of a recipe in this post, I'll link you to the various places on the internet I consulted. Maybe you will have better luck. Traditionally, beaten biscuits are considered the perfect vehicle for country ham, but of course during Reconstruction it is highly unlikely it would have been available!

Mine turned out pretty much like giant oyster crackers. I'm not sure it's wrong, but some pictures in these recipes look more bready. It's definitely more of a food of survival than of deliciousness, but I still wanted to try it.


Recipes consulted:

"The Art of the Beaten Biscuit" from Garden and Gun (a magazine similar to Southern Living, believe it or not) - this is the recipe I used more or less, but the baking time was puzzling. It said 325 F for an hour, or until cooked through. But mine were cooked through at 20 and tough at 25. I'm willing to entertain other points of user error. It was also interesting how it said you could beat the dough for 45 to 90 minutes, or for 2 minutes in the food processor. I also had found in both Cook's Illustrated and America's Test Kitchen that the plastic dough blade in a food processor is not needed, and you can just use the standard metal blade. So I did that, set the timer for 2 minutes, and held on to the food processor once I realized it was making entire rotations on the counter. I could tell the motor was trying hard too. This recipe doesn't have you rest the dough while others do, but it did look similar to the texture I thought I was going for.

Beaten Biscuits from White Lily Flour - this recipe had a completely different mixing time (15 minutes in the food processor? this would have destroyed my machine) and a completely different cooking temp/time (450 for 8-10 minutes)... and the picture shows them with jam. I dunno. It didn't seem as historical in nature so I let it go, but the temp/time differences definitely gave me pause.

Beaten Biscuits from Atlanta Magazine - this has a similar cooking time to what I did, but much more resting of the dough, after processing, and in the oven after baking.. after looking at so many this may be the best for the contemporary kitchen.

I also watched an entire 45 minute video on YouTube about Maryland beaten biscuits, using traditional equipment. It was fascinating but the state is pretty far north, and I'm just not sure - they ended up in large pillow shapes. I also found several historical recipes for other states in the south, but using plantation amounts or instructions. As it was I made half the recipe I settled on.

There are a lot of other recipes on the internet that call themselves beaten biscuits but are actually more accurately called drop biscuits, misnamed because, well, you beat the batter. Go southern for this if you try it at all!

Monday, June 10, 2019

Chocolate Sheet Cake with Whipped Salted Caramel Ganache Frosting

I've started experimenting with potential birthday cake recipes since next month is my birthday month. I even keep a group in Pinterest marked "Birthday Cake" for potentials as I encounter them, then of course I have shelves of cookbooks that also hold potential. Hopefully I'll try a mix. First up is a recipe from the internet - Chocolate Sheet Cake with Whipped Salted Caramel Ganache Frosting.


This recipe comes from Edd Kimber, aka The Boy who Bakes. I guess he won the first season of The Great British Bake Off but we didn't start watching until Season 2, so I first encountered him in one of the many baking Instagram accounts I follow (@theboywhobakes.) He also posted a video about making this cake that shows how quick and straight-forward of a recipe it is. The flavor mirrors the infamous Martha Stewart salted caramel chocolate layer cake that everyone made a few years back, that was messy and divine. I would say this recipe is similar in flavor but much simpler to assemble, so that's a win/win. See more notes from my attempt after the recipe!


Chocolate Sheet Cake with Whipped Salted Caramel Ganache Frosting
(recipe from Edd Kimber, not sure if recipe copyrights are different in UK, trying to give all credit where credit is due since it's available online!)

Chocolate Sheet Cake
Makes a 9x13 cake that serves 12-18 people

250g plain flour
75g cocoa powder
1 tsp baking powder
2 tsp baking soda
1/2 tsp salt
300g light brown sugar
2 large eggs
100ml oil (you can use something neutral tasting or olive oil)
225g sour cream
225ml hot coffee

Whipped Salted Caramel Milk Chocolate Ganache

200g milk chocolate, finely chopped
400ml double cream
200g caster sugar
1 tsp vanilla bean paste
1 tsp flaked sea salt
50g unsalted butter

salted peanut and cocoa nibs, for garnish 

Preheat the oven to 350F/180C/160C fan and lightly grease a 9x13 inch brownie pan, lining with a strip of parchment paper. The excess parchment should hang over the sides of the pan which will make removing the cake a lot easier later.

Make the ganache first as it needs a couple hours to chill before whipping. Place the chocolate into a medium bowl and set near the stove. Place the cream into a small saucepan and bring to a simmer. Place the sugar into medium sized saucepan and place over medium heat and cook until melted and caramelised to the colour of a rusty penny. Once caramelised add the butter and salt and stir to combine. Add the cream in two additions, being careful as it will bubble up viciously. Once the bubbling has subsided you should have a smooth caramel, if the cream wasn’t hot enough you may have a couple lumps which will melt if you just pop it back over low heat and stir for a couple minutes. Stir in the vanilla and then pour the hot caramel over the chocolate, set aside for a couple minutes before stirring together to form a smooth ganache. Pop the bowl in the fridge for a couple hours or until thickened. Make sure you don’t leave the ganache in the fridge for too long as it will become too firm to whip, it still needs to be spreadable.

For the cake sieve the flour, cocoa, baking powder, baking soda, salt and brown sugar into a large bowl and use a whisk to combine so everything is evenly combined. Make a well in the middle of the bowl and pour in the remaining ingredients and whisk together until a smooth cake batter is formed. Pour the batter into the prepared pan and bake in the oven for about 25-30 minutes or until the cake springs back to a light touch and it is slightly pulling away from the sides of the pan.

Notes from JennyBakes:

What I love about this recipe is that it is pretty forgiving. I was too lazy to use my scale so I searched online for ounce/cup equivalencies for the ingredients and may not have gotten them exact. The cake still worked. All of my 9x13 pans were occupied so I divided it into 2 9" square pans. The cake still worked. I had a few clumps in the caramel that refused to melt back in despite his reassurances, and then the milk chocolate didn't melt as smoothly as I would have liked (it was harder to find milk chocolate bars for baking as I usually use dark, so I bought Cadbury dairy milk bars and they are probably more intended for eating) so you can seem chocolate and/or caramel bits in the frosting but the cake still worked. I didn't use his recommended cake toppings since I was birthdayfying it and also am trying to get rid of these sprinkles that I keep using on everything, and the cake still worked. It is probably more sophisticated with the cocoa nibs and nuts, so I'd still recommend doing that.

Also I don't have a way to transport a 9x13 cake outside of its original pan so part of my cake division strategy was purely so I could take half to work!