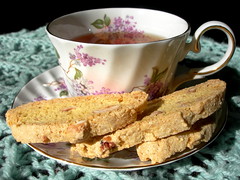
Today is my Mom's birthday. She lives far away from me, a forty-one hour drive to be exact, so I have to figure out ways to celebrate from afar. This year I sent her some coffee that is roasted locally that smelled exactly like an old favorite she used to drink, and decided I needed to bake something to send along with it.
Biscotti tend to be good travel cookies because they start out life crunchy, and will remain crunchy for a while. I still had hazelnuts left over from holiday baking, and came across the recipe for hazelnut biscotti in Baking with Julia, one of the cookbooks that gets the most use in my house. This is where the amazing hazelnut-skinning method that I mentioned in my last Yule Log post comes from.
It is more common for a mother to tell about the day of a child's birth, but the story of the day my Mom was born is a family legend, so I will retell it here. My Mom was born on a very cold day in February, and it was snowing. (She hates the snow). Her parents had just had the floors varnished, so her mother had to climb out the window to get to the hospital. I might have the details wrong, but it always makes me smile.
Hazelnut Biscotti
Makes about 4 dozen biscotti
2 cups water
3 tbsp baking soda
2/3 cup unblanched hazelnuts
1 2/3 cups all-purpose flour
1/2 tsp baking soda
1/4 tsp salt
2 large eggs
2 tsp hazelnut liqueur, such as Frangelico*
1 tsp pure vanilla extract
3/4 cup sugar
Center a rack in the oven and preheat the oven to 350 F.
To skin the hazelnuts, bring the water to a boil in a medium saucepan, add the baking soda and the nuts, and boil for 3-5 minutes, until the water turns black. To test if the skins have loosened sufficiently, drop a nut into a bowl of cold water and rub lightly against the skin - if the skin just slides off, the nuts are ready to go. Turn the nuts into a colander and run cold water over them. Slip off the skins, toss the nuts onto a towel, pat dry, and transfer to a jelly-roll pan.
Place the pan in the oven and toast the nuts, stirring occasionally, for about 15 minutes, or until evenly browned. The best way to test for total toastiness is to bite into a nut - it should be brown to the center. Remove the nuts from the oven and cool. Lower the oven temperature to 300 F.
When the nuts are cool enough to handle, coarsely chop them and set them aside.
Line a baking sheet with parchment paper and reserve until needed.
Put the flour, baking soda, and salt into a medium bowl and whisk just to blend.
In another bowl, whisk together the eggs, liqueur, vanilla, and sugar. Add the dry ingredients to the liquid and stir with a wooden spoon to mix. Add the nuts and continue to mix, just until well incorporated. (Since this dough is stiff, sticky, and hard to stir, you might find it easier just to reach in and mix it with your hands).
Flour your hands and lift half of the dough onto one side of the parchment-lined baking sheet. Pat and squeeze the dough into a chubby log 12-13 inches long. Don't worry about being neat or smoothing the dough - it will even out as much as it needs to in the oven. Repeat with the other half of the dough, leaving about 3 inches between the logs.
Bake the logs for exactly 35 minutes. Transfer the pan to a cooling rack and let cool for at least 10 minutes.
Using a serrated knife, cut the logs into 1/2-inch thick slices, cutting straight across or diagonally. (You can make the biscotti thinner or thicker, as you wish, and adjust the baking time accordingly.) Lay the biscotti on their sides on a cooling rack - you may need to use a second rack - then place the cooling rack in the 300 F oven, directly on an oven rack. (Baking the biscotti like this allows the oven's heat to circulate around the cookies, so there's no need to turn them over.)** The cookies may need to bake for as long as 15 minutes, but it's a good idea to start checking them after about 10 minutes. When the biscotti are golden brown, dry, and crisp, remove the cooling rack(s) from the oven. Let the cookies cool to room temperature before packing them for storage.
The cookies will keep in an airtight container for about a month.
*I just substituted with vanilla extract
**I baked them on a cookie sheet, and turned them over at 10 minutes.
Categories: Biscotti, Cookies, Hazelnuts

6 comments:
Biscotti looks great thanks for sharing the recipe. I am sure your Mom was pleased.
Wow! I love hazelnuts and biscotti! This looks just great.
Wow these look great! I love hazelnuts and biscotti!
Hi Jenny, thanks for a really great recipe. Made some which looked like I bought them from a cafe.
Thanks for posting this recipe. This is the best biscotti recipe I tried. People think I bought them when I serve them !
Thanks Jenny for sharing this one...particularly about the hazelnut skinning...great tip.
I shall make these soon ;o)
Flavourful wishes,
Claudia
Post a Comment