Monday, April 27, 2020

Quinoa Chocolate Cake (lower-sugar, grain-free)

Some recipes sink into my brain and won't let go until I've tried them, and this quinoa chocolate cake is one of those. It uses no flour, but pre-cooked quinoa is pureed/blended along with dry ingredients to make the base. The recipe developer also said it was gluten-free and refined sugar-free, which of course is an asset in my house. I was also drawn in by the beautiful presentation and photography over on her website so please check it out - she makes 2.5x this recipe, all in 6-inch rounds, and creates quite the party cake. I just baked one batch and did it in a 8x8 square pan, making it more of a snacking cake. Save your leftover quinoa, kids. You only need a cup for this cake.


Chocolate Quinoa Cake
(from The Kitchen McCabe)

FOR THE CAKE:
  • 1 cup Quinoa (cooked)
  • 2 large Eggs
  • ½ cup Unsalted Butter, melted
  • ⅛ cup Milk (plant based milks work great)
  • 1 teaspoon Vanilla
  • ¾ cup Coconut Palm Sugar
  • ½ cup Dark Cocoa Powder
  • ¼ teaspoon Salt
  • ¾ teaspoon Baking Powder
  • ½ teaspoon Baking Soda
FOR THE GANACHE*:
  • 1 cup Chocolate Chips(preferably 60% cacao content or higher)
  • ¾ cup Heavy Cream (coconut cream can also be used)
Instructions

FOR THE CAKE:
  1. Preheat the oven to 350 degrees f.
  2. Grease the sides of two 6" round baking pans and line the bottoms with circles of parchment paper.
  3. Place the quinoa, eggs, melted butter, milk, and vanilla in a high speed blender and process on high speed until smooth - quinoa should be undetectable.
  4. Add the sugar, cocoa powder, salt, baking powder, and baking soda to the blender and process just until combined.
  5. Divide the batter evenly between the two prepared pans.
  6. Bake in preheated oven for 18-20 minutes, or until a tester inserted in the center of the cake comes out clean.
  7. Remove from oven and let cool completely. Remove from pans, peel off parchment, wrap in plastic wrap, and refrigerate for 2 hours, or until chilled.
FOR THE GANACHE:
  1. Place the chocolate in a bowl.
  2. Heat the cream in a saucepan over medium high heat until it begins to steam. Pour over the chocolate and let sit for two minutes. Whisk until all of the chocolate is melted and mixture is smooth. Let sit for 30 minutes to firm up a bit.
  3. Unwrap cake layers. Place on layer on a plate and spread a bit of ganache evenly across the top. Place the second cake layer on top of the first and use the remaining ganache to frost the top and sides of the cake.
  4. Serve in slices cut with a hot, wet knife for cleanest cuts.
  5. Keep refrigerated. Will keep, covered, for up to a week.
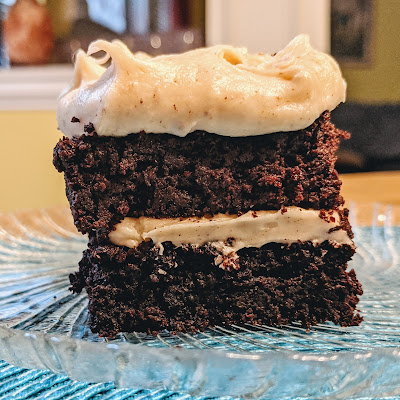
 *I didn't make the ganache - for most of this cake we just ate it plain. I did whip up a tiny recipe of espresso cream cheese icing for the picture and stacked two squares on top of each other.

Monday, April 20, 2020

Peanut Butter Cookies (grain-free, gluten-free, lower-carb)

Recently Deb of Smitten Kitchen posted a peanut butter cookie recipe that she originally blogged about in 2007, an adaptation of a recipe from Magnolia Bakery. Well I took Deb's recipe and used lower-carb ingredients to see if I could satisfy my husband's low-carb sweet tooth. He liked them! I tolerated them but ultimately I'm just too aware of the taste of the sugar substitutes, if I'm being honest. If they do not bother you, I bring you this cookie.


Peanut Butter Cookies


1 1/4 cups almond flour
3/4 teaspoon baking soda
1/2 teaspoon baking powder
1/4 teaspoon salt
1/2 cup (4 oz, 1 stick) unsalted butter, softened
1 cup peanut butter at room temperature
1/2 cup Swerve granulated sugar substitute
1/2 cup Swerve or Splenda brown sugar substitute
1 large egg, at room temperature
1 tablespoon milk
1 teaspoon vanilla extract
1/2 cup chocolate chips (we use Lily dark chocolate Stevia-sweetened)

Preheat oven to 350 degrees. In a large bowl, combine the almond flour, the baking soda, the baking powder, and the salt. Set aside.

In a large bowl, beat the butter and the peanut butter together until fluffy. Add the sugar substitutes and beat until smooth. Add the egg and mix well. Add the milk and the vanilla extract. Add the flour mixture and beat thoroughly. Stir in the chocolate chips. Drop by rounded teaspoonfuls onto ungreased cookie sheets, leaving several inches between for expansion. Using a fork, lightly indent with a crisss-cross pattern, but do not overly flatten cookies. Bake for 10 to 12 minutes. Do not overbake. Cookies may appear to be underdone, but they are not.

Cool the cookies on the sheets for 1 minute, then remove to a rack to cool completely.

Monday, April 13, 2020

Made-in-the-Pan Chocolate Cake

This cake has a long history and is often referred to as wacky cake, from the Depression era when people often didn't have eggs or milk to spare. It uses neither and is technically a vegan cake. The New York Times decided for some reason to mix it in the pan as well, which works fine but is not as easy as mixing in a bowl. This was another experiment in pantry baking while stores were out of flour but I still had some on hand. I topped it with leftover jam and bottom of the squirty can whipped cream.


Made-in-the-Pan Chocolate Cake (aka "Wacky Cake") 

Yield: 9 to 12 servings 
Time: 45 minutes

Ingredients


1 ¼ cups/160 grams all-purpose flour
1 cup/200 grams granulated sugar
cup/30 grams unsweetened cocoa powder
¾ teaspoon baking soda
½ teaspoon kosher salt
cup/80 milliliters canola oil
1 teaspoon vanilla extract
1 teaspoon apple cider vinegar or white vinegar
2 tablespoons semisweet or vegan chocolate chips (optional)
Confectioners’ sugar, for dusting on top (optional) 
 

Preparation

  1. Heat oven to 325 degrees. Add the flour, sugar, cocoa powder, baking soda and salt to an 8-by-8-inch square glass or metal baking dish. Whisk the mixture together until uniform in color. Use your fingers to break apart any lumps.
  2. Add 1 cup water along with the oil, vanilla extract and vinegar. Stir slowly with a fork or a whisk in small circles to blend. Mash, scrape and stir with a fork and spoon until the mixture becomes a smooth and uniform batter.
  3. Scrape the sides of the baking dish with a rubber spatula and spread the batter in an even layer. Sprinkle with chocolate chips, if using.
  4. Use a damp paper towel to wipe the edges of the baking dish clean. Carefully transfer the dish to the oven and bake until a toothpick inserted into the center of the batter comes out mostly clean, 28 to 33 minutes. (Instead of looking like you dipped the toothpick in chocolate frosting, it should look like it has some chocolate cake crumbs clinging to it.)
  5. Remove from the oven, let cool, then cut the cake into squares. If you’re feeling fancy, this tastes good (and looks pretty) with some confectioners’ sugar dusted on top.

Monday, April 06, 2020

Lemony Turmeric Tea Cake

Once I saw this cake and its name, I knew I was destined to make it. It's so bright! So cheery! And what will turmeric taste like with lemon? The description says, "Just slicing into it makes a bad day better..." and couldn't we use a little bit of that right now!

I felt like I overbaked it a little to get the middle to finish baking. I used yogurt instead of sour cream (both options are given) because I had previously made a citrusy cake that used yogurt. This has a somewhat strange order of ingredients in that the butter is folded in last; I'm not sure what this accomplishes. The sliced lemons on top aren't super edible but I liked sucking the insides out for a little sour boost before eating a bite of cake (I might be a weirdo.) I couldn't taste the turmeric but it does lend a brilliant color to the cake.


Lemony Turmeric Tea Cake
(from NYT Cooking, recipe from Alison Roman)

Ingredients

Nonstick cooking spray or butter, for greasing the pan
1 ½ cups/215 grams all-purpose flour
2 teaspoons baking powder
1 teaspoon kosher salt
¾ teaspoon ground turmeric
2 lemons
1 cup/200 grams granulated sugar, plus 2 tablespoons for sprinkling
¾ cup/180 milliliters sour cream or full-fat Greek yogurt, plus more for serving (optional)
2 large eggs
½ cup/115 grams unsalted butter (1 stick), melted
Whipped cream (optional)

Preparation

  1. Heat the oven to 350 degrees. Lightly grease a 4-by-9-inch loaf pan (see Tip) with nonstick cooking spray or butter, and line it with parchment, leaving some overhang on both of the longer sides so you’re able to easily lift the cake out after baking. 
  2. Whisk the flour, baking powder, salt and turmeric in a large bowl. 
  3. Grate 2 tablespoons zest from 1 lemon into a medium bowl. Halve the zested lemon and squeeze 2 tablespoons juice into a small bowl. Cut half the remaining whole lemon into thin rounds, discarding seeds (save the other half for another use). 
  4. Add 1 cup sugar to the lemon zest in the medium bowl; rub together with your fingertips until the sugar is fragrant and tinted yellow. Whisk in the sour cream, eggs and the 2 tablespoons lemon juice until well blended. 
  5. Using a spatula, add the wet mixture to the flour mixture, stirring just to blend. Fold in the melted butter. Scrape the batter into the prepared pan, smoothing the top. Scatter the top with the lemon slices and 2 tablespoons sugar. 
  6. Bake until the top of the cake is golden brown, the edges pull away from the sides of the pan, and a tester inserted into the center comes out clean, 50 to 60 minutes. (If the lemons are getting too dark, lay a piece of foil on top to prevent burning.) Let cool before slicing. (Cake can be baked up to 5 days ahead, wrapped tightly, and stored at room temperature.) Serve with whipped cream, if desired.