Monday, June 21, 2021

Raspberry Chocolate Malt Dacquoise

 One of the recent Rainy Day Bites Cookbook Club challenge options from Zoe Bakes Cakes was the "dacquoise with cream and berries." Originally my plan was to make the "raspberry charlotte royale" but then waited too long, so I had time to make one recipe but not the ingredients. Time to get creative! I had plenty of cream for a dacquoise, and plenty of raspberries, but no lemon curd. I've had a container of Ovaltine in my pantry for a while (not a paid advertisement, by the way), ever since reading how Joy the Baker uses it to make a silky chocolate buttercream. I had it as one of the options for a birthday cake I made in February, but went a different direction.  So I started thinking if Ovaltine powder would dissolve enough for a buttercream, maybe it would work in a whipped cream as well. 

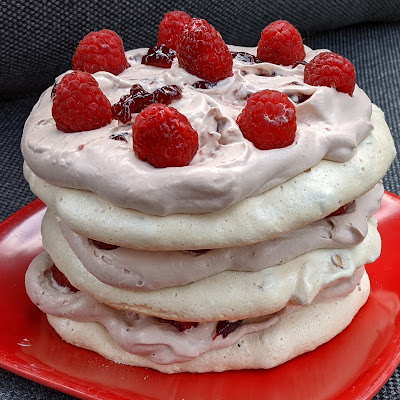
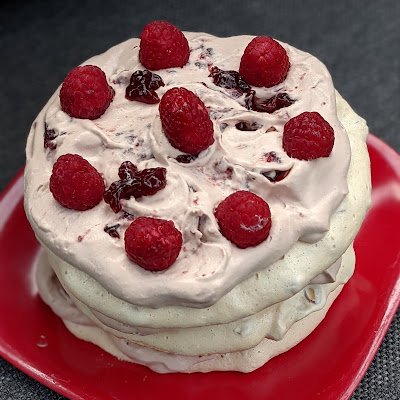
three discs of creamy white dacquoise on a red plate, alternating with layers of rosy brown ovaltine whipped cream, raspberry jam, and fresh raspberries

So this isn't really a recipe as much as it is a formula. I also didn't want to make a full size dessert since I'd have to eat it all myself, so I cut Zoe's recipe in half.

angled overhead view of same dessert described in previous image

I traced a cereal/soup bowl three times onto one sheet of parchment. I still baked it around the same time as the larger ones, maybe 5-10 minutes less. This made four perfect servings, one of which I had for breakfast two days after I made it (dacquoise really doesn't last that long, pro tip.)

I used the recipe from the cookbook, the only change I made was cutting it in half and using slivered almonds I had on hand instead of toasting my own. I thought about using pecan flour again but since I was using almonds anyway, I went ahead and used almond flour. I'm not sure I beat it quite long enough but it still baked well; I wish I'd formed the layers a bit more evenly so the stack would have been less uneven.

For the whipped cream, I used 1/4 cup Ovaltine powder to 2 cups heavy cream. I was uncertain if it would cause any problems so I started low. It did take longer to whip the cream, but it eventually got there. I think more Ovaltine would have been nice, probably not more than 1/2 cup to 2 cups cream. Alternately I could have added some powdered sugar. But I also liked that it wasn't overly sweet, since the dacquoise and jam are both very sweet. I thought about mixing the jam into the whipped cream but instead I globbed it on and attempted to swirl it in some - I should have thinned it out a little to make it fancier. I also could have put the raspberry jam down before the whipped cream, but I wouldn't have wanted to use any more than I used, and then it would not have been visible. It really does help break up the bland color. And then, of course, fresh raspberries.

The malted cocoa flavor in Ovaltine might not go with all the fruits, but I was thinking it would also be a nice option for spring, around Easter time, when you can get those malted robin eggs. Crushing those up in the dacquoise would be a stunner! Maybe I'll remember and bring this idea back around. You can see what other people made by following the #rainydaybitescookbookclub hashtag in Instagram.

Monday, June 14, 2021

Plum Cake

We are still baking from Zöe Bakes Cakes in the Rainy Day Bites Cookbook Club,  and one of the shared challenges was this plum cake. A slightly different version of this is posted on Zöe's blog - Plum Cake - but since this actual one doesn't seem to be, I will just link to the cookbook

The whole plum cake with two circles of quartered purple plums baked into the cake

It was hard for me to find plums in this area, and in my experience, southern plums are usually pretty tart. Where I grew up in the Pacific Northwest, we lived next to a man who would bring us a bucket of plums from his plum tree every summer - they were sweet and soft and a deep dark blue. It was funny when the only plums I could find were canned Oregon plums off the internet. But I'm not sure these are the best things to use in a cake since they're a bit syrupy and not fresh tasting.

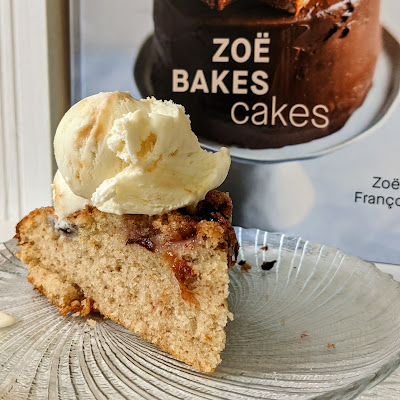
A slice of plum cake topped with ice cream. In the background is the cookbook the recipe comes from - Zoe Bakes Cakes

But I'm stubborn and made the cake anyway. I also used pecan flour instead of almond flour, and I'm not sure if there's a difference but the final result was a bit crumbly. I had purchased ice cream ahead of time that sounded like it might be a nice accompaniment - Jeni's Brown Butter Almond Butter - but I think this cake is more of a snacking cake, almost like a coffee cake, more for breakfast than dessert. It felt familiar to me, similar to the buttermilk strawberry cake I've made a few times, or this rhubarb coffee cake.

Monday, June 07, 2021

Nutella Swirled Banana Bread

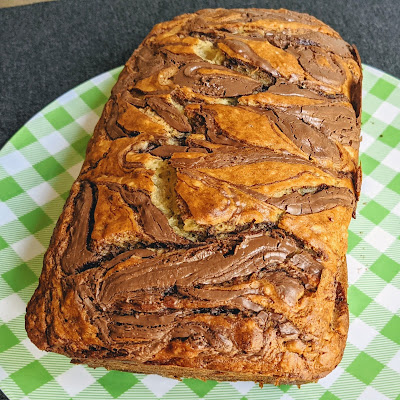
Another recipe from Zöe Bakes Cakes, a banana bread with two options - a Nutella swirl, or a cream cheese icing. I obviously went with the Nutella version, and I actually made a half recipe because of my one loaf pan. For more detailed directions and the cream cheese icing variation, see Zöe Bakes Cakes or her website, which also includes detailed photos. (This is the baking cookbook of focus for May-June in the Rainy Day Bites Cookbook Challenge.)

Overhead view of a swirled loaf.

Nutella Swirled Banana Bread

Ingredients

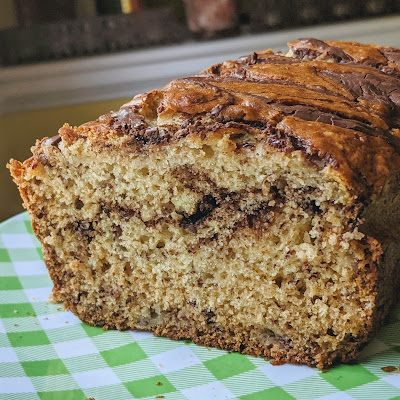
Front view of a sliced off loaf
 

Directions

Preheat the oven to 350°F (175°C). Generously butter two 8 by 4-inch (20 by 10-cm) or 9 by 5-inch (23 by 13-cm) loaf pans, then line them with buttered parchment paper.

In a large bowl, combine the bananas, brown sugar, butter, milk, eggs, and vanilla, and mix well with a wooden spoon.

In a separate bowl, whisk together the flour, baking powder, baking soda, and salt. Add the dry ingredients to the banana mixture and stir just until smooth.

Scoop the Nutella into a small bowl and heat in the microwave until softened enough to drizzle, 20 to 30 seconds.

Divide half of the banana batter between the prepared pans. Drizzle half of the Nutella over the two pans and run a small, thin knife through the batter in a zigzag or swirl pattern to distribute.

Add the remaining batter to the pans, top with the remaining Nutella, and swirl into the batter with the knife again.

Bake until a tester comes out clean, 40 to 50 minutes. Let the cakes cool in the pans for 10 minutes, then remove from the pans and set on a wire rack to cool completely before slicing.

Monday, May 31, 2021

Blueberry Pecan Muffins

This recipe is only slightly modified from Lost Lake Blueberry-Pecan Muffins in Summer: A Cookbook that I mentioned cooking from earlier this year. I had pecan flour from my boss that I was looking to use so I substituted that plus a little tapioca flour for the process in the book, where you start with nuts that are toasted and ground. I'm not sure they're going to result in the same muffin, so the recipe below is only slightly different, but it is not verbatim from the book. Just to clarify! 

One muffin with a few blueberries sits on a blue geometrical plate with a backyard in the background

Blueberry Pecan Muffins

1 1/2 cups pecan or almond flour
1/3 cup tapioca flour (optional)
1 1/2 cups all-purpose flour
1/2 tsp baking soda
1 1/2 tsp baking powder
1/2 kosher salt
1/2 tsp ground cardamom
1/2 tsp ground cinnamon
1 large egg, beaten
3/4 cup plus 1 tbsp sugar
1/2 cup buttermilk
1 tsp pure vanilla extract
1/2 cup (1 stick/115 g) unsalted butter, melted and cooled
1 1/2 cups blueberries
3/4 cup toasted pecan pieces (optional)

  1. Preheat the oven to 350 F. Line a 12-cup muffin tin with paper liners or coat the cups with nonstick cooking spray.
  2. Add the flours to a bowl. Add the baking soda, baking powder, salt, cardamom, and cinnamon and whisk or stir to combine.
  3. Whisk the egg and 3/4 cup of the sugar in a large bowl until pale, then whisk in the buttermilk, vanilla, and melted butter. Add the dry ingredients 1 cup at a time and stir with a wooden spoon until just combined. Gently fold in the blueberries and pecans, and spoon the batter into the prepared muffin tin.
  4. Bake for 25-30 minutes, until a toothpick inserted into a muffin comes out clean. Serve warm.

The original recipe had a more elaborate nut topping as well. These would probably be good with that or a streusel. I used blueberries I'd picked in my backyard last year and kept in the freezer because we're almost ready for a new crop!

Monday, May 24, 2021

pumpkin-mocha swirl bundt cake from Zoë Bakes Cakes

I was ecstatic when Zoë Bakes Cakes was selected for May-June for the Rainy Day Bakes Cookbook Challenge, because I'd been taking notice of her in social media. It was the first book I bought out in the real world after my post-vaccination period was up. The first challenge was a loaf cake, but the loaf recipes make two and I have only ever had one loaf pan! So I made the pumpkin-mocha swirl bundt cake. It's been a bit rainy and cooler here so I just pretended it was fall. I mean, arguably we can have pumpkin year-round, but do we? Zoë makes a slightly different version on her website, leaving out the espresso and making her own pumpkin spice mix (and her own pumpkin!), and an even more different version with Andrew Zimmern where she makes the chocolate layer as a streusel, a much thinner ribbon between pumpkin layers.

overhead shot of bundt cake on a green and white checkerboard plate

I have a fancy new Bundt pan that I'm not used to yet (I was using a 50cent garage sale find from Indiana that looked like my Grandma's, that never released a cake cleanly anymore and my husband bought me a new one) so I set a timer for 45 minutes to check and rotate the cake. I was glad I did because it was almost done at that point (the recipe says 1 hour 15 minutes, a good reminder that all ovens are different, and the pan you use varies too. The picture in the cookbook and at her blog uses a kugelhopf pan for a more dramatic slice and that might also my require more baking time.) My swirl layers are not perfect like Zöe's, but it tasted good.


A slice of the swirl bundt cake with the cookbook in the background

pumpkin-mocha swirl bundt cake

Dutch-processed cocoa powder for dusting, plus 2 Tbsp
1 cup / 240 ml mild-flavored oil (such as vegetable oil)
1 cup / 200 g granulated sugar
1 cup / 200 g lightly packed brown sugar
3 eggs, at room temperature
One 15-oz / 425 g can pumpkin puree
1/2 cup / 120 ml evaporated milk
1 Tbsp vanilla extract
2 1/4 cups / 270 g all-purpose flour
1 1/2 tsp baking soda
1 tsp kosher salt
1 Tbsp pumpkin pie spice, divided
1 tsp instant espresso
1/4 cup / 25 g confectioners' sugar

  1. Preheat the oven to 325 F / 165 C. Generously grease a 12-cup/2.8 L Bundt pan and dust with cocoa powder. 
  2. In a large bowl, combine the oil, both sugars, and eggs and stir until well incorporated. Then stir in the pumpkin puree, evaporated milk, and vanilla.
  3. In a separate bowl, whisk together the flour, baking soda, salt, and 2 tsp of the pumpkin pie spice. Add the dry ingredients to the pumpkin mixture and mix until it all comes together in a smooth batter.
  4. Divide the batter into two bowls and stir the espresso and 2 Tbsp cocoa powder into one of them.
  5. Pour one-fourth of the pumpkin batter into the prepared pan. Pour one-fourth of the cocoa batter evenly over the pumpkin. Repeat these layers, alternating the pumpkin and cocoa batters in the pan until they are both used up. Gently tap the pan on the counter several times to make sure the batter has fully settled into the nooks of the Bundt.
  6. Bake until a tester comes out clean, about 1 hour 15 minutes (or maybe 45-55!). Let the cake cook in the pan for 15 minutes, then turn out onto a serving dish.
  7. Meanwhile, in a small bowl, combine the confectioners' sugar and remaining 1 tsp pumpkin pie spice and stir to mix. Sprinkle over the top of the cake before serving.

 See all the cookbooks featured in JennyBakes in 2021.

Monday, May 17, 2021

Strawberry-Rhubarb Crumble from Smitten Kitchen (adapted to lower-sugar and grain-free)

I've had freezer rhubarb burning a hole in my pocket for months. Once it became spring, aka "rhubarb season," I started making stuff with it again like Rhubarb Swamp Pie and Rhubarb Comstock. We also bought a pint of organic strawberries that we somehow kept forgetting to use, and instead of molding in the fridge, they became slightly dehydrated. I decided they were still okay, and this Smitten Kitchen crumble recipe had been made and posted by someone else recently, and I just had to make it too. But I subbed the sugar for coconut sugar and the flour for almond flour, and it was great, delicious. I will put her recipe below (please see her blog for detailed photo instructions and other general deliciousness) and indicate the changes I made.

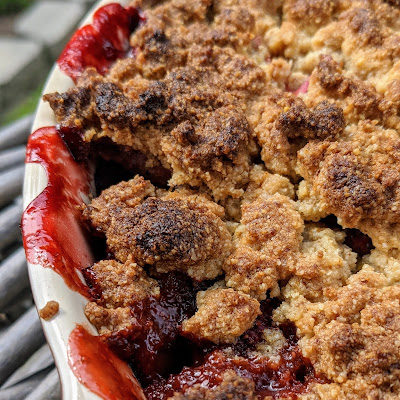
Outdoor photo of the entire crumble with a green faded backyard behind it.


The texture of the berries made them keep their shape a bit more, so file that thought away for the future! I can also say I have now used all the rhubarb. And I used my trusty oval dish that always seems to be more crumble/crisp/cobbler friendly even though it is smaller in volume to most recommended dishes. It just seems to work for me.

Overhead view of crumble, cropped to one side, red juices and browned crumbles.

Strawberry-Rhubarb Crumble
(recipe from Smitten Kitchen, see notes below for how I made it lower-sugar and grain-free)

Yields 6 to 8 servings.

For the topping:
1 1/3 cup flour*
1 teaspoon baking powder
3 tablespoons sugar*
3 tablespoons Demerara sugar (or turbinado sugar aka Sugar in the Raw)*
Zest of one lemon
1/4 pound (1 stick or 4 ounces) unsalted butter, melted

For the filling:
1 1/2 cups rhubarb, chopped into 1-inch pieces*
1 quart strawberries plus a few extras, hulled, quartered
Juice of one lemon
1/2 cup sugar*
3 to 4 tablespoons cornstarch
Pinch of salt

1. Heat oven to 375°F. Prepare topping: In a mixing bowl, combine flour, baking powder, sugars and lemon zest and add the melted butter. Mix until small and large clumps form. Refrigerate until needed.

2. Prepare filling: Toss rhubarb, strawberries, lemon juice, sugar, cornstarch and a pinch of salt in a 9-inch deep-dish pie plate.

3. Remove topping from refrigerator and cover fruit thickly and evenly with topping. Place pie plate on a (foil-lined, if you really want to think ahead) baking sheet, and bake until crumble topping is golden brown in places and fruit is bubbling beneath, about 40 to 50 minutes. 

Notes from JennyBakes:

I used 1 1/3 cup almond flour and 1/3 cup tapioca flour for teh crumble - I often use tapioca with nut flours to increase the elasticity slightly. It isn't required. I subbed coconut sugar for the sugar and only used 3 tbsp in the crumble (did not include the 3 for Demerara/turbinado) and used almost 1/2 cup in the filling - I was running low so might have opted to match it more equally. I didn't have fresh lemons so skipped the zest in the topping and used bottled juice in the filling. Crumbles are pretty forgiveable so it all worked out fine!

Monday, May 10, 2021

Zucchini-Chickpea Waffles with Crispy Eggs

New summer brunch recipe!! I had a review copy of Summer: A Cookbook by Marnie Hanel and Jen Stevenson, and marked almost every page to try. Since it's not quite summer here, I went for this savory waffle recipe for a light weekday dinner. The cookbook includes an "herb salad" component that I didn't make, just sprinkled chives over the top. The zucchini are in there but you don't really taste them, so the flavor you add to the waffles is the flavor you get. I think a remoulade or hollandaise might be another nice addition, but heavier than the summery intent of the recipes in this book. See the end for a few of my notes.

Waffles covered with crispy fried eggs and chives.

Zucchini-Chickpea Waffles with Crispy Eggs

1 large zucchini, graded (about 1 1/2 cups)*
1 tbsp grated lemon zest
3 tbsp finely chopped fresh dill
3 scallions, finely sliced
1 cup (90 g) chickpea flour
3/4 tsp kosher salt
1 tsp baking powder
2 large eggs
1/4 cup (60 ml) extra-virgin olive oil
1/2 cup water (so you don't forget!)

4 tbsp extra-virgin olive oil
4 large eggs
2 tsp minced fresh chives, for garnish
pinch of ground sumac, for garnish (optional)
flaky sea salt and freshly ground black pepper

  1. To make the waffles: preheat a 4-slice Belgian waffle maker, or equivalent. Preheat the oven to 200 F.
  2. Mix the zucchini, lemon zest, dill, and scallions in a small bowl. Whisk together the chickpea flour, kosher salt, and baking powder in a large bowl, then whisk in the eggs, olive oil, and 1/2 cup water. Add the zucchini mixture and mix well.
  3. [Make the herb salad, which I skipped.]
  4. Pour half the batter into the waffle maker and cook the waffle until golden and crispy (the exact cooking time will depend on your waffle maker.)* Transfer the finished waffle to the warm oven. Repeat to make the second waffle, if applicable.
  5. In a large skillet, heat 2 tbsp of the olive oil until very hot. Fry 2 of the eggs until the edges are dark brown and crispy and the egg whites are set but the yolks are still runny, 2-3 minutes (if runny yolks aren't your thing, cook them longer, or flip them.) Using a slotted spatula, transfer the eggs from the pan to a plate. Repeat with the remaining olive oil and eggs. 
  6. Separate each waffle into four sections, place two on each plate, and top with crispy egg. (This depends on your waffle maker too!) Garnish with preferred garnishes and a sprinkle each of salt and pepper, then serve immediate.y.

*Um, in my world 1 1/2 cups is a decent sized normal grocery store zucchini. A large zucchini is the watermelon sized squashes most gardeners know well. You do NOT want that much zucchini; best to go by the cup measurement.

Also in my world, a full recipe filled one waffle maker once, leaving 2 substantial waffles for each of us. I felt this was a better meal for 2 if that's all you're eating. 

I will definitely make this again, it's a versatile recipe that could go a hundred different directions.