Monday, April 14, 2008

Adventures with Black Cocoa


Cocoa powders
Originally uploaded by watchjennybake.
It started around Christmas time, when a friend sent me a gift card for King Arthur Flour, and told me I absolutely had to try the black cocoa. I had never heard of it, so I bought a pound to play around with. Since then I've heard this is what makes Oreos so black, but don't quote me on that one.

I actually used it a couple of weeks ago in my Hi Hat Cupcakes because I was out of regular cocoa powder, but it wasn't as intentional as I wanted to be.

I wanted to make at least one recipe that I had made before with regular cocoa powder, so I could compare them. Enter Alton Brown's Cocoa Brownie Recipe, one I find myself making more than any other brownie recipe, I think because it only calls for cocoa powder and not baking chocolate, which I can't seem to keep around the house. But with 1 1/4 cups cocoa powder, surely using black cocoa would make a significant difference!

I followed Alton's recipe, merely substituting black cocoa for half the cocoa powder when it was sifted. Alton Brown's cocoa brownie recipe has been blogged multiple times, so please check the results at the Food Blog Search if you want to see the original.

Black Cocoa Brownies

Blackies (Adapted from Cocoa Brownies, originally created by Alton Brown)
4 large eggs
1 cup sugar, sifted
1 cup brown sugar, sifted
8 ounces melted butter
3/4 cup unsweetened cocoa, sifted
3/4 cup black cocoa, sifted
2 teaspoons vanilla extract
1/2 cup flour, sifted
1/2 teaspoon salt

Preheat the oven to 300ยบ. Butter and flour an 8-inch square pan. In a mixer fitted with a whisk attachment, beat the eggs at medium speed until fluffy and light yellow. Add both sugars. Add remaining ingredients, and mix to combine. Pour the batter into a greased and floured 8-inch square pan and bake for 45 minutes. Check for doneness with the tried-and-true toothpick method: a toothpick inserted into the center of the pan should come out clean. When it's done, remove to a rack to cool. Resist the temptation to cut into it until it's mostly cool.

The result are dark chocolate brownies that are tender, chewy, and reminiscent of Oreo cookies. My students devoured them this afternoon.

A pound of cocoa is quite a bit, so I still had a bunch to try. I remembered Gale Gand making a cake with Wayne Harley Brachman back when she had a show on the Food Network, and knew the Brooklyn Blackout Cake was a prime candidate for trying out more black cocoa.

Brooklyn Blackout Cake

Throughout the recipe, any time cocoa was called for, I merely substituted half black cocoa for regular. This recipe is usually called a blackout cake because you turn 1/4 of the baked cake layers into crumbs, and they go on the custard that is spread on the outside. It was almost unnecessary to do this with the blackness of both the cake and custard, but I still did it for the effect.

Brooklyn Blackout Cake

I'm not sure this recipe was as successful as the brownies in taste and texture. To me, the extra crumbs on the outside give it the mouthfeel of being dry when it actually isn't. You haven't really lived, however, until you have stirred a bubbling pot of black chocolate custard on the stove - it just makes the entire baking experience surreal to make black colored things.

The last thing I am dying to do is to make a dark hot chocolate. I'll keep you posted!

Categories: Black Cocoa, Brownies, Cake, Chocolate, Custard

Sunday, March 30, 2008

Daring Bakers Challenge - The Perfect Party Cake

Morven was this month's hostess for the Daring Bakers challenge, and she picked a recipe from Baking: From My Home to Yours, a cookbook I keep giving as a gift but don't actually own... yet. After the way this cake turned out, I know this cookbook will become a staple.

We were given a lot of freedom this time around - we could play with the flavors, the fillings, etc. I had a bunch of ideas but only ended up with time to make the cake once. So I went with....

"Da Lime in Da Coconut Cake."

*groan*

I know, I know, its cheesy, but now that I know you're humming it, you can watch it here too:


Now that that's over, I can talk about the changes I made to the recipe. I didn't have cake flour at home, so I used all-purpose flour with the recommended change of simply removing 2 tbsp from each cup of flour. It worked wonderfully - the end result was beautifully risen and very tender, probably because of the baking soda reacting to the buttermilk, but still - what a great end result.

Instead of lemon juice, I used lime; instead of lemon zest I used lime again. Instead of vanilla extract, I used coconut. Other than that the recipe was the same, down to using raspberry jam slightly stirred.

Layers before icing
There was one step that I completely screwed up on, and didn't realize it until I had all of my layers stacked with jam in between The recipe actually asks you to spread buttercream between the layers as well as on the sides and top. I didn't want to risk taking the layers apart, and personally I thought this helped cut down on the super sweetness of the cake, but wouldn't want to let Dorie down.

This is not a healthy cake. If you use all the icing, this recipe has an entire pound of butter in it! But the texture of the cake and the perfect texture of the cooked buttercream makes this the perfect party cake indeed. I brought this to work and witnessed several people going back for a second slice before they'd even had lunch (a clear sign of a good recipe!).

Daring Bakers Orange Logo
In the future I will definitely make this recipe again - I want to try making a chocolate version, a peanut butter and jelly sandwich cake version (I'm thinking I can substitute peanut butter for one of the sticks of butter in the icing but we'll see if that works!), and a sacher-torte version. What makes this a perfect party cake? Well, besides the fact that the flavor and texture are exquisite, it looks impressive but also travels well - never underestimate the value of coconut to act as an icing buffer and protector! I know some of the other Daring Bakers have really done some creative things with this recipe, and you can check them out here.

ETA: For those of you who have a LiveJournal account, you can add this blog to your friends list here.


Categories: Cake, Coconut, Daring Bakers, Lime, Raspberry

Saturday, March 22, 2008

Peeps Hi Hat Cupcake


Peeps Hi Hat Cupcake
Originally uploaded by watchjennybake.
With all the baking blogs I read, I often come across recipes I can't get out of my head. When Laurie from the Quirky Cupcake blog posted about her entry for the Fierce Cupcake Challenge, including a Peeps vs. Bunnies war, I found myself going back to it just to have another giggle.

(Go ahead. I'll be here when you get back. It's worth it, trust me!)

I like to make treats for my student workers and have been on a cupcake kick this year, so this seemed perfect. When I was running out of steam Tuesday night I started thinking about just making a normal buttercream for the top, but followed through on the recipe.

It starts with a normal enough chocolate cupcake, but then you make a cooked meringue that goes on top (making them look more like ice cream cones than cupcakes... this is where the hi-hat name comes from), then they are dipped in chocolate, and topped by sprinkles. And Peeps, in my situation.

The end result is a cupcake sweeter than you would believe - the meringue is more like a marshmallow, and I'm pretty sure everyone who ate one left for Easter Break on a huge sugar high.

I was going to wait until Easter and post something about an amazing masterpiece that I was sure I would put together - but I am just not in a baking mood tonight, so this might be it!

Categories: Chocolate, Cupcakes, Holiday, Meringue

Monday, March 10, 2008

Oatmeal Cookie Pancakes


Oatmeal Cookie Pancakes
Originally uploaded by watchjennybake.
There are certain foods I crave when I am feeling stressed - chocolate (always) and breakfast. This pancake recipe makes such a thick batter you almost can't call them pancakes, but then you do and justify eating them for breakfast.

By the way, I blame my pancake craving entirely on this entry in the Cream Puffs in Venice blog. She is someone whose blog I never miss, and while I have yet to try her ricotta pancakes recipe, I couldn't not make pancakes after seeing this entry.

When you click on the link to the recipe, you will note that it is a Rachel Ray recipe. So sue me. Some of her recipes are pretty good.

If you are still developing your baking abilities, there is little you can do to mess up on pancakes. All the ingredients are stirred together in a bowl. As long as your griddle is hot enough and you don't turn them too soon, you should have delicious pancakes in no time!

I like how some of the moisture in this recipe is provided by bananas. It helps me ignore the sour cream and melted butter and deem it healthy, because it has fruit in it! It would have more if I hadn't substituted chocolate chips for the raisins....

I have mentioned before that my day job is being a librarian - here is a food research tool for you! A few people have taken advantage of the Google custom search and created a food blog search. It is a great way to look for recipes. I've added it to the side bar of my blog so you can use it any time.


Categories: Breakfast, Chocolate, Oats, Pancakes

Friday, February 29, 2008

Daring Bakers Challenge: Pain Francais (French Bread)

I have always said I needed to learn more about baking bread, and to learn more of Julia Child's recipes. When I found out that this month's Daring Baker's challenge, hosted by Mary (Breadchick) from The Sour Dough and Sara from I Like to Cook, was going to be Julia Child's French Bread, I was excited! And then I was disappointed. I knew this month would be crazy, and since I rarely make challenge recipes before the end of the month, and I would be in Rhode Island for an entire week including the last viable weekend, I was afraid I would have to back out of this one.

Suddenly, yesterday, I was hit by a burst of insanity that is not infrequent in my baking inspirations (and I'm sure many of you can relate to me here) - if I started as soon as I got home around 4:30, I could wait out the entire 9 hour process and still post to my blog today! Call me crazy, call me delusional.... or just call me a Daring Baker!

I took pictures of some of my process, but to be honest most of them were in my dark kitchen and just didn't turn out great. I had this great one of a huge gas bubble after the dough had risen a second time, but it is blurry. Imagine, if you will, this marvelous dough with only four ingredients - water, yeast, salt, and flour - going through the long process of being mixed, kneaded, rising, kneaded, rising, shaped, rising, slit, baked, sprayed with water, doused with steam from ice cubes I threw on the oven floor, and then reluctantly allowed to cool overnight.

The recipe, which is at least ten pages long, can be found here on Breadchick's blog. As with most Julia Child recipes, you are very rarely left with a question as to what it is you are supposed to do. She is truly one of the great teachers in the culinary world. I did have some confusion over what folding lengthwise meant, but I just did what made the most sense. If you click on the link to the recipe, you can see Mary's illustrations of almost every step, and that will answer any questions you might have.

There were two routes to take for the process of the recipe - hand or stand mixer. I have a Sunbeam mixer with a dough hook but always feel best mixing and kneading by hand - it is much easier for me to tell if the dough needs extra flour or water that way. This particular day, I added probably an extra 1/4-1/3 cup of water.

Pain Francais (French Bread)
There were many shape options for the bread - since this was my first time making the recipe, I picked the 3 batards, a slightly fatter and shorter baguette. I'd like to go back and try the recipe again with some of the other shape options.

There were several options for baking the bread too - there were instructions on how to turn your oven into a baker's oven with quarry tiles, etc., but as I decided to do the challenge last minute I didn't hunt anything like this down. I did a version in between the two methods and sprayed the bread down every 3 minutes for the first half of baking, as well as throwing ice cubes into the bottom of the oven to add some steam. According to Julia, this extra moisture helps the outside develop a nice crust while also encouraging the yeast in its work a little while longer.

I am grateful for this challenge. Even though the process took all day, the actual time spent with the dough was minimal. I really should try more bread recipes! If you have a bread recipe that can't be missed, please post it in a comment!

Daring Bakers Orange Logo
This recipe was brought to you by the Daring Bakers. To see hundreds of other interpretations of this recipe, please visit the Daring Bakers Blogroll.

Categories: Bread, Daring Bakers, French, Vegan

Monday, February 25, 2008

Quahog Dessert


Quahog
Originally uploaded by watchjennybake.
To be clear, I did not make this.

I spent the last week in Newport, RI, for theMusic Library Association annual conference. Being a music librarian is what you might call my day job. Newport was snowy and beautiful (you can see pictures from my trip here)!

Most of the time when I travel, I like to visit a bakery and write a post reviewing their items, but anything that Newport has that wasn't a chain was closed for the off-season. I know there are some great bakeries in Providence but I was too busy to make it there, plus it snowed.

This is the dessert we were served at our banquet at the Hyatt on Goat Island. A quahog is another name for a hard clam, and I loved how this dessert was created to look like one of the local clammy wonders. The almond-flavored shell was painted inside with chocolate and had a bunch of fresh fruit. The cream was a mango mousse and whipped cream, with a blueberry serving as a sort of pearl. Wait, do clams have pearls? Maybe this was an oyster, but I loved the idea of it being a quahog, so I'll leave it at that.

Obviously I have done no baking in the previous week, so I will simply let you gaze in awe at this masterpiece.

Sunday, February 17, 2008

Coconut Cupcake


Coconut Cupcake
Originally uploaded by watchjennybake.
Looks like I'm on a cupcake kick - well... kind of. This little coconut cupcake was part of a much bigger production. A friend of mine and I have been talking about having an afternoon tea for some time, but then I got sick, and then the second date we picked didn't have a good response rate. The third date was almost cancelled for other illness, but I'm glad we stuck with it!

We had decided we wanted to do a white theme, but then white was a little too limiting, so we went with white and blue food. And by theme, I simply mean the food we made, not decor. Frankly, who needs decor with good looking food!

The stack of tea food
Other food included cucumber sandwiches, and blueberry scones. I used the buttermilk scone recipe from Baking with Julia and added dried blueberries (from Whole Foods, so the only sweetener was apple juice) and lemon zest. Cucumber sandwiches were simple - flavored cream cheese with cucumbers. I need to be honest and say that I feel uncreative with these and need to experiment with more interesting tea sandwiches, however these fit the color theme.

When you talk about coconut cupcakes, it would almost be blasphemy to make a recipe other than Ina Garten's famous one. This version is about a double batch of the one I made. The cupcakes were great right out of the oven, a little dry the next day when I served them, but I heard reports that they were terrific later on. I did cook them longer than instructed, so I'm sure that's my fault, but I didn't want to serve gooey cupcakes!

Cream Dessert with Blueberry Sauce
This was similar to couer d'creme, and with blueberry sauce, delicious!


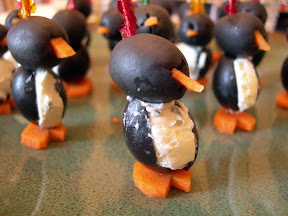
I had been waiting for an excuse to make these cream cheese penguins too, and they were so adorable!

I am on my way to a conference, so will post recipes, etc., at a later time.

Categories: Blueberry, Coconut, Cream, Cute, Cupcake, Scone, Tea, Tea Sandwiches

Thursday, February 14, 2008

Happy Valentines Day!

Some people think using a cake mix is like cheating. There is also an idea out there that cakes made from cake mixes don't taste good. I disagree wholeheartedly with both!

For many years I have been using recipes from The Cake Mix Doctor and Chocolate from the Cake Mix Doctor. The cakes are great, and the frostings are always superb. She isn't using the cakes as directed on the box, and the changes make all the difference. I think my favorite creation was using her double chocolate rum cake and using it as a basis for chocolate tiramisu - I should really post that recipe sometime.

When finding a recipe for Valentines Day, my mind was on cupcakes for some reason, and red velvet cupcakes seemed fitting. This recipe comes from the Cake Mix Doctor website, so I will just point you there to make these for yourself.

The batter is thick and a vivid red, thanks to the addition of sour cream and red food coloring; and the mini chocolate chips add a lot of interest and flavor. I'm not sure I'm a huge fan of the white chocolate in the cream cheese icing, but it does add an extra dimension of flavor. Some of them had pink sprinkles, lucky them!


Categories: Chocolate, Cupcake, South

Tuesday, February 12, 2008

Ebleskivers


Ebleskivers
Originally uploaded by watchjennybake.
Actually, I do not know if the plural of ebleskiver is ebleskivers or not!

For Christmas this year, I got a fun pan to make these little baby pancakes in. I'm a big fan of gadgetry despite my limited kitchen space - if I ever have a house of my own with a huge kitchen, I plan on needing an entire extra closet just for gadgets, and one for seasonal dishes.

Anyway, ebleskivers are little pancakes that are cooked in a little pan with round holes, and you are instructed to turn them with toothpicks. I tried filling them the first time I made a batch but most of the filling ended up baking on the outside of the ebleskiver. The first time I made them, I also followed a more traditional recipe where you separate the eggs and it was good, but to be honest, the recipe that called for biscuit mix was just as good.

And this time we had them with more leftover lemon curd, yet another good use of the deliciousness that came from the last Daring Bakers challenge.

I'm not going to post a specific recipe here. I'm still trying them out, but wanted to share the fun of a new pan and a new breakfast treat! I have heard that the one that calls for ricotta is the best one, and I have not tried it yet.

Categories: Breakfast

Monday, February 04, 2008

Happy Mardi Gras!


King Cake Slice
Originally uploaded by watchjennybake.
I have been wanting to make a king cake for a while now, and almost missed my chance again this year. After all, it is a sacrilege to make king cake before Twelfth Night or after Mardi Gras, and Mardi Gras Day is on Tuesday! So if it is too late for you, just file it away until next year.

When looking for King Cake recipes, I found several versions. The biggest variation has to do with the filling. Ultimately, I had two deciding factors - I wanted one that looked reliable, and I wanted one that I could incorporate some of the lemon curd I still had left over from the last Daring Bakers challenge. The recipe I chose was from the culinary king of New Orleans - Emeril Lagasse.

King Cake
Courtesy of Chef Emeril Lagasse, found on Gumbo Pages.com

* 2 envelopes active dry yeast
* 1/2 cup granulated sugar
* 1/4 pound (1 stick) unsalted butter, melted
* 1 cup warm milk (about 110°F)
* 5 large egg yolks, at room temperature
* 4 1/2 cups bleached all-purpose flour
* 2 teaspoons salt
* 1 teaspoon freshly grated nutmeg
* 1 teaspoon grated lemon zest
* 1 teaspoon vegetable oil
* 1 pound cream cheese, at room temperature
* 4 cups confectioner's sugar
* 1 plastic king cake baby or a pecan half
* 5 tablespoons milk, at room temperature
* 3 tablespoons fresh lemon juice
* Purple-, green-, and gold-tinted sugar sprinkles

Combine the yeast and granulated sugar in the bowl of a stand mixer fitted with a dough hook. Add the melted butter and warm milk. Beat at low speed for 1 minute. With the mixer running, add the egg yolks, then beat for 1 minute at medium-low speed. Add the flour, salt, nutmeg, and lemon zest and beat until everything is incorporated. Increase the speed to high and beat until the dough pulls away from the sides of the bowl, forms a ball, and starts to climb up the dough hook. If the dough is uncooperative in coming together, add a bit of warm water (110 degrees), a tablespoon at a time, until it does.

Remove the dough from the bowl. Using your hands, form the dough into a smooth ball. Lightly oil a bowl with the vegetable oil. Place the dough in the bowl and turn it to oil all sides. Cover with plastic wrap and set aside in a warm, draft-free place until doubled in size, about 2 hours.

Meanwhile, make the filling. In a large mixing bowl, combine the cream cheese and 1 cup of the confectioner's sugar. Blend by hand or with an electric mixer on low speed. Set aside.

Line a baking sheet with parchment paper.

Turn the dough out onto a lightly floured work surface. Using your fingers, pat it out into a rectangle about 30 inches long and 6 inches wide.

Spread the filling lengthwise over the bottom half of the dough, then flip the top half of the dough over the filling. Seal the edges, pinching the dough together. Shape the dough into a cylinder and place it on the prepared baking sheet seam side down. Shape the dough into a ring and pinch the ends together so there isn't a seam. Insert the king cake baby or pecan half into the ring from the bottom so that it is completely hidden by the dough.

Cover the ring with plastic wrap or a clean kitchen towel and place in a warm, draft-free place. Let the dough rise until doubled in size, about 45 minutes.

Meanwhile, preheat the oven to 350°F.

Brush the top of the risen cake with 2 tablespoons of the milk. Bake until golden brown, 25 to 30 minutes. Remove from the oven and let cool completely on a wire rack.

Make the icing. Combine the remaining 3 tablespoons milk, the lemon juice, and the remaining 3 cups confectioner's sugar in medium-size mixing bowl. Stir to blend well. With a rubber spatula, spread the icing evenly over the top of the cake. Sprinkle with the sugar crystals, alternating colors around the cake.

The cake is traditionally cut into 2-inch-thick slices with all the guests in attendance.

YIELD: 20 to 22 servings

King Cake
King Cake is really more of a bread, and I had decided to make all Mardi Gras food for Super Bowl weekend. I started it the day before, and instead of letting it rise the last time, I stuck it in the fridge overnight. I had a slight confusion over how much cream cheese was 1 lb, but ended up using 2 8-oz packages. It seemed okay, if a bit excessive.

I wish I had baked this longer. It was gooey underneath the filling, but the testers all came out clean. Now that the filling has set up more than it had in the picture of the slice, it is this fluffy delicious texture that is more mousselike than anything. I added probably 2 tbsp of lemon curd to the filling and it added welcomed flavor and depth to the entire cake.

The topping was super super sweet, and just too much, even though I was eating a small slice with a strong cup of tea. Most times I would look at a pastry ring and express disbelief that it is supposed to feed 20-22 people, but you really don't want much more than a small slice of this decadent treat.

I feel like I have let the traditionalists down by my colored sprinkle choices, but the store didn't have gold (power) or purple (justice), so I used green, which symbolizes faith during Mardi Gras, and pink, simply because, well, that is what I had.

Categories: Bread, Cake, Lemon, Holiday

Monday, January 28, 2008

Daring Bakers Challenge - Lemon Meringue Pie

If these don't look like pie, you would be correct, sir. In my year making desserts in an Indiana tearoom, I had to make two lemon meringue pies every Thursday morning for one customer who would always request them. So when Jen at The Canadian Baker picked lemon meringue pie for our January challenge, I knew I would be trying some of the alternatives.

Now I'm finding myself wondering how many Daring Bakers are named Jen. Hmm!

The tartlet you see in the front is the option we were given along with the challenge - freestyle lemon meringue tartlets. These were basically circles of the pastry, baked, with lemon curd scooped on top and surrounded by meringue. I decided they would look pretty as flowers and squeezed the meringue out of a ziploc bake in a flowerlike pattern.

The smaller tart in the back was just a teeny pie, basically. I had these four cute tart pans that have been begging me to be used in a recipe, any recipe, so I made four little tarts and four freestyle tartlets. I had a lot of everything left, but am putting on a tea this afternoon, so the lemon curd will be lovely for that.

This recipe was pretty good. I thought the crust was perfect, and the lemon curd was a wonderful texture, although it had quite a few more random steps than the one I usually make (cool the water for 5 minutes?) - I know several bakers had issues with the firmness of the curd, but I have to admit that once I got to a certain point I was going entirely by feel since I have made lemon curd so many times. I even got to use a flat silicone whisk that I got for the holidays, so was geeking out a little because of the new toy.

My only issue with the recipe is the salt level of the finished product. I may have waited too long to add it to the meringue, but regardless, the taste was visible, and way too much.

Closeup of lemon curd
(See? Perfect texture!)

Lemon Meringue Pie

Makes one 10-inch (25 cm) pie

For the Crust:
¾ cup (180 mL) cold butter; cut into ½-inch (1.2 cm) pieces
2 cups (475 mL) all-purpose flour
¼ cup (60 mL) granulated sugar
¼ tsp (1.2 mL) salt
⅓ cup (80 mL) ice water

For the Filling:
2 cups (475 mL) water
1 cup (240 mL) granulated sugar
½ cup (120 mL) cornstarch
5 egg yolks, beaten
¼ cup (60 mL) butter
¾ cup (180 mL) fresh lemon juice
1 tbsp (15 mL) lemon zest
1 tsp (5 mL) vanilla extract

For the Meringue:
5 egg whites, room temperature
½ tsp (2.5 mL) cream of tartar
¼ tsp (1.2 mL) salt
½ tsp (2.5 mL) vanilla extract
¾ cup (180 mL) granulated sugar

For the Crust: Make sure all ingredients are as cold as possible. Using a food processor or pastry cutter and a large bowl, combine the butter, flour, sugar and salt. Process or cut in until the mixture resembles coarse meal and begins to clump together. Sprinkle with water, let rest 30 seconds and then either process very briefly or cut in with about 15 strokes of the pastry cutter, just until the dough begins to stick together and come away from the sides of the bowl. Turn onto a lightly floured work surface and press together to form a disk. Wrap in plastic and chill for at least 20 minutes.

Allow the dough to warm slightly to room temperature if it is too hard to roll. On a lightly floured board (or countertop) roll the disk to a thickness of ⅛ inch (.3 cm). Cut a circle about 2 inches (5 cm) larger than the pie plate and transfer the pastry into the plate by folding it in half or by rolling it onto the rolling pin. Turn the pastry under, leaving an edge that hangs over the plate about ½ inch (1.2 cm). Flute decoratively. Chill for 30 minutes.

Preheat oven to 350ยบF (180ยบC). Line the crust with foil and fill with metal pie weights or dried beans. Bake for 20 to 25 minutes. Carefully remove the foil and continue baking for 10 to 15 minutes, until golden. Cool completely before filling.

For the Filling: Bring the water to a boil in a large, heavy saucepan. Remove from the heat and let rest 5 minutes. Whisk the sugar and cornstarch together. Add the mixture gradually to the hot water, whisking until completely incorporated.

Return to the heat and cook over medium heat, whisking constantly until the mixture comes to a boil. The mixture will be very thick. Add about 1 cup (240 mL) of the hot mixture to the beaten egg yolks, whisking until smooth. Whisking vigorously, add the warmed yolks to the pot and continue cooking, stirring constantly, until mixture comes to a boil. Remove from the heat and stir in butter until incorporated. Add the lemon juice, zest and vanilla, stirring until combined. Pour into the prepared crust. Cover with plastic wrap to prevent a skin from forming on the surface, and cool to room temperature.

For the Meringue: Preheat the oven to 375ยบF (190ยบC). Using an electric mixer beat the egg whites with the cream of tartar, salt and vanilla extract until soft peaks form. Add the sugar gradually, beating until it forms stiff, glossy peaks. Pile onto the cooled pie, bringing the meringue all the way over to the edge of the crust to seal it completely. Bake for 15 to 20 minutes, or until golden. Cool on a rack. Serve within 6 hours to avoid a soggy crust.

Daring Bakers Extra Challenge
Free-Style Lemon Tartlets

Prepare the recipe as above but complete the following steps:

To roll out tartlet dough, slice the dough into 6 pieces. On lightly floured surface, roll each circle of dough into a 5 inch disk. Stack the disks, separated by pieces of plastic wrap, on a plate, and refrigerate for 30 minutes.

To bake the dough, position rack in oven to the centre of oven and preheat to 350ยบF (180ยบC). Place the disks of dough, evenly spaced, on a baking sheet and bake for 20 to 25 minutes, until golden brown. Cool completely.

To finish tartlets, first place oven rack in the upper third of the oven and increase heat to 425ยบF.

Divide the lemon filling equally among the disks, mounding it in the centre and leaving a 1-inch border all the way around.

Spoon the meringue decoratively over each tartlet, right to the edges, in dramatic swirling peaks. Return tartlets to oven and bake for about 5 minutes, until the meringue is golden brown.

Pie recipe courtesy of Wanda’s Pie in the Sky by Wanda Beaver, 2002
Tartlet recipe courtesy of Ripe for Dessert by David Lebovitz, 2003

Daring Bakers Blue Logo
If you are curious to see other renditions, please check out the Daring Bakers Blogroll. We just keep growing and growing!

Some of my favorites include bakers who worked in other fruits - blueberry sauces, blackberry coulis, yum!

Categories: Daring Bakers, Lemon, Meringue, Pie, Tart

Monday, January 21, 2008

Chocolate Shortbread Olรฉ

It has snowed twice in the last week, and is bitterly cold today. This is not that common where I live in South Carolina. Cold weather makes me want to create the opposite - something warm, or even spicy.

I have had some of the Nestle Chocolatier chocolate bars in my cupboard since my plan to make Seven Layer Bars for Christmas again this year evaporated. Ever since then, the chocolate has been calling to me.

"Eat me!" it says. "You don't need to put me in a recipe."

Lately, I swear, they have been screaming. So I took revenge and went on the hunt for a recipe to use up the chocolate, something I could share easily. I found this recipe for Chocolate Shortbread Olรฉ on the Nestle Chocolatier site, where every recipe I have tried has been superb. Last February I made their Decadent Chocolate Satin Pie as well as the Chocolate Mayan Bundt Cake.

Chocolate Shortbread Olรฉ
Ingredients:

8 oz. NESTLร‰ CHOCOLATIER™ 53% Cacao Dark Chocolate Baking Bar(s), broken into small pieces
2 cups all-purpose flour
1 teaspoon ground cinnamon
1/8 teaspoon ground cayenne pepper
1 cup packed light brown sugar
3/4 cup (1 1/2 sticks) butter, softened
1 cup pecans, toasted, chopped

Directions:
Preheat oven to 325ยบ F.

Microwave small chocolate pieces in small, uncovered, microwave-safe bowl on high (100%) power for 45 seconds; stir. If pieces retain some of their original shape, microwave at additional 10- to 15-second intervals, stirring just until melted. Cool to room temperature.

Combine flour, cinnamon and cayenne in medium bowl. Beat brown sugar and butter in large mixer bowl until light and fluffy. Beat in melted chocolate. Stir in flour mixture until blended. Stir in pecans.

Shape dough into 1-inch balls; place 2-inches apart on ungreased baking sheets. Flatten with bottom of glass dipped in sugar.

Bake for 10 to 12 minutes or until edges are set. Cool on baking sheets for 2 minutes; remove to wire racks to cool completely.

Jenny's notes: The dough was very dry and crumbly as made, but came together pretty well with my hands. Next time I would add a little less flour. The cayenne pepper really adds a kick, and is a wonderful addition here.

I made a few small changes - the chocolate I had was 4 oz. of bittersweet and 4 oz. of semisweet, so I substituted that for the dark chocolate. I also neither had pecans nor did I think that sounded like the best nut to use - I had almonds that I didn't want to have to throw away, so I toasted them up on the stove.

Olรฉ!

Categories: Almond, Chocolate, Cookies, Shortbread

Tuesday, January 15, 2008

Nutty Orange Coffee Cake


Nutty Orange Coffee Cake
Originally uploaded by watchjennybake.
As someone newly transplanted to the south, I like to try and bake some southern treats from time to time. I was skeptical of this recipe, as I am of many of Paula Deen's recipes - for instance, I don't believe I'll ever be able to make her fudge that has velveeta as a secret ingredient without gagging. No offense, Paula.

This recipe comes from The Lady & Sons, Too, the second cookbook from her very popular Savannah restaurant. She has the recipe available on her website as well as on FoodNetwork.com, so I will go ahead and copy it here for now. I actually own this cookbook, a gift from a minister I used to work with, but this is the recipe I find myself making repeatedly.

Sometimes you use shortcuts while baking. This recipe uses canned biscuits! But by the time you have wrapped a dab of cream cheese in a biscuit, dipped it in melted butter, and dredged it in a mixture of orange zest, nuts, and sugar - you would never imagine any of it came from a can.

The end result is a flaky, sweet (but not overly, balanced nicely with the cream cheese), impressive looking coffee cake, appropriate for brunch or a special breakfast.

Nutty Orange Coffee Cake
3/4 cup granulated sugar
1/2 cup chopped pecans
2 teaspoons orange zest
2 (12-ounce) cans refrigerated buttermilk biscuits (10 count)
1 (8-ounce) package cream cheese
1/2 cup (1 stick) melted butter
1 cup sifted confectioners' sugar
2 tablespoons fresh orange juice

Preheat the oven to 350 degrees F.

In a small bowl, combine the granulated sugar, pecans, and zest; set aside. Separate the biscuits. Place about 3/4 teaspoon cream cheese in the center of each biscuit. Fold each biscuit in half over the cheese, pressing the edges to seal. Dip the biscuits in melted butter, then dredge in the granulated sugar mixture. Place the biscuits, curved-side down, in a single layer in the hollows of a lightly greased 12-cup bundt pan, spacing them evenly (do not stack). Place any remaining biscuits around the tube, filling any gaps. Drizzle any remaining butter over the biscuits, and sprinkle with any remaining sugar mixture. Bake for 35 to 40 minutes, until golden brown. Immediately invert the cake onto a serving platter. Combine the confectioners' sugar and orange juice, stirring well; drizzle the glaze over the warm cake. Serve warm.

This time around, I left out the nuts, and it is still wonderful without them. Eventually I want to try making different versions of this - maybe a chocolate chip raspberry one, or a lemon cinnamon version. The possibilities are pretty endless, and the preparation is so quick using the canned biscuits!

I also don't follow the directions about not stacking the biscuits. I always have a few extra, and I layer them around the center of the dish and it works just fine.

Categories: Breakfast, Coffee Cake, Nuts, Orange, Southern Cuisine

Friday, January 11, 2008

Chocolate Cinnamon Bread


Chocolate Cinnamon Bread
Originally uploaded by watchjennybake.
You know it has been a completely crazy week when it is Friday before I realize I never posted in what is supposed to be a weekly Monday blog! Winter Term at the university where I work is the craziest time, and the music library has been hopping.

Since I waited, I'm posting about something I made later in the week. I had a new co-worker start this week, and where I work, we have "Welcome Breaks" where people bring food, hooray. I actually made this recipe Christmas Eve (AKA Hubby's birthday) morning, but didn't photograph it then, so I repeated it for this celebration.

The recipe is Chocolate Cinnamon Bread, and I know it has been making the rounds on the baking blogs. I first read about it on Taste and Tell, another one of the Daring Bakers blogs. I will let you go to her post for the recipe, and to see a picture of how it should look if you follow the recipe exactly.

The first time I made it I did the spice mixture and sprinkled the bottom of the pans I used with it, but I used these silicone flower mini cake pans and everything stuck despite using non-stick spray. (This is why there is no photo from Christmas Eve!). I also had been out of cinnamon that day, so it was more of a chocolate spice (cardamom, ginger, and clove) bread.

This time around I actually didn't have enough cocoa powder, so used only 3/4 cup and added an additional 1/3 cup flour. I also used a bundt pan instead of two loaf pans because I wanted it to serve more people. I took it out of the oven when the top was brown, even though I wasn't convinced it was completely cooked, but the texture seemed okay when it was cut into the next morning.

That's why the picture isn't great - I cut a quick slice and snapped a photo on the entertainment center before jumping in the car to go to work! Crazy week, simple recipe, delicious fun!


Categories: Bread, Chocolate, Cinnamon

Tuesday, January 01, 2008

Buttermilk Chocolate Chip Scone

My first post of 2008! Happy New Year, everyone.

At our house, we drink a lot of tea. I mean a LOT of tea. Only the good stuff. I even played around with making some blends of my own for my husband for Christmas this year - his favorite was "Larkin in the Morn," a malty rich breakfast tea blend.

With tea simply must come scones. These may look quite a bit like the chocolate chip scones that I have blogged previously, but that recipe is a classic cream, butter, and baking powder scone. I was flipping through Baking with Julia, contemplating making croissants over the holidays (which I wimped out on), and came across the buttermilk scone recipe. I had extra buttermilk in the fridge from the cake I made, so thought I might as well.

Then I got curious about baking with buttermilk. I know that it is always paired with baking soda in recipes, but didn't know WHY. A little internet research explained it to me:

Baking soda, also known as sodium bicarbonate, is a basic salt and reacts with acidic liquid ingredients to create the bubbles of carbon dioxide. (found on It's Chemistry in the Baking)

Easy enough. What I don't really understand is why this reaction is desired more than just using more baking powder, so I'd love to hear an opinion on those of you bakers who are more scientifically trained than I am.

The texture of these was good, considering that they have far less fat than the scones with butter and cream, but I think I still prefer my traditional recipe.

Baking with Julia is actually written by Dorie Greenspan, and I have grown to really love her cookbooks. I won't copy the recipe here, but this book is a baking essential. It has a nice combination of complicated recipes (like croissants, which I hope to eventually try) and good standards like this scone recipe.

Categories: Chocolate, Scones

Monday, December 24, 2007

Triple-Chocolate Cake with Chocolate Peppermint Filling

My husband has the misfortune of having a Christmas Eve birthday, making the stretch from the 24th and 25th of December full of gifts, sweets, and events. Wait, maybe misfortune is not quite the right term to use!

It is his tradition to get a mint chocolate chip log roll cake from Baskin Robbins every year, and I kept pestering him, telling him I could make something better, and this year he decided to let me have a shot.

I'm not sure I met the challenge. There were a few issues with this recipe that made me wish I had done a trial run, but between surgery and other holiday baking I just didn't have a chance!

I made the Triple-Chocolate Cake with Chocolate Peppermint Filling from epicurious.com, after an extensive cookbook and internet search for something chocolate minty. The filling is a soft ganache made with milk chocolate, the cake batter has cocoa powder and mini chocolate chips, and the glaze has semisweet/bittersweet chocolate (I used a mixture of both). Now when I count that, I get four chocolates, but maybe that name was taken.

My biggest complaint is the cake itself. It could be my fault, but I overcooked it way too much. I think part of the reason is the mini chocolate chips, which increase the cooking temperature of the cake far past a normal cake would cook once it is taken out of the oven. So because the cake was practically crusty on the outside, the gloss was not as smooth as I would have liked (in fact, this first picture shows some of the ganache peeking through).

Triple-Chocolate Cake with Chocolate Peppermint Filling

Flavor wise, it was pretty good, but I was too distracted by the dryness of the cake. The filling was possibly the best part, and I also substituted one of the teaspoons of vanilla for peppermint extract in the cake, so it was all quite pepperminty.

I'm having a hard time deciding if this was even what I would consider "good" or not. Peppermint is something I enjoy but doesn't really rank in my top dessert flavors (unless we're talking mochas, in which case peppermint is my #1) so I could take or leave this cake.

I served this with Ben & Jerry's Mint Chocolate Cookie ice cream, which upped the mint even more. What I am wishing now is that I had tried to replicate the original Baskin Robbins cake, and just make an improved version. I think that was my intent before I started recipe hunting, and then it turned into a completely different animal.

Categories: Cake, Chocolate, Mint

Saturday, December 22, 2007

Buche de Noel - Daring Bakers December 2007 Challenge


Yule Log 2007
Originally uploaded by watchjennybake.
I have wanted to make a Buche de Noel, or yule log cake, for several years now but never got around to it. When it came out as the Daring Bakers Challenge for December, I was excited, to say the least. I knew I had a tree trimming party to go to and planned to make it for that day. The day of the party, it was pouring down rain, the kind of day that makes you want to lock the door, make a pot of tea, and watch movies or read books all day long.

I was actually worried it was going to be "one of those days" when I went to the post office to send holiday gifts (the day after the deadline, of course), and then to the grocery store. The only thing I needed was parchment paper, and guess what I forgot? Which meant I was going BACK out in the rain to hunt down parchment paper - which by the way, in my town, neither Walgreens nor CVS deemed important enough to carry - so I didn't get started until around 1 pm. I don't mind having a disastrous baking day (see last month's Daring Bakers Challenge) but was desperate not to have this day be one of them.

Chocolate genoise cake layer

The first step is baking the genoise layer. I decided to do a chocolate version, and altered the recipe based on Nick Malgieri's suggestions on the old episode of Sara's Secrets (where he bakes this cake!). I watched that episode twice before I delved into this project.

Unfrosted yule log
I slightly overbaked the cake, knowingly, because it told me to start on the buttercream once the cake was in the oven, but then I had egg whites whisking on the stove when the cake was over and I freaked out a little. So later on, the cake cracked when it rolled up, but it was still all good.

Creamy buttercream
I was worried that my buttercream would break after reading some stories of the other Daring Bakers, but I had my fears put to rest by Nick Malgieri, who said once the mixture had cooled completely down in the mixer, you could just throw the softened butter in one stick at a time and beat it until it came together - so I did, and it was wonderfully creamy and SO delicious. This is not the buttercream you make by mixing powdered sugar and butter. I didn't have rum or brandy, so I used Kahlua, which really amped the coffee flavor in this.

Meringue mushrooms

While the rolled cake and buttercream chilled, I went to work making meringue mushrooms. I have made meringue a zillion times -back in my tearoom days we had to have lemon meringue pies every Thursday (and oh look, I even made meringue earlier this month)- but I have never made meringue mushrooms. Lacking a pastry bag, I used a gallon ziploc and it worked pretty well.

The mushrooms added the most mystery to the cake - a lot of people at the party thought they were "actual" mushrooms and I had to prove they weren't by cutting them apart. The cocoa powder applied before baking really added a touch of realism.

I didn't do much to decorate the cake other than add fork marks (after the pictures were taken, ha!). I was late to the party, it was pouring down rain, and I realized too late that I had no covered dish large enough to transport the cake. So I used the umbrella on the cake and ended up at the front door looking like a drowned rat, but the cake was dry!

Daring Bakers Blue Logo
The recipe can be found on either blog of this month's challenge hosts - Ivonne and Lisa. All the Daring Bakers (I believe we're over 300 strong now) can be seen in the list here.


Categories: Buttercream, Cake, Chocolate, Coffee, Daring Bakers, Holiday, Meringue

Monday, December 17, 2007

Gifts from the Kitchen

I often make baked goods as gifts for the holidays, and this year was no exception. I have been wanting to make biscotti for years but this was the first time I had tried it. I'll do it again, they were so easy. I won't include the recipe, because it is just another one from The Baker's Field Guide to Christmas Cookies, and I've given you enough of those. It's like my cookbook of the month.

These biscotti, though, are perfect for the holidays. The red of the cranberry, the slight green of the pistachio.... the dough is fragrant with vanilla and lemon, and they had a lot more flavor than I expected. I originally meant to get some white chocolate to dip the ends in but forgot. Without it they were probably easier to dip in coffee or tea though. For some of my friends, I made little tea gifts with loose tea, disposable/fillable tea bags, and biscotti; a type of relaxation gift. Biscotti have a long shelf life, and would probably ship well, but mine got consumed too quickly to test that theory out. The dough has eggs but no fat, so that plus the baking twice gives them a dry consistency that is perfect for dunking.

Peanut Butter Biscuits
The second recipe is for the dogs, literally. My husband's stepmother is mother to some basset hounds and foster parent to even more. The Daily Drool is a web site for basset hound owners and fans, and that is the source of this recipe. Bailey, my beagle, can smell these a mile a way and highly recommends them. This year I made these for friends with dogs and sent them off, much to Bailey's chagrin. Luckily he received some from Janice so he didn't suffer much!

Daily Drool Peanut Butter Basset Biscuits
4 cups whole wheat flour
2 cups oatmeal
1/2 to 3/4 cup chunky peanut butter
2 1/2 cups hot water

Mix all ingredients, adding more hot water if dough is too sticky. Knead well. Roll out to 1/4 inch and cut into shapes with cookie cutter. Bake on greased cookie sheet at 350 degrees for 40 minutes. Turn off heat and let cool in oven overnight.

Jenny's notes: Bailey wanted me to make sure to mention that cat and bone shaped treats are the best.

I usually make a half batch of this, which fills one cookie sheet perfectly. These can go bad quickly if not fully dried out, so definitely don't skip the step of leaving them in the oven overnight. Then store them in an airtight container.

Categories: Biscotti, Cranberry, Dog Treats, Peanut Butter, Pistachio

Monday, December 10, 2007

Cranberry Snowdrift Bars


Cranberry Snowdrift Bars
Originally uploaded by watchjennybake.
A lot of the recipes I make during the holidays are family traditions or recent standards - wagon wheel cookies, peanut butter balls, various fudges, and my recently discovered seven layer bars. I am trying to add a few new recipes to the repertoire. This one comes from the book I mentioned last week, A Baker's Field Guide to Christmas Cookies. Can I just say again that I highly recommend this cookbook? I haven't made an unsuccessful recipe from it yet.

I really liked these - they capture the flavor (cranberry) of the season as well as a weather reference (meringue), although if you live in South Carolina like I do you have been experiencing weather that is the opposite of snowy - today it got to 77 degrees! So we sometimes have to create a feeling with our baking if nothing else cooperates.

Cranberry Snowdrift Bars

Crust:
1 1/4 cups all purpose flour
Pinch of salt
1/2 cup (1 stick) unsalted butter, softened
1/4 cup granulated sugar
1/4 tsp vanilla extract

Filling and topping:
1 cup whole-berry cranberry sauce, not jellied
2 large egg whites
1/8 tsp cream of tartar
1/2 cup granulated sugar
1/4 tsp vanilla extract

1. Coat an 8-inch square baking pan with nonstick spray.

2. Whisk flour and salt together in a small bowl.

3. In a large bowl with an electric mixer on medium-high speed, beat butter until creamy, about 3 minutes. Add sugar gradually, beating on high speed until light and fluffy. This may take as long as 8 minutes. Do not rush; mixture should be almost white in color. Beat in vanilla. Add in 1/3 of the flour and mix on low speed. Gradually add remaining flour, mixing just until blended. Pat crust in an even layer in baking pan. Refrigerate at least 30 minutes or overnight. Wash and dry beaters of mixer.

4. Preheat oven to 350 degrees F. Bake crust until completely dry to touch and a pale golden brown, about 40 minutes. The edges will be a bit darker. Place pan on rack to cool 5 minutes, then spread cranberry sauce evenly over crust using a small offset spatula or back of a spoon.

5. To make topping, whip egg whites until foamy in a medium clean, grease-free bowl with mixer on high speed. Add cream of tartar and whip until soft peaks form. Add sugar gradually, whipping until stiff but not dry peaks form. Beat in vanilla. Spread meringue evenly over cranberry layer. Use back of teaspoon to make peaks and swirls in meringue.

6. Bake until meringue is a light golden brown, about 25 minutes. Place pan on rack to cool. Cut into 20 bars (4 x 5).

Fluffy pillow of meringue

Jenny's notes: Definitely let egg whites come to room temperature before beating, and the meringue will go much more easily. I also doubled this recipe. Why do all the work and only have an 8x8 pan to show for it, when you can use up the entire can of cranberry sauce that way?


Categories: Cookie, Cranberry, Holiday, Meringue, Shortbread

Monday, December 03, 2007

Fun with Sugar Cookie Dough

I have this great cookbook called A Baker's Field Guide to Christmas Cookies, and I pick a few recipes out of it to try every year. I've been eyeing the "Yuletide Mocha Orange Patchwork, Pinwheel, and Marbled Cookies" recipe for several years and decided to try it for the first holiday cookies of the 2007 season.

Mocha Orange Pinwheel and Marbled Cookies
This recipe could be replicated with any combination of flavored, firm sugar cookie dough. This time around in the recipe the orange dough was crumbly - I may have miscounted the flour when I measured, because the mocha dough was perfection.

If you are going to mix up sugar cookies, you might as well make two batches!

Yuletide Mocha Orange Patchwork, Pinwheel, and Marbled Cookies
from A Baker's Field Guide to Christmas Cookies

Yield: 100 pinwheels or 50 assorted 3- to 4-inch patchwork cookies; yield of marbled cookies varies

Ingredients

Orange dough:
3 cups all-purpose flour
1/2 tsp baking soda
1/4 tsp salt
1 cup (2 sticks) unsalted butter, softened
1 cup granulated sugar
2 tsp finely grated orange zest
1 tsp vanilla extract
1 large egg

Mocha dough:
2 1/2 cups all-purpose flour
1/2 cup Dutch-processed unsweetened cocoa powder
1/2 tsp baking soda
1/4 tsp salt
1 cup (2 sticks) unsalted butter, softened
1 cup granulated sugar
1 tsp instant espresso or coffee
1 tsp vanilla extract
1 egg

1. For orange dough, whisk flour, baking soda, and salt together in a small bowl. In a large bowl with an electric mixer, beat butter until creamy, about 2 minutes. Add sugar gradually, beating until light and fluffy, about 3 minutes; beat in orange zest and vanilla. Beat in egg. Add about one-third of flour mixture and mix on low speed. Gradually add remaining flour, mixing until just blended. Scrape dough onto large piece of plastic wrap. Use wrap to help shape into a large, flat disc, then cover completely with wrap. Refrigerate until firm enough to roll out, at least 2 hours or overnight.

2. For mocha dough, whisk flour, cocoa, baking soda, and salt together in a small bowl. In a large bowl with an electric mixer on medium-high speed, beat butter until creamy, about 2 minutes. Add sugar gradually, beating until light and fluffy, about 3 minutes. Dissolve instant espresso into vanilla, then beat into dough. Beat in egg. Add about one-third of the flour mixture and mix on low speed. Gradually add remaining flour, mixing until just blended. Scrape dough onto large piece of plastic wrap. Use wrap to help shape into a large, flat disc, then cover completely with wrap. Refrigerate until firm enough to roll out, at least 2 hours or overnight.

3. Line 2 cookie sheets with parchment paper.

4. For patchwork cookies: Choose two compatible cookie cutters, large and small, such as a large and small star or bell or a large gingerbread person and a small heart. The only absolute is that the small cookie cutter must fit within the larger one with a border of dough all around. Roll both doughs out to 1/4-inch thickness on lightly floured surface. I will use stars as our example: Cut out a large orange star and place on cookie sheet. Cut out a large mocha star and place 2 inches away on the same sheet. Now cut out a small star out of the larger orange star and a small mocha star out of the large mocha star. Place small mocha star inside larger orange star (in void created by removing small orange star) and vice versa. Be as creative as you like, but keep similarly sized cookies on same sheet for even baking times. When pan is filled with cookies, place in freezer for 15 minutes or refrigerator for 30 minutes.

For Pinwheel Cookies:
Cut each flavored dough in half. Roll half of orange dough out to 1/4-inch thickness on lightly floured surface to a rectangle about 14x16 inches. Roll half of mocha dough out in the same manner. Place orange dough on top of mocha dough and square off the four sides by trimming with a pizza cutter or sharp knife. Starting at one short end, roll both doughs up together as tightly as possible. Your roll should be about 2 inches in diameter. Carefully cover rolled dough with plastic wrap. Repeat with remaining dough halves. Freeze 30 minutes or refrigerate for 1 hour, until very firm. (Rolls may be frozen at this point for up to 1 month). Trim ends of roll so that spiral design is flat. Cut 1/4-inch-thick slices off roll and place 2 inches apart on cookie sheets.

For Marbled Cookies:
Briefly knead all the scraps left from both flavors of dough together to create a marbled effect, roll out as described above, and cut out cookies as you wish; they will look marbled.

5. Preheat oven to 350 degrees F. Bake until dry to touch and edges are just beginning to color, about 12 minutes for cookies 2 inches across. Lift up a cookie; it should lift without breaking, and bottom will be slightly colored. Adjust baking time up or down accordingly if cookies are much smaller or larger. Slide parchment onto racks to cool cookies completely.

Categories: Chocolate, Cookies, Holiday, Mocha, Orange