Monday, September 26, 2016

Cold Chocolate Snacking Cake

What is a "snacking cake," exactly? As far as I can figure it, it is a simple cake, one that can be frosted in the pan and served directly from it. No layers, no decorations, no fuss. This one has been on my to-make list for a while because of the cold factor, and when I desperately needed to make something to post to the blog in time, this was a great pick because everything is a pantry ingredient.


Cold Chocolate Snacking Cake
(recipe from The View from Great Island blog)

Ingredients
  • 3/4 cup unsweetened cocoa powder
  • 3/4 cup all-purpose flour
  • 1/2 teaspoon baking powder
  • 1/4 teaspoon salt
  • 3/4 cup (1 1/2 sticks) unsalted butter, room temperature
  • 1 cup sugar
  • 3 large eggs
  • 1 teaspoon vanilla extract
  • 1/2 cup sour cream
  • for the frosting
  • 1 cup heavy cream
  • 6 oz good semi sweet chocolate, chopped
  • 1/2 cup confectioner's sugar, sifted
  • 1/3 cup dark cocoa powder, sifted 
Instructions
  1. Set oven to 350F
  2. Spray an 7 1/2 x 11 1/2 brownie pan with cooking spray (you could substitute a 9x9 square pan, but the cooking time will be slightly longer and the cake will be taller)
  3. In a medium bowl, whisk the cocoa, flour, baking powder, and salt; set aside.
  4. In a mixing bowl, cream butter and sugar until light and fluffy. Beat in eggs, one at a time, then beat in vanilla. Reduce speed to low. Add flour mixture alternating with sour cream, starting and ending with the flour mixture.
  5. Spread batter into prepared pan. Tap pan firmly on counter top several times to force out large air bubbles. Bake until a toothpick inserted in center comes out clean, about 30 minutes. Don't over bake.
  6. To make the frosting: Heat the cream in a 2 cup glass measuring cup in the microwave until simmering. Add in the chocolate and let sit for 10 minutes, and then stir until smooth and glossy and the chocolate is all melted. If the chocolate isn't completely melted and smooth, zap it for another 15-30 seconds in the microwave.
  7. Add the sugar and cocoa powder and whisk until completely smooth. Pour over the cooled cake. Put the cake in the refrigerator to chill and set the frosting. I like to leave it there for a couple of hours. Serve cold, and store in the fridge. 
Notes from JennyBakes:
-I used a 9x9 square pyrex and ended up baking it for 40 minutes. It probably only really needed 35.

Monday, September 19, 2016

Nigella Lawson Flourless Chocolate Orange Cake

As mentioned in my previous blog post, my reading friend adapted this cake to a orange coconut cake, but once she'd mentioned it I couldn't get it out of my head I had to make the original. I used coconut sugar instead of regular to make it a bit lower on the glycemic index, but otherwise kept it the same.


This cake has one strange technique and a few strange ingredients - you must boil oranges a few hours (and then you use the entire thing, peel and all.) Since the "flour" is all almonds, you can see some nobbly bits. The end result is not overly chocolatey but reminded me more of a gingerbread in texture.


Flourless Chocolate Orange Cake
(recipe from Nigella Lawson as seen on Food.com)

2 small thin-skinned oranges, approx 375g total weight (or 1 large)*
6 eggs
1 tsp baking powder
1/2 tsp baking soda
200 g ground almonds**
250 g caster sugar***
50 g cocoa****
  1. Put the whole orange or oranges in a pan with some cold water, bring to the boil and cook for 2 hours or until soft.
  2. Drain, and when cool, cut the oranges in half and remove any big pips.
  3. Then pulp everything - pith, peel and all - in a food processor.
  4. Preheat the oven to gas mark 4/180°C (350F). Butter and line a 20cm springform tin.
  5. Add the eggs, baking powder, baking soda, almonds, sugar and cocoa to the orange in the food processor. Run the motor until you have a cohesive cake mixture, but slightly knobbly with the flecks of puréed orange.
  6. Pour and scrape into the cake tin and bake for an hour, by which time a cake tester should come out pretty well clean. Check after 45 minutes because you may have to cover with foil to prevent the cake burning before it is cooked through, or indeed it may need a little less than an hour; it all depends on your oven.
  7. Leave the cake to get cool in the tin, on a cooling rack. When the cake is cold you can take it out of the tin. Decorate with strips of orange peel or coarsely grated zest if you so wish, but it is darkly beautiful in its plain, unadorned state.
*I used two navel oranges
**I used 2 cups almond flour
***I used 3/4 cup coconut sugar and 1/2 cup granulated sugar
****1/2 cup

Monday, September 12, 2016

Did You Ever Have a Coconut Orange Cake?

I recently read Did You Ever Have a Family? by Bill Clegg, a novel that was longlisted for the Man Booker Prize and the National Book Award in 2015. The story revolves around a tragic event, a family dying the night before a wedding is to occur. But some of the characters, who narrate their own chapters, talk about the cake that was requested for the wedding. It seemed unusual, so of course I had to make it. Another reading friend was reading the book at the same time, and also tried a version which I hope to at least link to below.

"My mom made Lolly Reid's wedding cake. She got the recipe from a Brazilian restaurant in the city where she went one night after going in with her friends to see a show. It was a coconut cake made with fresh oranges. She prepared for days. It didn't have any pillars or platforms or fancy decorations; just a big sheet cake with a scattering of those tiny, silver edible balls...."
All I knew, since Clegg has not made the recipe he had in mind available anywhere, was that it had coconut and orange, should be a sheet (as opposed to a layer cake or bundt), and that I could add some of the tiny edible balls. I found two recipes I was considering. Both were in tube or bundt pans, but I knew that would roughly fill a 9x13 pan. One recipe that had the central ingredients and also identified as Brazilian was the Brazilian Flair Orange Cake with Coconut, but it seemed to be orange with coconut as a garnish, and I read the focus as being on coconut. I put that one aside for the Brazilian Cold Coconut Orange Cake, since it seemed to have the right flavor focus. It is assembled somewhat like a tres leche cake, where you pour a mixture of milks over the warm cake after poking holes in it. This is where the recipe went wrong for me, though, because it became too moist. I didn't end up taking it for coworkers to eat or anything! I suspect their "can" is a different size than my (14 oz) "can," but didn't think about it when mixing everything together. The cake as it was, with a simple glaze, would have been a delight. I also think the pictures accompanying that recipe don't look like they followed the end of the recipe, just made the cake part.


My reading friend Trudie liked the book less than I did but made a better cake. She started with Nigella Lawson's Flourless Chocolate Orange Cake, replacing the cocoa gram to gram with coconut. The color was so vivid, and the cake looked more like a cake and less like a pudding.  So beautiful, thanks Trudie!

More notes from Trudie:

1. Boiling up the oranges is critical as I have made this before and took a short cut with the boiling time and the oranges are too bitter, (however I have seen mention of microwaving them, to save time). The rest of the cake takes about 10mins to assemble - so it is just this stage needs planning.

2. Ground Almonds = Almond Meal, I am pretty sure you would have this, mine looks like this

3. For my coconut version of this cake I omitted the 50g of cocoa and put in 50g of shredded coconut instead

Monday, September 05, 2016

Clemson Blue Cheese Savories

It's Labor Day, and my husband has now been at his new job at Clemson University for a month! Clemson has been making blue cheese on campus since 1941. It even has its own website. N- brought home crumbles to try, and while we enjoy them in the various places we typically put blue cheese, I wanted to find a recipe that would better feature the cheese. These little round savory cracker-cookies topped with fig jam would be perfect on a cheese plate or at a tea - the perfect balance of savory and sweet. They come together quickly. I made a few changes in that I rolled the dough in plastic wrap and chilled it 15 minutes, then sliced and baked. I didn't get quite as many as 3 dozen, but thought that would be easier than rolling them out.


Blue Cheese and Fig Savories
(recipe from Food52)

Makes about 3 dozen
  • 1 cup all-purpose flour
  • 1/2 cup butter, room temperature
  • 4 ounces blue cheese, crumbled
  • Ground black pepper
  • Fig preserves, about 3 Tablespoons
  1. Preheat the oven to 350 degrees. Line a baking sheet with parchment paper.
  2. Place the flour, butter, blue cheese and a few grinds of black pepper in the bowl of a food processor. Process until the dough just comes together and starts to form a ball.
  3. Dump the dough onto a lightly floured surface and knead a few times to pull the dough together. Roll out to 1/8 inch thick with a floured rolling pin. Cut rounds out of the dough with a floured 1-inch cutter and transfer the rounds to the parchment-lined baking sheet.
  4. Using the back or a round half-teaspoon measure or your knuckle, make an indentation in the top of each dough round. Spoon about ¼ teaspoon of fig preserves into each indentation, using your finger to push the preserves as best as possible into the indentations.
  5. Bake the savories for 10 – 14 minutes, until the preserves are bubbling and the pastry is light golden on the bottom.
  6. Let cool on the baking sheet for at least 10 minutes, the remove to a wire rack to cool.
  7. You’ll find fig preserves at the grocery – it may be shelved with the “fancy” jams and jellies. You can make these a day ahead and keep them in two layers separated by waxed paper in an airtight container.
 

Sunday, August 28, 2016

Cinnamon Swirl Muffins (Grain-Free)

It isn't fall weather yet but I am so ready for the temperature to start dipping below 70 degrees Fahrenheit. It has been in the 90s here with rain threatening constantly, making everything a humid mess. Well, inside my house we keep it frigid so I was ready to go for something cinnamon.'

This is a recipe I adapted from a 1-minute coffee cake in a mug single serving recipe from Chocolate Covered Katie. It's adapted in a number of ways - I have made the recipe for more than one serving, I have used a different combination of flours, and I have used eggs and eliminated some of the other liquid ingredients to compensate. Still, I always want to give credit where credit is due. Check her out, she has great healthy recipes that taste good, with a lot of options for single-serving baking projects. These can be made as singles in the microwave but won't look quite as nice. Still tasty though.


Cinnamon Swirl Muffins (Grain-Free, Lower-Sugar)

1 cup plus 2 tbsp almond flour
1/2 cup tapioca flour
1 1/2 tsp baking powder
1/2 tsp salt
6 tbsp coconut sugar
2 eggs
1/4 cup vegetable oil

For the swirl:
1 tsp cinnamon
2 tbsp brown sugar Splenda
1 tbsp butter, melted/softened
Pinch of salt

Yield: 6 muffins

Instructions

Preheat oven to 350 F. Combine batter dry ingredients and mix well. Add wet and mix until just mixed. In a tiny bowl, combine all swirl ingredients. Fill six greased muffin cups 1/2 way with the batter.

Sprinkle on two-thirds of the swirl, then spoon the remaining batter on top. Finally, sprinkle on the rest of the swirl. Bake 12-13 minutes. If you aren't worried about sugar consumption, a powdered sugar glaze might be a nice addition!

Monday, August 22, 2016

Grain-Free Chocolate Waffles

I started making the recipe I posted in July for grain-free waffles this weekend, one which has quickly become a favorite in our almost weekly rotation. I knew we were eating them with strawberries, so at the last minute tried making a chocolate version. I took notes so I could share what I did!


Crispy Chocolate Grain-Free Waffles
(adapted from an adaptation on a  recipe on Simply Nourished Recipes)


Ingredients
  • 2 cups almond flour (or 1.5 cups almond flour and .5 cup tiger nut flour)*
  • 1/4 cup unsweetened cocoa powder
  • 1 cup tapioca starch/flour
  • 1 Tbsp. + 1 tsp. baking powder
  • 2 eggs
  • 1 cup almond milk
  • 1/2 cup coconut sugar
  • 1 tsp. vanilla
  • ½ cup coconut oil, melted
Instructions
  1. Preheat waffle iron according to manufacturer's directions.
  2. In a large bowl, combine almond flour, tiger nut flour, cocoa powder, tapioca starch, coconut sugar, and baking powder. Whisk or stir to combine well.
  3. Add wet ingredients to dry and stir until combined.
  4. Use 1/3 to 1/2 cup of batter at a time and use waffle maker as directed.
*On this particular day, I had no almond flour. Three bags of coconut flour, but no almond flour. So I went all tiger nut flour and it was fine!

Monday, August 15, 2016

Chocolate Chili Icebox Cookies

These are a simple, easy cookie that bakes up perfectly. Not overly sweet, and the cayenne is only the subtlest kick in the seconds after taking a bite.


Chocolate Chili Icebox Cookies
(recipe from Sweet Paul Magazine, Winter 2014)

Makes about 4 dozen

You will need:

1 1⁄2 cups all purpose flour
1⁄3cup Dutch-processed cocoa powder
3⁄4 teaspoon cinnamon, ground
1⁄2  teaspoon cayenne pepper 
1⁄2  teaspoon salt
1⁄4 teaspoon baking soda
1 1⁄2 sticks unsalted butter, at room temperature
3⁄4 cup sugar
1 egg white
1 teaspoon vanilla extract
demerara sugar, for rolling

  1. Whisk together the first 6 ingredients.
  2. Beat butter and sugar until light and fluffy.
  3. Add egg white and vanilla and beat to combine. Scrape down sides of bowl.
  4. Add the flour mixture and stir just until combined.
  5. Turn dough onto a lightly floured surface.
  6. Dust your hands with flour and shape into a disc.
  7. Cut disc in half and shape each into logs about 8” long and 11⁄2” in diameter.
  8. Roll in demerara sugar and wrap well with plastic wrap.
  9. Refrigerate until completely chilled, at least 4 hours or up to overnight.
  10. Preheat oven to 350oF.
  11. Line baking sheets with parchment paper.
  12. Cut into 1⁄4” slices and arrange cookies on baking sheets 1” apart.
  13. Bake, in batches if necessary, until cookies are soft but dry. This will take about 9 minutes.
  14. Transfer to a wire rack and let cool completely.

Monday, August 08, 2016

Lingonberry Snitter

I had my library order Scandinavian Baking and it is a beautiful cookbook! I wanted to make something from it before returning it, but a lot of the savory baked goods would have required me to purchase obscure ingredients (rye flakes? no idea.) The description of this recipe said it was super sweet so I bought lingonberry jam to put in the middle (which isn't very sweet.) In the end, it was really not that sweet at all, so I'm a bit puzzled. Plus the directions don't get the math right, they say to roll the dough into a 16x9 sheet and then cut it into two pieces that are each 8x4.5... but for that size you'd end up with four pieces. Very confusing. I just decided as long as the pieces were the same size, it was all good. It also turned out that the baking time was too long - I would try 12-15 minutes as 20 made mine overbaked.

From some of the reviews I've read, there are multiple errors in the cookbook. So do bake Scandinavian, but maybe from a different source. Dang! It's so gorgeous, you can understand how I got pulled in.


Lingonberry Snitter (adapted from cookbook mentioned above)

1 2/3 cup flour
1/3 cup powdered sugar
7 tbsp butter, chilled
1 egg
Jam (I used about 2/3 of a jar of lingonberry)

7/8 cup powdered sugar
2 tbsp water

Sift together flour and sugar. Rub in butter with fingertips until mixture is sandy. Gently barely mix in egg. Chill dough for 30 minutes. Roll out into rectangle, even sides, cut into two equal sections. Place on parchment paper lined sheet and prick all over with fork. Bake 12-15 minutes at 350 and let cool. Mix powdered sugar and water together and spread over one piece. Let sit 30 minutes after sprinkling with colored sugar or edible glitter. Spread jam on the other side and pile the frosting topped on on top. Cut into awkward cracked pieces.

Monday, August 01, 2016

Apricot Pistachio Bars (and how I made the recipe grain free)

I've had this recipe on my to-make list forever. When I found myself with extra apricots, I finally made it (once I tracked down pistachios.)  But I wanted everyone in my household to be able to eat them, so I made them with substitutions for flour and sugar. I'll copy the recipe as is from the amazing Deb at Smitten Kitchen, and make notes below as to what I changed.

Everyone who tried these liked them, including co-workers who don't care about eating lower carb and grain-free.  My husband said he did not think he would ever order it from a bakery case because of the color (green!) but I thought the apricot color was pretty with the pistachio. These were not too sweet, a sophisticated bar.


Apricot Pistachio Squares
(from Deb at Smitten Kitchen)

Yield: 16 or 25 bars, depending on how you cut them

Crust
1 cup (125 grams) all-purpose flour*
1/4 teaspoon table salt
1/4 cup (50 grams) granulated sugar**
1/2 cup (4 ounces or 115 grams) unsalted butter, cold is fine

Filling
3/4 cup (a scant 4 ounces or 110 grams) shelled unsalted pistachios
1 tablespoon (10 grams) all purpose flour*
Few pinches of sea salt
6 tablespoons (75 grams) sugar**
5 tablespoons (70 grams) unsalted butter, cold is fine
1 large egg
1/4 teaspoon almond extract, 2 teaspoons brandy or another flavoring of your choice (totally optional)
1 pound firm-ripe apricots

To finish
Powdered sugar or 1/4 cup apricot jam***

Heat your oven to 350 degrees F. Cut two 12-inch lengths of parchment paper and trim each to fit the 8-inch width of an 8×8-inch square baking pan. Press it into the bottom and sides of your pan in one direction, then use the second sheet to line the rest of the pan, perpendicular to the first sheet. (If you have an 8-inch square springform, you can skip this and just butter it well.)

Make the crust: Combine the flour, salt and sugar in the bowl of a food processor. Cut the butter into chunks, and add it to the bowl, then run the machine until the mixture forms large clumps — that’s right, just keep running it; it might take 30 seconds to 1 minute for it to come together, but it will. Transfer the dough clumps to your prepared baking pan and press it evenly across the bottom and 1/4-inch up the sides. Bake for 15 minutes, until very pale golden. For the sake of speed, transfer to a cooling rack in your freezer for 10 to 15 minutes while you prepare the filing.

Make the filling: In your food processor bowl (which I never bother cleaning between these steps), grind your pistachios, sugar, flour and salt together until the nuts are powdery. Cut the butter into chunks and add it to the machine. Run the machine until no buttery bits are visible. Add any flavorings and egg, blending until just combined.

Spread filling over mostly cooled (warmth is okay but it’s hoped that the freezer will have firmed the base enough that you can spread something over it) crust. Cut apricots in half (or, you might find that you can tear them open at the seams with your fingers) and remove pits. From here, you have a few decoration options: you can place the apricot halves in facedown or up all over the pistachio base. You can do as I did, which is cut them into strips, then slide each cut half onto a butter knife or offset spatula, tilt it so that it fans a little, and slide it onto your pistachio filling decoratively.

Bake the bars for 60 minutes, or until they are golden and a toothpick inserted into the pistachio portion comes out batter-free. This might take up to 10 minutes longer depending on the juiciness of your apricots and the amount you were able to nestle in. Let cool completely in pan; you can hasten this along in the fridge.

To finish, you can make a shiny glaze for your tart by warming the jam in a small saucepan until it thins, and brushing this mixture over the top of the cooled tart. Or, you can keep it rustic with just a dusting of powdered sugar, as I did.

Cut bars into squares — chilled bars will give you the cleanest cuts. Keep leftover bars chilled.

* - I used a mixture of 2/3 almond flour and 1/3 tigernut flour, mostly because that is what I had in the cupboards!
** - I used coconut sugar instead.
*** - I skipped this step. They were tasty enough without this, and more like a breakfast baked good.

Monday, July 25, 2016

The Pies of Summer: Apricot Pie

Today is the 10th anniversary of JennyBakes (if you count my first actual baking post and not my introduction.) Happy blogiversary to me! That day was peaches, so this day will be apricots.


I have been waiting for apricot season ever since I saw this recipe in Ruth Reichl's My Kitchen Year: 136 Recipes that Saved My Life. It sounded amazing. I was in Oregon for a week starting on the 4th of July, and mentioned it to my Mom, but assumed that it was not yet time for apricots in Oregon. Instead I found out that she "has a guy" who "she can call" and "meet in a parking lot" for some types of fruit. And somehow their season started early, so that was the last week to order apricots. She ordered a big box, and I made this for my belated birthday dessert with my family.

I was surprised by the incredible tartness of this recipe. I suspect that unless the apricots you are using are just about to turn, they are so ripe and sweet, that this pie may be too tart for you! It was too tart for me. I ended up making another version where I left out the crust and just did fruit and topping, and that was a step better. I think I might try mixing apricots with other fruits.

But it also may be that the tartness is the thing, that you aren't sure at first but it's the taste that brings you back, that becomes summer to you. It's a clear favorite among Ruth Reichl's friends and family, so there must be something to it. Try it and report back!

Apricot Pie
(as seen in book above and RuthReichl.com)
 
1 recipe pie dough (for a single crust pie)
2 pounds apricots (Jenny's note: I used 16!)
1 stick butter, melted
3/4 cup sugar
3/4 cup flour
fresh nutmeg

Roll out the pie dough, fit it into a 9 inch pie pan, crimp the edges and put it into the freezer for 15 minutes while you preheat the oven to 425 degrees.

Break the apricots apart with your fingers; do not peel them, but remove the pits.

Melt the butter.  Stir in the sugar (brown sugar is fine), then the flour.  Grate in a bit of nutmeg.
Put the apricots into the unbaked shell.  Cover them with the sugar mixture and put the pie on the bottom rack of your oven. After ten minutes turn the heat down to 375 and bake for 35 or 40 minutes more, until the top is crusty and golden. Transfer to a cake rack and cool before serving.

Monday, July 18, 2016

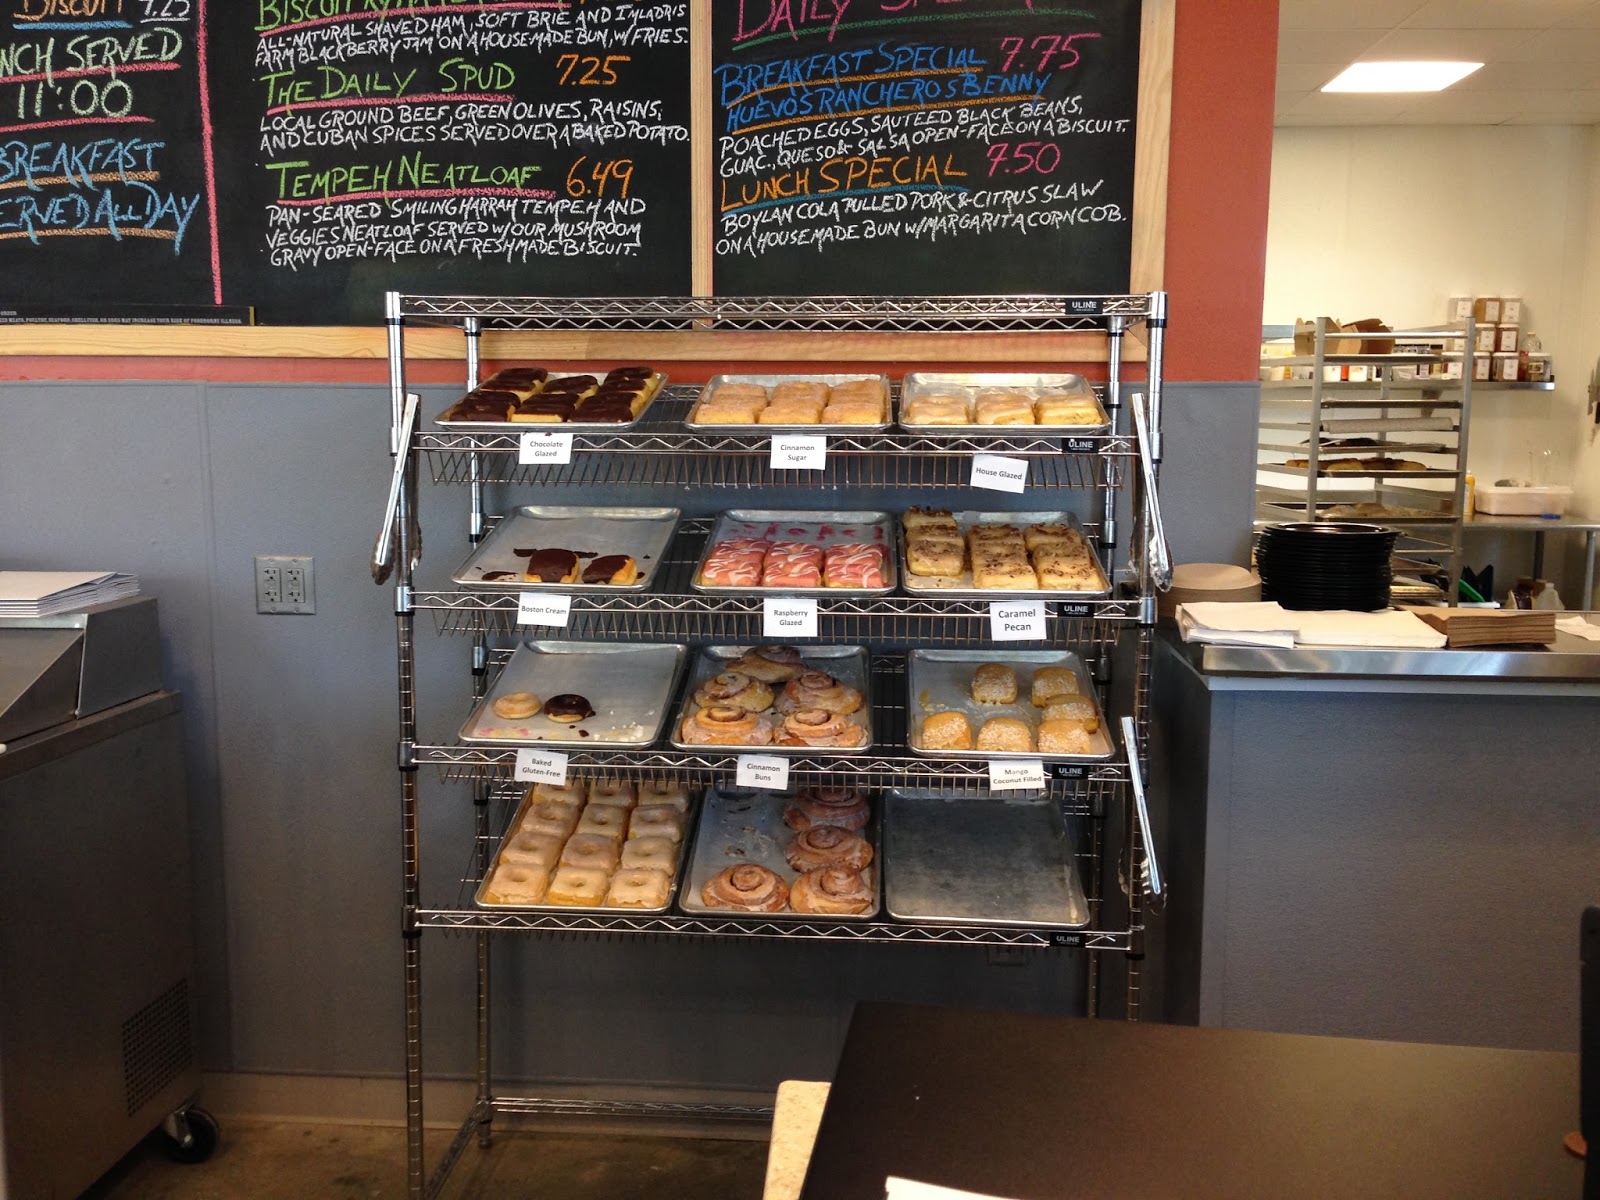
Bakery Review: Asheville Biscuitry (Asheville, NC)

I made a visit to the Asheville Biscuitry earlier this summer. It was an accident that I even came across it, all because I got lost trying to go south from the UNC Asheville campus. My bad sense of direction meant another bakery adventur e.

The sign says biscuitry but they must be in the back; doughnuts on the other hand are everywhere! The menu has biscuit sandwiches and grilled doughnuts, and you can also get a cinnamon bun. And being Asheville, there are plenty of options for vegheads.


I chose four square filled doughnuts - two boston cream and two mango-coconut. I was most definitely not disappointed!


The most pleasant surprise comes from the obviously handcrafted flavors. The coconut cream had actual coconut, and the boston cream filling had vanilla beans. These are not commercial doughnuts only dipped in sugar, these have a nuance of flavor and a skill in preparation. Definitely worth a trip! And I'd like to return to try some of the creative sandwich creations.

Monday, July 11, 2016

Crispy Grain-Free Waffles

This is our favorite lower-carb, grain-free waffle recipe yet! We've tried a lot of stinkers but this one had a great texture. The tiger nut flour is completely optional - I only used it because I ran out of almond flour and had some on hand. But who knows, maybe it is the answer to why these tasted so good. We enjoyed ours with fresh strawberries and whipped cream


Crispy Grain-Free Waffles
(adapted from a recipe on Simply Nourished Recipes)

Ingredients
  • 2 cups almond flour (or 1.5 cups almond flour and .5 cup tiger nut flour)
  • 1 cup tapioca starch/flour
  • 1 Tbsp. + 1 tsp. baking powder
  • 2 eggs
  • 1 cup almond milk
  • ¼ cup coconut sugar
  • 1 tsp. vanilla
  • ½ cup coconut oil, melted
Instructions
  1. Preheat waffle iron according to manufacturer's directions.
  2. In a large bowl, combine almond flour, tiger nut flour, tapioca starch, coconut sugar, and baking powder. Whisk or stir to combine well.
  3. Add wet ingredients to dry and stir until combined.
  4. Use 1/3 to 1/2 cup of batter at a time and use waffle maker as directed.
 

Monday, July 04, 2016

Dark Chocolate Cookies with Cherries

I made these cookies because a friend liked them so much she posted about them in Facebook! The chewy texture and bittersweet chocolate make these divine, the perfect adult cookie.

I made a few changes right off the bat. 12 oz of bittersweet chocolate in the original made sense if you were melting it and it was a major component of the batter, but just to chop it up and add to the cookie seemed expensive and excessive. I should have bought a bag of chips. As it was I only used one of the Ghiradelli bars (4 oz).  I also found tart dried cherries everywhere but not really "sour" so I just went with it, also with probably 5 oz instead of 9. The online recipe also directs the baker to make cookies out of 1/4 cup dough for each cookie - um, no, that's crazy. They'll never bake! I will post the recipe I made and not Martha's, although surely her recipe will be more decadent. It will also be more difficult to handle since there is less batter holding the cookies together, and a higher percentage of things that melt.


Dark Chocolate Cookies with Cherries
(adapted from Dark Chocolate Cookies with Sour Cherries by Martha Stewart)

  • 1 3/4 cups all-purpose flour
  • 1 1/4 cups unsweetened Dutch-process cocoa powder
  • 2 teaspoons baking soda
  • 1/4 teaspoon salt
  • 1 1/4 cups (2 1/2 sticks) unsalted butter, room temperature
  • 1 1/4 cups granulated sugar
  • 3/4 cup firmly packed dark-brown sugar
  • 2 large eggs
  • 1/4 teaspoon pure vanilla extract
  • 4 ounces bittersweet chocolate, coarsely chopped
  • 3/4 cups dried cherries, firmly packed (5 ounces)
  1. Preheat oven to 350 degrees. Line two baking sheets with parchment paper; set aside. In a medium bowl, sift together the flour, cocoa, baking soda, and salt; set aside.
  2. In the bowl of an electric mixer fitted with the paddle attachment, cream the butter and sugars until fluffy. Add eggs and vanilla extract; beat until well combined. Add the flour mixture, and beat on low speed, until just combined. Do not overbeat. With a wooden spoon, fold in chocolate and cherries. (Dough can be frozen at this point, wrapped well in plastic, up to 1 month; thaw completely before baking.)
  3. Use a cookie scoop or form balls of roughly 1- 1.5 inches. Bake until puffed and cracked, 9 to 11 minutes but do not overbake.Transfer to a wire rack to cool completely. Store in an airtight container, at room temperature, up to 3 days. 
Recipe Notes from JennyBakes
  1. There is a lot of controversy on Martha's website; I think at some point there were no eggs listed. Clearly the recipe needs eggs, so just use what I have listed. There was also confusion over whether 1 1/4 cups of butter is the same as 2 1/2 sticks. It is in the USA... just go with 20 tbsp.
  2. If you really want to use 12 oz bittersweet chocolate, buy a bag of chips! Having to chop up the chocolate and then mix it in is a killer.

Monday, June 27, 2016

Paleo Blueberry Bars

This is a lot like what happens if you made a muffin batter but didn't want to take the time to make muffins. But hey, we all have mornings like that. And this is a pretty healthful recipe that can be adapted to almost any fruit combination. The original used blackberries, I used blueberries, just make it what you can!


Paleo Blueberry Bars
(adapted from What Runs Lori)
  • 1 cup coconut flour
  • 1/2 cup shredded coconut* 
  • 1 tsp cinnamon
  • 1 tsp baking powder
  • 1/2 tsp baking soda
  • 1/2 tsp salt
  • 1/4 cup coconut sugar
  • 2 bananas (about 1 cup)
  • 2 eggs
  • 2 tbsp coconut oil, melted
  • 1 tsp vanilla extract
  • 1 cup almond milk
  • 1 cup blueberries, fresh or frozen (or berry of choice)
Preheat oven to 350 degrees. Grease an 8×8 baking pan and set aside.

In a large bowl, mix together the coconut flour, shredded coconut, cinnamon, baking powder and soda, and salt. Add in the coconut sugar, mixing again.

In the same bowl, add in the bananas, eggs, melted coconut oil, vanilla extract, and almond milk. Mix until all ingredients are incorporated.

Fold in the berries and spoon the batter into the greased pan. Bake for 40 minutes or until the sides are golden.

Remove from oven and cool. Cut into about 16 squares.

Recipe Notes from JennyBakes
  1. The original recipe said 1/4 cup - 1 cup of almond milk but as this is a coconut flour recipe you NEED at least 1 cup. If the batter is looking more like cookie batter than muffin, you might want to add even more. Or experiment by adding another egg.
  2. This was almost not sweet enough. If I made these again I would use 1/2 cup coconut sugar. It isn't as sweet as some of the chemical sugar subs so sometimes a recipe needs more of it, not just a straight trade.
  3. *I sometimes find adding shredded coconut adds dryness, something this recipe doesn't need. I left it out.

Monday, June 20, 2016

Brick Street Cafe Chocolate Cake

The Brick Street Cafe is located in Greenville, SC, roughly fifteen minutes from me. I've never actually sat down and had a meal there, but I have had their cake. Sweet potato, chocolate, etc. All delicious, a well deserved cake reputation. When I saw a random blog claiming to have their recipe for chocolate cake, I had to give it a try. I'm not sure it's the same cake but it was a big hit regardless!


If the cake looks a bit squatty, it is completely my fault. I didn't pay attention to the pan requirement and realized too late (for the hundredth time) that I do not HAVE a tube pan, which is what the recipe calls for. The two pans hold similar amounts, but there is a marked difference in how easy it is to get the cake back out in the end. The top of the cake stayed in the pan, and was consumed for breakfast with fresh strawberries. Oh how I suffer.


I brought this to a book club meeting, our annual dinner where we discuss nominations for the next year's list. We had 53 candidates that had to be narrowed to 10! Sometimes when you get a bunch of women together, everyone pretends not to eat dessert, so I was a little nervous about bringing one. But I just couldn't find salad inspiration like I had previously, so I went with my instincts. And some people had two servings! I would consider that success. I had to Julia Childs it a little and still ended up telling about the cake top, but like Julia, poured myself a glass of wine and served it anyway.

I do think if I made it again I'd bake it in 2-3 cake layers and make a rich chocolate buttercream or a ganache mousse combo, because what I love better than a rich chocolate cake is a rich chocolate cake in layers with other rich things.

Brick Street Cafe Chocolate Cake (allegedly)
(as discovered on the Through Her Looking Glass blog)


Ingredients
 
Cake:
  • 2 cups sugar
  • 1 cup butter, softened
  • 1½ teaspoons pure vanilla extract
  • 3 large eggs
  • 2½ cups cake flour
  • 1 cup baking cocoa, sifted
  • 2 teaspoons baking soda
  • ½ teaspoon salt
  • ½ cup instant chocolate pudding mix (small box)
  • 2¼ cups buttermilk
  • 1 cup semi-sweet chocolate chips
Chocolate Icing:
  • ½ cup water
  • ½ cup butter
  • 1 teaspoon vanilla
  • 1 cup baking cocoa, sifted
  • 3½ cups powdered sugar, sifted
  • 3 tablespoons heavy cream (more or less for consistency)

 Instructions

Cake:
  1. Preheat regular, conventional oven to 350°.
  2. Beat sugar, butter & vanilla in large bowl.
  3. Beat in eggs.
  4. Mix in cake flour, baking cocoa, soda, salt, chocolate pudding and buttermilk.
  5. Stir in semi-sweet chocolate chips.
  6. Pour into greased tube pan.
  7. Bake in regular, conventional oven at 350° for 30 minutes.
  8. Adjust baking temperature down to 325° and continue baking 30-40 minutes more, until cake tester comes out clean.
  9. (Check with cake tester at the one hour mark.)
  10. Cool cake completely before icing.
Chocolate Icing:
  1. Heat water, butter and vanilla together in sauce pan on stovetop until melted.
  2. Remove from heat.
  3. Stir in one cup cocoa.
  4. Stir in powdered sugar, sifted.
  5. Stir in heavy cream, up to 3 tablespoons (or more) until you get the desired consistency.
  6. Ice cake by filling the hole in the middle of the cake first, then spread icing over cake top and pour over the sides. Icing will harden as it cools.

Monday, June 13, 2016

Grain-Free Blueberry Scones (gluten-free, paleo, naturally sweetened)

It is blueberry season and it is HOT outside. Hot and humid. That is when I start craving blueberry baked goods with iced coffee. I looked at a few lower carb, grain-free recipes, and ended up adapting one. I guess that makes this my recipe! We liked these. They aren't mushy like some grain-free recipes can be.


Blueberry Scones (grain-free, paleo, naturally sweetened)
(adapted from a recipe by Allison Nichols)

Ingredients
  • 2 cups almond flour
  • ½ cup arrowroot flour
  • 1/4 cup coconut sugar
  • ½ tsp sea salt
  • 2 tsp baking powder
  • 4 Tbsp coconut oil, melted and slightly cooled
  • 2 eggs, whisked a little
  • 1 cup blueberries
Instructions
  1. In a medium-sized bowl, mix the almond flour, ¼ cup arrowroot flour, coconut sugar, sea salt, and baking powder.
  2. Slowly add the wet ingredients to the dry, and mix until just combined.
  3. Add your blueberries along with the last ¼ cup of arrowroot flour.
  4. Form the batter into a ball and place on a parchment paper lined baking sheet.
  5. Press into a circle and cut 8 wedges.
  6. Bake at 375 for 18-20 minutes, or until golden brown on top.
  7. Cool on a wire rack.
Recipe Notes from JennyBakes
  1. I replaced the maple syrup with coconut sugar since it is lower on the glycemic index. I knew that would leave me without some of hte moisture. As it was, the comments on the original recipe complained of dryness. My simple solution was to just use 2 eggs. I could have used 1/4 cup almond or almond-coconut milk in addition to the 1 egg. The batter was a bit sticky but after they baked it was a nice sconelike texture.
  2. I prefer coconut oil to butter when working with almond flour. I have seen it make a big difference in texture. I don't understand the science but have started making that replacement across the board. 
  3. Fresh blueberries got a bit demolished in the final mixing step; frozen berries might work better here.

Monday, June 06, 2016

The Pies of Summer: Strawberry Pretzel Icebox Pie

This pie has been on my mind a few years now, ever since coming across it in Southern Living. I finally had all the ingredients in the house at one time, so once we got more fresh local strawberries, I proceeded to make this pie. I'd say the best part is the crust (see notes for a mistake I made!) since I'm not a huge fan of condensed milk-jello concoctions (but wow, these ingredients seem very popular with summer pies.) While this is meant for a summer pie and is likely best with fresh berries, since it is ending up in the freezer, it can't hurt to use frozen fruit thawed. It would save an entire appliance since nothing has to chop up the berries.


Strawberry Pretzel Icebox Pie
(original recipe from MyRecipes.com)


Ingredients


2 cups finely crushed pretzel sticks
3/4 cup butter, melted*
1/4 cup firmly packed light brown sugar
2 cups sliced fresh strawberries
1 (14-oz.) can sweetened condensed milk
1/2 (8-oz.) package cream cheese, softened
4 tablespoons plus 1 tsp. strawberry gelatin (1/2 [3-oz.] package)
2 cups whipping cream, divided
1/3 cup granulated sugar
 

Preparation


1. Preheat oven to 350°. Stir together first 3 ingredients; firmly press on bottom, up sides, and onto lip of a lightly greased 10-inch pie plate. Bake 10 to 12 minutes or until lightly browned. Remove from oven to a wire rack, and cool completely (about 30 minutes).
2. Process strawberries in a food processor until finely chopped, stopping to scrape down sides as needed.
3. Beat condensed milk and next 2 ingredients at medium speed with an electric mixer until smooth. (Use the whisk attachment if using a stand mixer.) Add strawberries; beat at low speed just until blended. Transfer to a large bowl.
4. Beat 3/4 cup whipping cream at high speed until soft peaks form; gently fold whipped cream into strawberry mixture. Spoon into prepared crust. Cover and freeze 8 to 12 hours or until firm.
5. Beat remaining 1 1/4 cups whipping cream at high speed until foamy; gradually add granulated sugar, beating until soft peaks form. Spread over pie. Freeze 1 hour or until whipped cream is firm.

Recipe Notes from JennyBakes
  1. I measured 2 cups of pretzel sticks, which gave me far less than 2 cups of pretzel sticks crumbs. I definitely think the recipe wants 2 cups of the crumbs, so you need more than 2 cups of pretzels. I only used 1/2 cup melted butter, but actual 2 cups of the crumbs may require the full 3/4 cup/ 
  2. I used an immersion blender to chop the berries. I didn't want to have to wash the food processor for that wee task.
  3. The recipe doesn't say how to serve the pie, but letting it sit out at least 30 minutes before serving seems about right. It needs to stay in the freezer otherwise. 
  4. Don't forget to allow for the overnight freezing time! This pie can't be served immediately. 

Monday, May 30, 2016

The Pies of Summer: Raspberry Pie

In the Reading class I am teaching for our May Experience term, I challenged the students to read a book in a genre they do not usually read. For me, I was left choosing between Amish romance and... sports! In the end, I read both, but I went Amish romance first. The book is The Forgotten Recipe and is all about an Amish woman baking raspberry pies and healing from the death of her intended.

Most novels that gush about a recipe include one in the back, so I was shocked that this one didn't! Not even on the author's website. I had to take matters into my own hands. I happened to have two Amish cookbooks at home. I found a workable recipe for raspberry pie in Me, Myself, and Pie: Amish Recipes by Sherry Gore. I had previously made a pie crust recipe from this cookbook that I didn't care for, so I used the all-butter crust from Smitten Kitchen for the crust.


Red Raspberry Pie

For the Crust
Two 9-inch unbaked pastry pie crusts

Ingredients
3 cups raspberries
1 1/4 cups water
1 cup sugar
1/4 cup cornstarch
1 tbsp lemon juice
2 tbsp butter
pinch of salt

Preheat oven to 400 F. Cook raspberries with water, sugar, and cornstarch over medium heat until thick, stirring occasionally. Add lemon juice, butter, and salt. Remove from heat. Let mixture cool in the refrigerator 30 minutes. Pour cooled mixture into unbaked pie crust. Cover with top crust and seal. Score top crust to vent. Bake for 10 minutes at 400. Reduce heat to 350 F and continue baking for 30 minutes.

Serve with whipped cream or vanilla ice cream, if desired. 

Recipe thoughts from JennyBakes:
  1. I thought I didn't like pie crust; it turns out I didn't like half shortening pie crust. I'm not sure I'll ever go back. 
  2. While 3 cups was okay, 4-5 cups would have been better. Fresh raspberries contain a lot of air and once they break down in cooking, they did not really fill the crust. If you were starting from frozen berries, 3 cups might be more accurate.
  3. Smart bakers would roll out the pie dough while the filling is cooling.
  4. I made this pie with a lattice top because it felt more like a picnic pie that way.
 

Monday, May 23, 2016

The Pies of Summer: North Carolina Beach Pie


There is an elaborate legend about this pie, recently featured on NPR. When I came across the story I knew I had to try it. The only thing is, I've been to the North Carolina shore and asked others who I know spend weeks there every summer, and nobody has ever seen this pie or heard this story. I'm tempted to call shenanigans.

Also, this pie was a bit cursed for me. The first time I separated the eggs and the added the egg whites to the mixture instead of the citrus juice. The next time I tried the crust was so loose I almost dumped the pie all over the floor and oven when I took it out, so that explains why this one looks so messy. In the end, this is rather like a key lime pie (made milder by mixing lemon and lime juice) with a saltine crust. The salty-tart-sweet is nice but it's not a pretty looking pie. The recipe below specifies not to turn the saltines into sand but the picture of the original recipe shows it that granulated. I'm not sure which I believe because crushing the crackers by hand makes the final result a bit messy.

Have you heard of Atlantic Beach Pie or North Carolina Beach Pie?

Recipe: Bill Smith's Atlantic Beach Pie

Makes one pie

For the crust:
1 1/2 sleeves of saltine crackers
1/3 to 1/2 cup softened unsalted butter
3 tablespoons sugar

For the filling:
1 can (14 ounces) sweetened condensed milk
4 egg yolks
1/2 cup lemon or lime juice or a mix of the two
Fresh whipped cream and coarse sea salt for garnish

Preheat oven to 350 degrees.

Crush the crackers finely, but not to dust. You can use a food processor or your hands. Add the sugar, then knead in the butter until the crumbs hold together like dough. Press into an 8 inch pie pan. Chill for 15 minutes, then bake for 18 minutes or until the crust colors a little.

While the crust is cooling (it doesn't need to be cold), beat the egg yolks into the milk, then beat in the citrus juice. It is important to completely combine these ingredients. Pour into the shell and bake for 16 minutes until the filling has set. The pie needs to be completely cold to be sliced. Serve with fresh whipped cream and a sprinkling of sea salt.

Monday, May 16, 2016

Low Carb English Muffins

When I first saw this recipe in Pinterest, I was pretty skeptical. But I went ahead and tried it one weekday morning and was pleasantly surprised! I made the recipe as is, but next time plan to double it yet cook it in three ramekins for slightly less time.... as is, it is quite deep, almost too high to toast if simply split in half.

However for those of us with few bread options in our lower carb eating, this is a great recipe to have on hand. I ate mine with peanut butter and sugar free jam but this would hold up to an egg sandwich nicely. That's what I plan to do with it this weekend!


Low Carb English Muffins
(as seen on SugarFreeMom.com!) 

Ingredients
  • 2 tbsp unsweetened almond butter or peanut butter
  • 1 tbsp butter
  • 2 tbsp almond flour
  • 1/8 tsp salt
  • 1/2 tsp baking powder
  • 1 tbsp unsweetened almond milk
  • 1 egg, beaten
Instructions
  1. Spray the ramekin you are using with olive oil cooking spray or coconut oil spray.
  2. Add the almond butter and butter to the dish.
  3. Microwave for 30 seconds and mix until smooth. Set aside to cool.
  4. In a small bowl whisk the almond flour, salt and baking powder together.
  5. Pour the milk and egg to dry ingredients and stir until combined.
  6. Pour this mixture into the ramekin with the almond butter mixture and stir to combine well.
  7. Microwave 2 minutes.
  8. Allow to cool a few minutes before taking it out of the ramekin and slicing in half to toast.
  9. Toast until desired.
  10. Enjoy!